July 05, 2026

Level Up Your Programming Game with a Java Book and Smalltalk
by Donald Raab at July 05, 2026 07:10 AM
A limited-time free offer and the Smalltalk that helped it happen
 Eclipse Collections Categorically on the Kindle App on my Mac Book Pro
What’s in this blog for you?
The Kindle-only version of “Eclipse Collections Categorically: Level up your programming game”, will be free to download on July 5, 2026 from 12:00am PDT until 11:59pm PDT .
By the time I publish this blog, the free Kindle-only book offer will be available for 24 hours. Good luck!
Note: As the image above subtly demonstrates, you don’t need a Kindle device to read a Kindle book. There is a Kindle app for multiple platforms, and it reads in full color. If you can’t see the option for a “$0 to buy” Kindle-only copy to download on mobile versions of the Amazon app, try the Amazon web site instead.
There may also be a sale on print editions of the book. Best to click on the link above and find out if you’re interested. There are hardcover and paperback versions of the book, also in full color.
I hope you will enjoy the book in whatever format you prefer. If you wind up purchasing a copy or already purchased a copy, thank you! Eclipse Collections Categorically is a very special programming book. Read on to find out what makes it special.
Inspired by Smalltalk
If you haven’t heard of, or learned the Smalltalk programming language in the past 50 years, I have good news for you — you still can, and it’s easy to learn. I am constantly inspired by Smalltalk. Watch this video with Dan Ingalls demonstrating Smalltalk-76 on a Xerox Alto to see what was possible in Smalltalk-76 the same year that the USA celebrated its 200th anniversary.
I continue to be inspired by Smalltalk, 30+ years after I first learned it, and 25+ years since I last programmed in it professionally. I created two things in the past 22+ years that have been inspired by Smalltalk.
- The open source Java library named Eclipse Collections
- The book, “Eclipse Collections Categorically: Level up your programming game”
The Smalltalk collection protocols inspired the collection protocols in Eclipse Collections (e.g. select, reject, collect, detect, injectInto). Something more general, subtle, and more applicable to any and all programming languages today inspired me in how I organized and wrote the chapters of Eclipse Collections Categorically. This Smalltalk feature also inspired the title.
I’ve gone to the category of “Arithmetic”
If you watch and listen to Dan Ingalls in the YouTube video about Smalltalk-76, he says the quoted text above after he clicks on the message category “Arithmetic”.
While I was struggling for the first three months trying to write a book about Eclipse Collections, I realized I had been missing something.
 Photo by Brett Jordan on Unsplash
I explain how I missed and finally rediscovered the feature of method categories in Appendix C: The Collections of Smalltalk of Eclipse Collections Categorically.
Learning about method categories from Smalltalk
Method categories are a crucial missing feature in Java that I didn’t appreciate the importance of when I was coding in Smalltalk. Method categories are so important to feature-rich classes that I organized this book into chapters representing method categories in Eclipse Collections. Smalltalk code browsers have had support for method categories for over 40 years. Developers can assign methods to semantic categories in the Smalltalk browser.
You can learn a bit about Smalltalk and its collections framework in my book Eclipse Collections Categorically. The impact the language has had n my programming career and the inspiration for Eclipse Collections is explicitly explained in the book.
I also have written a bunch of somewhat disorganized blogs about Smalltalk over the years. Let me fix that for you in the following section.
Blogs about Smalltalk
I have written bits and blurbs about Smalltalk in blogs over the years in many places, and randomly in some in depth blogs. Recently, I did something a little different. I blogged about Smalltalk in several short blogs I was writing while on vacation over a two week period. Consider this blog an index to all of my recent and older Smalltalk musings in blogs. Enjoy!
A Set of Smalltalk Blogs from my Summer Vacation
I didn’t plan on writing about Smalltalk on vacation. I hadn’t planned on writing anything. These things just happen, so I went with it. I ultimately decided to schedule a free Kindle book offer today because of Smalltalk, my summer vacation and the 250th year anniversary of USA, 50 years after Smalltalk-76 was created. Enjoy!
😮 Does Your Programming Language Ever Surprise You in a Good Way?
⛓️ Cascading Messages in Smalltalk
✍️ Coding the Haiku Kata in Smalltalk
“What if Java?” blogs
Before I wrote my book, I wrote several “What if” blogs for Java developers. These blogs were directly inspired by Smalltalk. They are meant to make you think. The last blog in this series shows you when I first discovered and shared how we can categorize methods in our IDEs. I published this blog before I finished my book. I was stealing my own thunder to share the importance of method categories for free.
␀ What if null was an Object in Java?
🔟 Billion Integers Walk Into an Array
🏘️ Grouping Java methods using custom code folding regions with IntelliJ
⌯ What if Java had Symmetric Converter Methods on Collection?
Immediately after I wrote the first three blogs in this section, I hopped in my car and drove down the east coast of the U.S. to the Florida Keys on a 17 day road trip with my wife. This is how I got motivated and focused to write my first ever book. Travel blog for anyone interested here.
Smalltalk Blogs Post Book Publishing
Two Smalltalk related blogs I wrote after publishing my book.
🏴☠️ Smalltalk Isn’t Dead, it’s Just Waiting in Deep Thought
🗂️ Divide and Conquer Feature-Rich APIs, Categorically!
Older Smalltalk Blogs
I wrote these blogs over the years, partly to keep my Smalltalk muscles fresh, and to make sure a new generation of developers didn’t miss out completely on the wonder that is Smalltalk. Smalltalk featured prominently in my first ever blog here on Medium almost nine years ago called “Symmetric Sympathy.” See below.
🍻 Smalltalk or Java? Why not both!
🧩 Comparing my Smalltalk and Eclipse Collections Wordle Kata Solutions
🧪 Exploring the Smalltalk Collections API in unit tests using Pharo 8.0
🧘🏻 A Little Smalltalk for the soul
That’s All the Smalltalk Blogs I’ve Written Folks
I’ve been blogging on Medium for almost nine years, and have written 284 blogs over that time. I didn’t realize until I wrote this blog that I have now written 19 blogs with Smalltalk featured prominently. It certainly helped that I wrote 6 new Smalltalk focused blogs while I was on vacation in June. This blog will help you find the Smalltalk related blogs I’ve written if you’re ever looking.
Writing Eclipse Collections Categorically has helped me relearn so much that I had forgotten about Smalltalk in the past 25 years that I’ve been primarily coding in Java. I’m happy I’ve been able to share all of my Smalltalk related blogs here. It will help me find them as well.
Thanks for reading!
Note: If you miss the free Kindle book offer today (June 5, 2026) then follow me here on Medium, on BlueSky, Mastodon, or LinkedIn. I will share future free Kindle book offers or print sales that happen for my book on these platforms. Stay tuned and thank you!
I am the creator of and committer for the Eclipse Collections OSS project, which is managed at the Eclipse Foundation. Eclipse Collections is open for contributions. I am the author of the book, Eclipse Collections Categorically: Level up your programming game.
July 03, 2026
What ifFalse was true?
by Donald Raab at July 03, 2026 03:34 AM
This is not the fizzBuzz in Smalltalk you were looking for.
 What if we not the fizzBuzz on its head?
False is a Boolean too
Imagine a programming language that treated both Boolean types and values as equals. Think of an if-statement that didn’t relegate false to an else or a !. Imagine you could first test false and then true, without a !. If your imagination is running wild then you are thinking about Smalltalk.
In Smalltalk, there is a class Boolean with two subclasses, True and False. There is one instance of True named true that is a reserved word in Smalltalk. There is one instance of False named false that is a reserved word in Smalltalk.
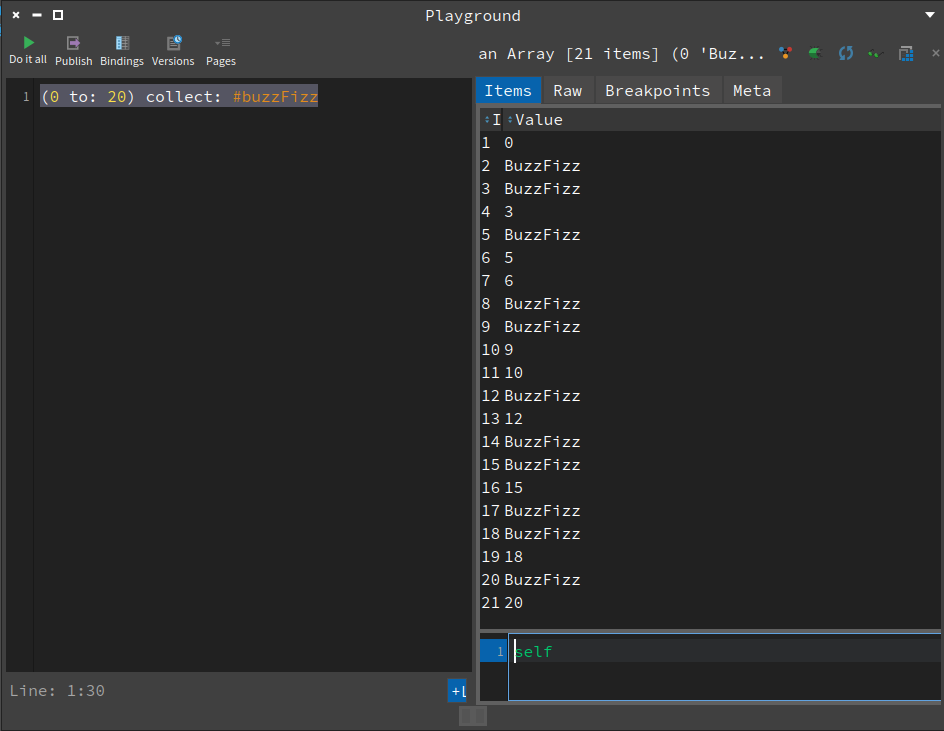
In the image above I have displayed the result of flipping fizzBuzz, where numbers divisible by either 3 or 5 are displayed, and numbers that are not display “BuzzFizz”. The following blog showed how I implemented fizzBuzz in Smalltalk.
This blog shows how I implemented buzzFizz in Smalltalk.
Test First-ish
I copied the fizzBuzz test and refactored the code. The test failed once I refactored the copied code and replaced fizzBuzz with buzzFizz.
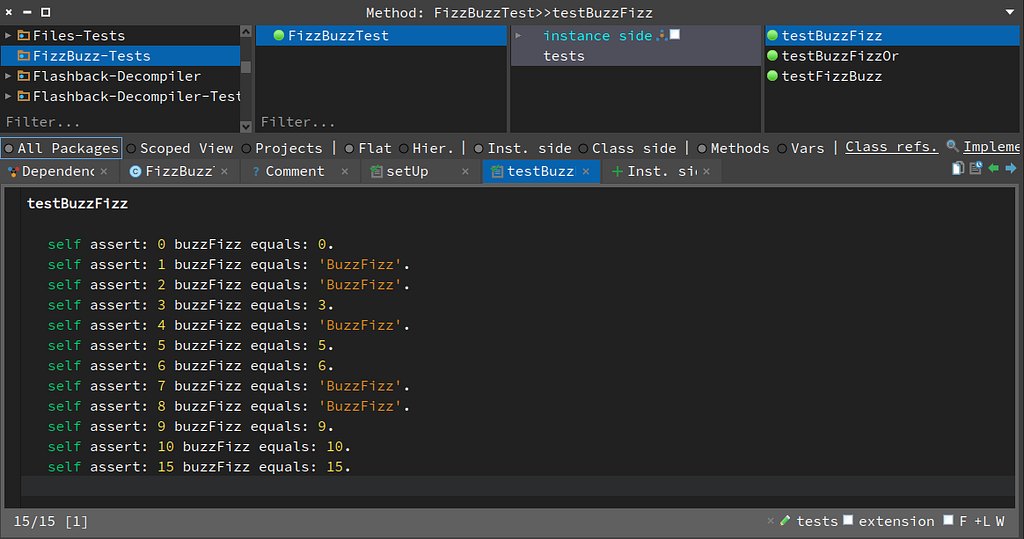 Testing buzzFizz which is the inverse-ish of fizzBuzz
The source for the test:
testBuzzFizz

 self assert: 0 buzzFizz equals: 0.
 self assert: 1 buzzFizz equals: 'BuzzFizz'.
 self assert: 2 buzzFizz equals: 'BuzzFizz'.
 self assert: 3 buzzFizz equals: 3.
 self assert: 4 buzzFizz equals: 'BuzzFizz'.
 self assert: 5 buzzFizz equals: 5.
 self assert: 6 buzzFizz equals: 6.
 self assert: 7 buzzFizz equals: 'BuzzFizz'.
 self assert: 8 buzzFizz equals: 'BuzzFizz'.
 self assert: 9 buzzFizz equals: 9.
 self assert: 10 buzzFizz equals: 10.
 self assert: 15 buzzFizz equals: 15.
Adding buzzFizz to Integer
The following code should melt your brain in most programming languages. I tested for false without a ! (not) or else.
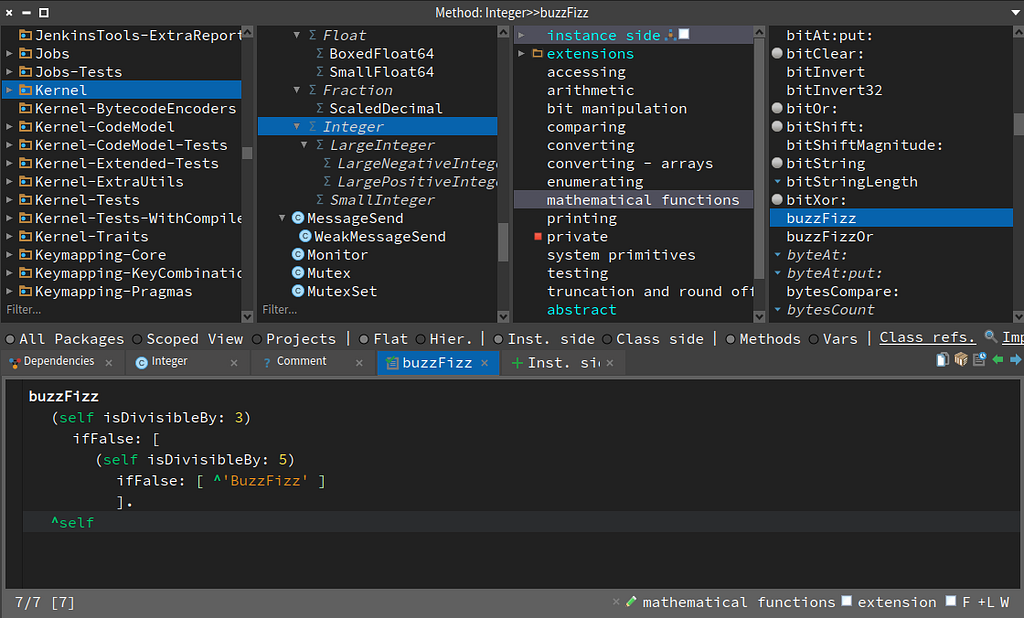 The method buzzFizz added to Integer
The source code for buzzFizz:
buzzFizz
 (self isDivisibleBy: 3)
  ifFalse: [
   (self isDivisibleBy: 5)
    ifFalse: [ ^'BuzzFizz' ]
    ].
 ^self
There are four very important things in this code.
- Boolean is an object with methods. The method isDivisibleBy: on Integer returns a Boolean.
- ifFalse: is a method on Boolean that takes a BlockClosure. The method is a no-op on True, and evaluates on False.
- ^ is the return character (e.g. return in Java)
- I use a non-local return from the inner ifFalse block
If you only have ever programmed in Java, you may not have heard of a non-local return. This doesn’t return from the block and continue evaluating the code in the rest of the method. This returns the value from the method. So ifFalse: evaluates true twice, then ^self will never be reached.
Using the or: method
The following approach might melt your brain a little less or more. I added a method named buzzFizzOr to Integer as follows:
buzzFizzOr
 ^((self isDivisibleBy: 3) or: (self isDivisibleBy: 5))
    ifFalse: [ 'BuzzFizz' ]
    ifTrue: [ self ].
Now I was able to keep this to a single return by using the or: method on Boolean, which returns a Boolean. I got rid of the non-local return, but now self might be jumping out at you. Did you notice that self is being returned as the result from inside of the block, but self represents the Integer value, not the block? Now you know.
Oh right, forgot the test. Here you go.
testBuzzFizzOr

 self assert: 0 buzzFizzOr equals: 0.
 self assert: 1 buzzFizzOr equals: 'BuzzFizz'.
 self assert: 2 buzzFizzOr equals: 'BuzzFizz'.
 self assert: 3 buzzFizzOr equals: 3.
 self assert: 4 buzzFizzOr equals: 'BuzzFizz'.
 self assert: 5 buzzFizzOr equals: 5.
 self assert: 6 buzzFizzOr equals: 6.
 self assert: 7 buzzFizzOr equals: 'BuzzFizz'.
 self assert: 8 buzzFizzOr equals: 'BuzzFizz'.
 self assert: 9 buzzFizzOr equals: 9.
 self assert: 10 buzzFizzOr equals: 10.
 self assert: 15 buzzFizzOr equals: 15.
Final Thoughts
I wrote a blog a while ago that pondered about what would happen if Java didn’t have an if-statement.
I kept the discussion in this blog more or less theoretical. Now you’ve seen in practice how a language like Smalltalk can survive without an if-statement.
Thanks for reading!
I am the creator of and committer for the Eclipse Collections OSS project, which is managed at the Eclipse Foundation. Eclipse Collections is open for contributions. I am the author of the book, Eclipse Collections Categorically: Level up your programming game.
July 02, 2026

Eclipse Theia in Practice: Getting Started and Lessons from the Field
by Jonas, Maximilian & Philip at July 02, 2026 12:00 AM
Want to build a modern, AI-native tool or IDE? At Open Community Experience 2026 (OCX26) in Brussels, we gave a practical, experience-driven talk on Eclipse Theia: what the framework is, how to get a …
The post Eclipse Theia in Practice: Getting Started and Lessons from the Field appeared first on EclipseSource.
June 30, 2026
The Eclipse Foundation and the ORC Working Group launch ORC Learning Hub to help open source developers, maintainers, and software teams prepare for the Cyber Resilience Act
by Natalia Loungou at June 30, 2026 10:03 AM
BRUSSELS – 30 JUNE 2026 – The Eclipse Foundation, one of the world’s largest open source software foundations, in collaboration with the Open Regulatory Compliance (ORC) Working Group, today announced the launch of the ORC Learning Hub, a free global education initiative designed to help the people responsible for building, maintaining, securing, and governing open source software prepare for the European Union’s Cyber Resilience Act (CRA). The program provides practical, role-specific training for open source developers, maintainers, contributors, project stewards, product teams, security and compliance professionals, OSPO leaders, and legal teams.
While the CRA is a European regulation, its impact is global. Any organisation that distributes or commercialises software-enabled products in the EU market, including those built on open source, must comply with its requirements. Open source is now nearly universal in modern software, with more than 96% of commercial codebases containing open source (OpenLogic 2026 State of Open Source Report). As a result, the need for clear, actionable guidance is urgent across the global software industry.
The CRA changes the rules for how software is developed and delivered globally,” said Mike Milinkovich, executive director of the Eclipse Foundation. “Because open source is part of almost every modern application and system, CRA readiness has to happen where software is actually built. The ORC Learning Hub helps developers, maintainers, project stewards, and software teams understand what the CRA requires and put that knowledge into practice.
Developed by the ORC Working Group and hosted by the Eclipse Foundation, the ORC Learning Hub brings together expertise from across the open source ecosystem, industry, and regulatory domains. It delivers open source–focused training to help organisations understand how the CRA applies in real-world scenarios and what actions they need to take.
With the first CRA obligations set to take effect in September 2026, organisations face a narrowing window to prepare. Until now, guidance has been fragmented and largely high-level, particularly when it comes to open source software. The ORC Learning Hub addresses this gap by delivering clear, actionable, and role-specific education aligned with modern, open source–driven software development practices.
The Cyber Resilience Act introduces mandatory cybersecurity requirements for products with digital elements sold in the EU, including those built with or dependent on open source software. It places new responsibilities on manufacturers and distributors of such products in the European market. The CRA also introduces a new actor, the open source software stewards, which must adopt secure development practices, ensure transparency, and manage vulnerabilities across the entire software supply chain.
At the core of the ORC Learning Hub is a modular training program designed to guide organisations through CRA readiness step by step. The full program includes:
- Module 1: Introduction to the CRA for Open Source Software
- Module 2: Introduction to the CRA for Manufacturers
- Module 3: SBOMs and Vulnerability Management in Open Source
- Module 4: CRA Due Diligence and Open Source Usage
- Module 5: Vulnerability Management in Practice
The Learning Hub launches with Modules 1 and 2 available today, providing tailored entry points for:
- Open source developers, maintainers, contributors, and project stewards
- Product teams, security and compliance professionals, OSPO leaders, and legal teams
Additional modules covering SBOMs, due diligence, and vulnerability management will soon be released.
The ORC Learning Hub is designed to:
- Help developers, maintainers, project stewards, and software teams understand what the CRA means for their work
- Clarify how CRA obligations apply to open source software, communities, and downstream product development
- Provide role-specific guidance for manufacturers, developers, maintainers, OSPOs, security teams, and legal/compliance professionals
- Help organisations operationalise CRA readiness across modern, open source-based software supply chains
- Support global collaboration on emerging regulatory best practices
The ORC Learning Hub is free and available globally. Organisations and open source stakeholders are encouraged to begin preparing now, ahead of the September 2026 deadline, and to stay engaged as new modules and guidance are released. The program is available at https://orcwg.org/training/
About the ORC Working Group
The Open Regulatory Compliance Working Group (ORC WG) brings together open source foundations, global enterprises, and industry stakeholders to address the growing impact of software regulations on open source. With more than 60 members, ORC develops best practices, specifications, and practical resources to help organisations navigate evolving regulatory requirements. Its initial focus is the European Cyber Resilience Act (CRA), while supporting the long-term security, sustainability, and adoption of open source innovation worldwide.
About the Eclipse Foundation
The Eclipse Foundation provides a global community of individuals and organisations with a vendor-neutral, business-friendly environment for open source collaboration and innovation. We host Adoptium, the Eclipse IDE, Jakarta EE, Open VSX, Software Defined Vehicle, and more than 400 high-impact open source projects. Headquartered in Brussels, Belgium, we are an international non-profit association supported by over 300 members. Our events, including Open Community Experience (OCX), bring together developers, industry leaders, and researchers from around the world. To learn more, follow us on X and LinkedIn, or visit eclipse.org.
Media contacts:
Schwartz Public Relations
Julia Rauch/Luca Myska
Sendlinger Straße 42A
80331 München
EclipseFoundation@schwartzpr.de
+49 (89) 211 871 -43/ -52
514 Media Ltd (France, Italy, Spain)
Benoit Simoneau
M: +44 (0) 7891 920 370
Nichols Communications (Global Press Contact)
Jay Nichols
+1 408-772-1551
June 29, 2026
Eclipse Open VSX graduates to mature phase, marking a major milestone for open developer tooling
by Lemmy Nwadishi at June 29, 2026 04:16 PM
Eclipse Open VSX has reached an important milestone in its evolution as open source infrastructure for developer tooling. The project now serves millions of developers worldwide through AI-native IDEs, cloud development environments, and VS Code-compatible platforms, delivering more than 600 million extension downloads every month.
Reflecting this growth and impact, Eclipse Open VSX has officially transitioned from the incubation phase to the mature phase of the Eclipse Foundation development process. This achievement recognises the project's technical maturity, strong community, and long term commitment to open, vendor-neutral governance.
June 28, 2026
Save Memory in Java by Making Memory Efficiency Your Top Priority
by Donald Raab at June 28, 2026 10:19 PM
Leverage Java libraries and frameworks which focus on memory efficiency.
 Photo by Markus Winkler on Unsplash
Code in Java like it’s 2004
If you’re worried about the impending RAM Supply Apocalypse, and concerned that you won’t be able to afford to upgrade hardware to scale your memory hungry Java applications, then it’s time you pay attention to memory efficiency.
Wasting memory because it saves you time building something will sometimes come back to haunt you. Memory-efficient programming has become a lost art in Java because we have been spoiled with copious amounts of memory. Agentic AI may be ushering in a new age of memory-efficient programming. This may make this kind of programming a highly sought after skill again. If you want to enhance this skill set in Java, then keep reading.
The Memory Efficiency of Java Stream
Java Stream is not memory-efficient at startup. Stream has a nice interface, let’s you write fluent declarative code, and can save you memory when applying multiple lazy operations to large datasets. Stream is wasteful, in ways it really doesn’t need to be, when used with serial processing of small collections. Serial processing of small collections is a common use case for Java Stream, and if you read some of the resources I have linked below you will find that this is the worst use case possible for Java Stream.
Java Stream suffers from a core design problem in its implementation, that can be summed up as follows.
One Stream to rule them all.
One Stream to find them.
One Stream to bring them all
and in the darkness bind them.
(with apologies to Lord of the Rings)
The Java Stream interface is pretty good. The problems begin with the One abstract implementation of Stream named ReferencePipeline. ReferencePipeline is the one Stream that binds together both serial and parallel code paths. For a long time, I considered ReferencePipeline to be an unfortunate design decision because it made the reading and debugging of Stream code next to impossible for humans. This complication was later validated when JetBrains added a Stream specific visual debugging tool to IntelliJ IDEA.
I was not aware until this year how bad Java Stream is in terms of startup memory consumption because of the “there can be only one” design decision. The simple way to think about the problem is that we all pay the startup memory cost for parallel processing when using a serial Stream, which is the most common case.
Agentic AI Finds Needles in the Haystack
I have been using Agentic AI the past few months at work to discover, identify, and correlate memory and performance issues with Java Stream. I have been comparing Java Stream alternatives to equivalent Eclipse Collections alternatives for memory consumption and performance. The discoveries have been surprising. I have blogged about many of these discoveries publicly.
I have been looking at Java Stream performance since before Java Stream was released in Java 8 in 2014. I blogged about one parallel Stream performance problem I discovered and reported that resulted in a class called RandomAccessSpliterator being added to the JDK. If you use List.of() in your code bases, then you are using this Spliterator implementation without knowing it.
I have not previously looked at the memory footprint of Java Stream or Eclipse Collections LazyIterable/ParallelIterable. I never thought to look at startup memory cost of Java Stream, because I assumed it was always a short-lived object and would never be detectable on a Java heap and wouldn’t noticeably impact performance. Using Agentic AI I was able to discover a correlation between the startup memory cost of Stream and measurable performance differences for serial Stream on small collections, where small is defined as a collection of less than 100 elements.
Show Your work
I’ve been blogging for several months after making a batch of discoveries using Agentic AI. I validated each individual discovery by writing code by hand using Java Object Layout (JOL) and Java Microbenchmark Harness (JMH), and then blogged about them. I am going to share the list of blogs I wrote below so you have an index of content to research on your own if you are interested in learning more.
🫙 Empty Should be Empty
🔄 Performance of Lazy and Eager Iteration Patterns on Small Lists in Java
🚗 Some Benefits of Enabling Compacy Object Headers in Java 25 for Streams
🏁 Measuring the Startup Memory Cost for Lazy Iteration Patterns in Java
🧮 Counting and Collecting Collectors
🆓 “Fat-Free” Lambdas in Java
🐆 Snow Leopards and Tribbles in Java Heaps
Note: Where I identify memory inefficiencies in Java Stream, they are potential opportunities for future improvements that can help everyone using the API. They just need to be verified, assessed, and prioritized based on cost and benefit.
Memory-Efficient By Design
Eclipse Collections started out its existence solving memory efficiency problems in 32-bit Java 4 in 2004. Memory-efficiency has been prioritized first in the Eclipse Collections design and implementation for the past 22 years. A Feature Rich API was prioritized second, and performance was prioritized third. Eclipse Collections often excels at all three, but sometimes there are necessary tradeoffs.
For the original story of how memory efficiency became the initial design priority of Eclipse Collections, the following is the blog to read.
Sweating the small stuff in Java
Java is Memory-Efficient, if You Know How to Use it
Java is a very memory-efficient programming language, if you know how to leverage the features it provides you. The JVM and language have added many great memory enabling features over the years, some which wind up eventually being enabled by default, benefitting everyone without them having to do anything. Compressed Oops and Compact Object Headers are great examples of memory-efficient features which show up initially as optional features and then eventually enabled by default. Compressed Oops have been enabled by default since Java 7. Compact Object Headers will be enabled by default starting in Java 27.
Primitive Support FTW
Java’s support for eight primitives has been a memory and performance benefit and curse since the beginning. Valhalla has plans to eventually solve the original sin of Java having Object and primitive types not able to play nicely together in language features like Generics.
Eclipse Collections has full support for all eight Java primitives across many collection types. You can wait for Valhalla to solve the problem of being able to use List<int> in code, or you can use Eclipse Collections IntList (and seven other primitive lists) today. It’s your choice to either leverage a library that enables you to get full use of Java’s memory-efficient and performant primitives with collections, or to continue to go in a box.
Go Primitive in Java, or Go in a Box
Stateless Lambdas FTW
The Java language has had support for hoisting stateless lambdas as statics since lambdas were first introduced in Java 8. Java Stream, other Java collections libraries, or other JVM language probably don’t give you the features you need to make more stateless lambdas static. You may be generating lambda garbage in your code without knowing it, if you are capturing state in a closure.
Eclipse Collections has had support for an additional level of “fat-free” lambdas since around 2007. This was seven years before Java 8 had lambda support added. We needed this “fat-free” lambda support in Goldman Sachs to make using functional APIs less painful in memory-sensitive high-performance coding paths.
The Apache Groovy programming language has recently added an additional level of “fat-free” lambda support in its API targeted for release in Groovy 6.0. The blog above is the resource that make the Groovy development team aware of the need to have library features provided to enable more use of stateless lambdas.
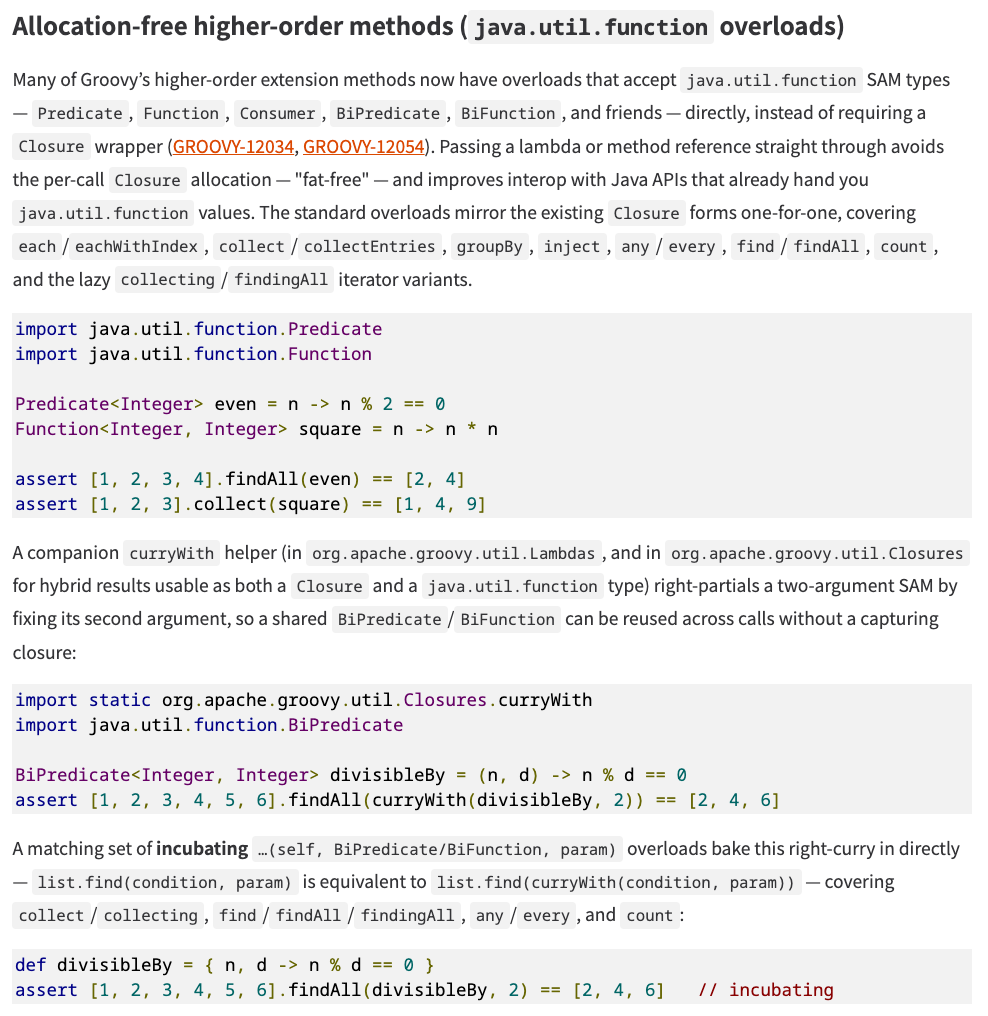 Groovy 6.0 release note on “fat-free” lambda API support
Object Pooling
If you’re deploying Java applications that run for a long time between restarts and cache a lot of state, then you need to know about object pooling. In my experience, the largest memory savings for large memory JVM heaps can sometimes be achieved through object pooling . Many developers I have met know about the built in String pooling in Java, and have heard of or used the String.intern() method. Many developers I have met have also not thought to pool their own immutable domain objects. If you wind up creating a lot of duplicate objects in memory over time, then using object pooling can be helpful.
Both Google Guava and Eclipse Collections have options for pooling. In Guava, look for the Interners class which supports both strong and weak pools. In Eclipse Collections, which only supports a strong pool by default, look in this blog for information about the Pool interface.
Final Thoughts
I have helped folks I have worked with for years, make their Java applications and libraries more memory-efficient. I have provided the entire Java community, via the open source Eclipse Collections library, access to many of the tools and tricks I have learned and used over the years to fine tune memory savings in banks like Goldman Sachs.
The only thing I am unable to provide you with is the incentive to make your code more memory-efficient. Agentic AI may soon do this for you. If you have read this far, then maybe you have some new tools you were unaware of previously that can help you in the new memory-constrained environment we all find ourselves in again.
Thanks for reading! If you want to know more about Eclipse Collections, I wrote a book about it that you can find linked below.
I am the creator of and committer for the Eclipse Collections OSS project, which is managed at the Eclipse Foundation. Eclipse Collections is open for contributions. I am the author of the book, Eclipse Collections Categorically: Level up your programming game.
June 26, 2026
FizzBuzz in Smalltalk
by Donald Raab at June 26, 2026 07:03 PM
Accept the things you can’t change. Change the things you can’t accept.
 Wait, wut? Note: Smalltalk arrays are one index based, so the first element in this screenshot is for 0.
The Smalltalk Magic Trick
Amidst all of the discussion over basic language syntax and library depth, developers who only program in languages like Java miss the true power of a language like Smalltalk.
Smalltalk is evolvable.
You can change the system.
The Inline FizzBuzz Approach
I decided to sit down and solve the FizzBuzz problem in Smalltalk. I had posted a blog with my Java based solution on StackOverflow from a decade ago.
Ternary, Predicate, and Pattern Matching for FizzBuzz with Java 26
I started with the “simplest” possible solution which only requires inlining code as follows.
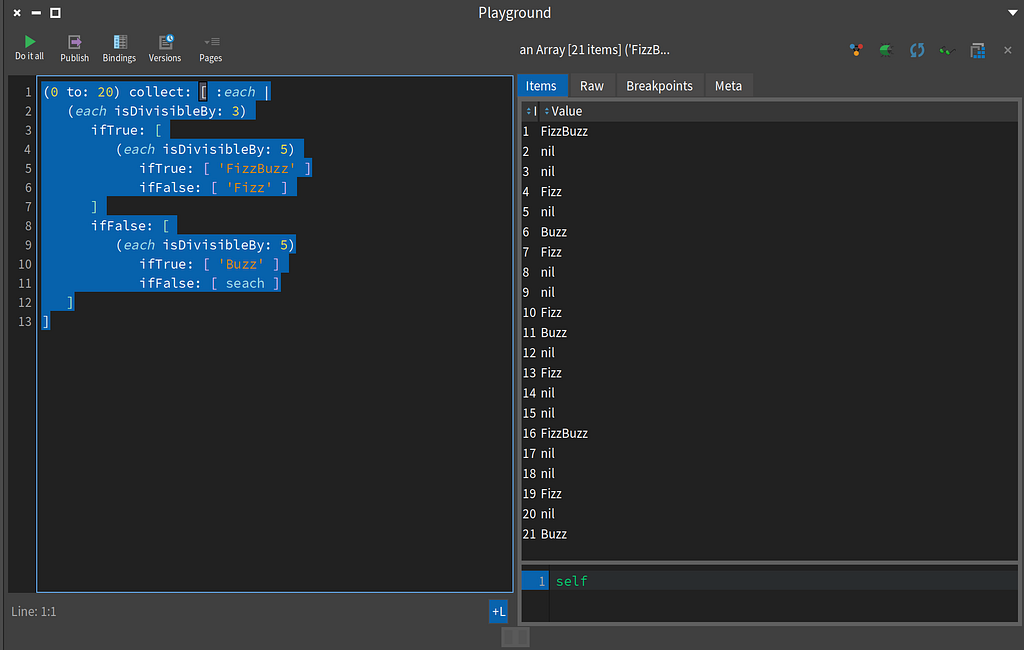 FizzBuzz in Smalltalk using inlined code
Here’s the source for the inline approach:
(0 to: 20) collect: [ :each |
 (each isDivisibleBy: 3)
  ifTrue: [
   (each isDivisibleBy: 5)
    ifTrue: [ 'FizzBuzz' ]
    ifFalse: [ 'Fizz' ]
  ]
  ifFalse: [
   (each isDivisibleBy: 5)
    ifTrue: [ 'Buzz' ]
    ifFalse: [ seach ]
 ]
]
The code (0 to: 20) creates an Interval. Then I send the collect: message, which takes a one argument BlockClosure, to the Interval. Then we see a bunch of Boolean messages with blocks (i.e. ifTrue:ifFalse:). If you read my recent blog on Smalltalk Blocks, you’ll learn that Smalltalk doesn’t have an if-statement. Control structures are achieved in Smalltalk using messages and blocks.
The message isDivisibleBy: is available on Number types in Smalltalk. It is a more human readable form of i % n == 0 in Java, which I read in my brain as “i mod n equals zero.”
We can see the definition of isDivisibleBy: on the Number class in Smalltalk.
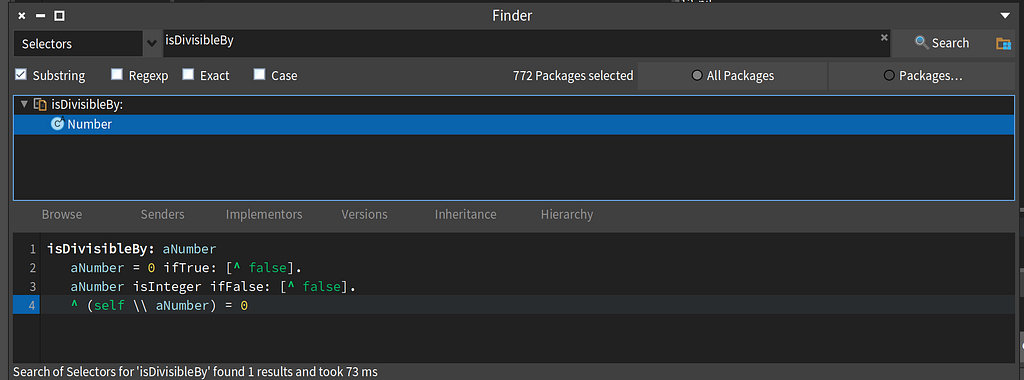 The method isDivisibleBy: on Number in Smalltalk
This implementation should explain why I used isDivisibleBy: instead of (i \\ n) = 0. Any developer can read isDivisibleBy: but I would have to explain that \\ is mod in Smalltalk, instead of % like in Java. That would lose folks quickly, but now you know.
Evolving the Integer Class to Include fizzBuzz
Now I’m hoping since you see a method named isDivisibleBy: on Number, you may have had a lightbulb go off in your head.
Can we add other methods to numbers? 💡
Yes. Yes we can.
Let’s add a fizzBuzz method to the Integer class.
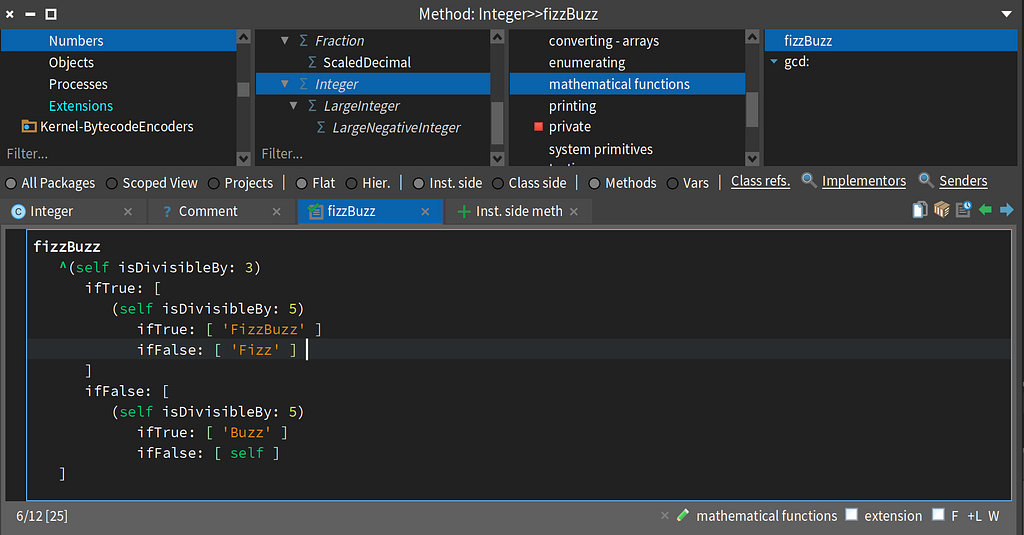 Adding fizzBuzz to the Integer class in Smalltalk
Now, I just went to the Integer class and added a method by typing in an empty method template. Easy! When I used to pogram in Smalltalk, we would use a slightly different approach for extending existing classes via extension methods that we wanted to share in multiple projects. I will leave that to the reader to discover that capability in Pharo Smalltalk. For my purposes here, it is enough to show that we can change existing library classes.
Here’s the source for the fizzBuzz method.
fizzBuzz
 ^(self isDivisibleBy: 3)
  ifTrue: [
   (self isDivisibleBy: 5)
    ifTrue: [ 'FizzBuzz' ]
    ifFalse: [ 'Fizz' ]
  ]
  ifFalse: [
   (self isDivisibleBy: 5)
    ifTrue: [ 'Buzz' ]
    ifFalse: [ self ]
 ]
This code looks almost identical to the code I used inline. The name fizzBuzz at the top is the method signature. The ^ is the return character in Smalltalk. The reserved word self in this context refers to the instance of the Integer class.
Here’s a test for the fizzBuzz method.
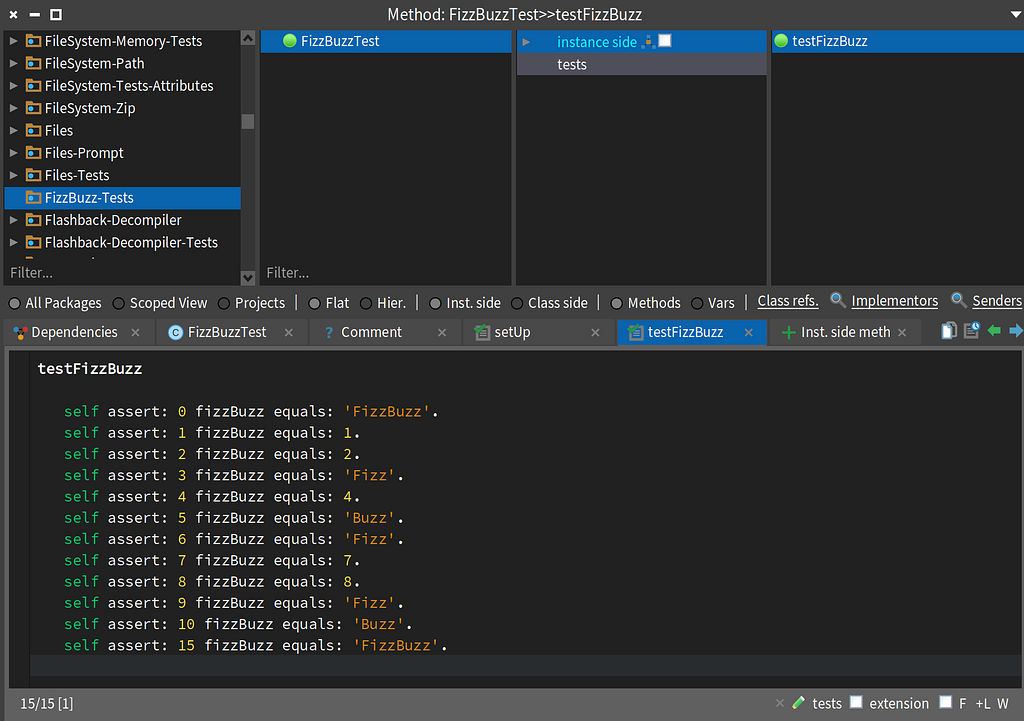 FizzBuzzTest
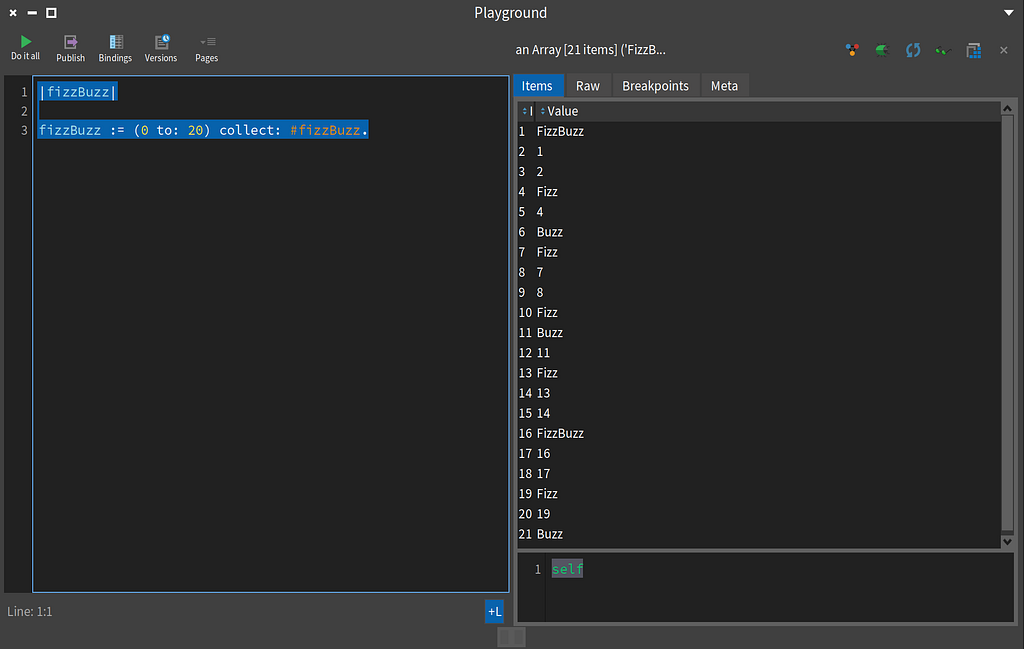
Now that we have a fizzBuzz method on Integer we can write the code as follows, and never have to write fizzBuzz algorithm by hand again.
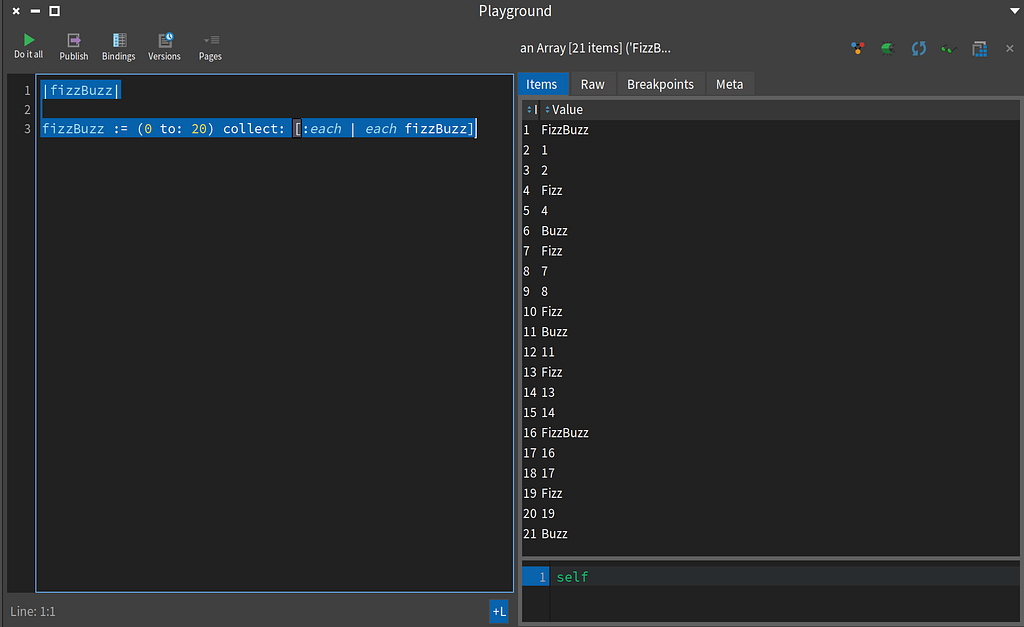 Using fizzBuzz on the Integer class with an Interval
The source is as follows:
|fizzBuzz|

fizzBuzz := (0 to: 20) collect: [:each | each fizzBuzz]
The |fizzBuz| sets up a local variable. The := assigns the result of code on the right to the variable on the left. I used a one argument BlockClosure with collect: here. I can simplify this to use a Symbol as follows:
|fizzBuzz|

fizzBuzz := (0 to: 20) collect: #fizzBuzz
A Symbol in Smalltalk is a unique String that can be used as a key, or as a replacement for a Block as I’ve used it here. Why does this work? Let’s look at the value: method on Symbol which is the equivalent method that would be called on BlockClosure.
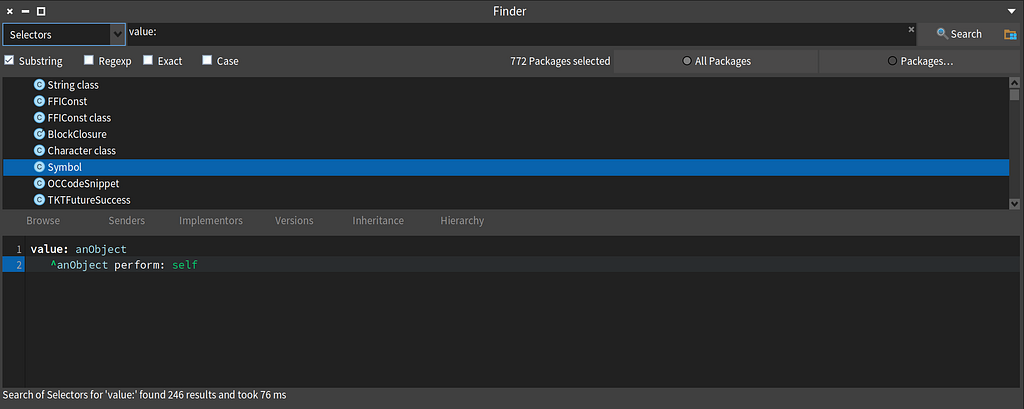 The value: method as defined on the Symbol class which allows a Symbol to behave like a BlockClosure.
That’s All Folks!
I thought it would be fun to round out a final Smalltalk blog for June 2026 with the FizzBuzz implementation so folks could compare it to the equivalent in Java. I haven’t been able to figure out yet how to get emojis to display correctly in Pharo Smalltalk. Some quick Googling looks like I need to get some other fonts installed or something. I settled on just switching back to the standard Fizz and Buzz Strings.
Smalltalk is a pure object-oriented programming language. The code in this blog gives a bit of a sampling of what that can feel like for solving problems. Think object message. You can accomplish so much with this simple paradigm.
It’s mystery is only exceeded by it’s power.
Thanks for reading!
I am the creator of and committer for the Eclipse Collections OSS project, which is managed at the Eclipse Foundation. Eclipse Collections is open for contributions. I am the author of the book, Eclipse Collections Categorically: Level up your programming game.
June 25, 2026
Eclipse Theia: News from the Next-Gen Tools Platform
by Jonas, Maximilian & Philip at June 25, 2026 12:00 AM
At Open Community Experience 2026 (OCX26) in Brussels, Thomas Mäder (Castle Ridge Software) and Jonas Helming (EclipseSource) gave the yearly project update on Eclipse Theia in their role as project …
The post Eclipse Theia: News from the Next-Gen Tools Platform appeared first on EclipseSource.
June 23, 2026
Coding the Haiku Kata in Smalltalk
by Donald Raab at June 23, 2026 07:35 PM
Inspired by implementations in Eclipse Collections, Java Stream, & Groovy
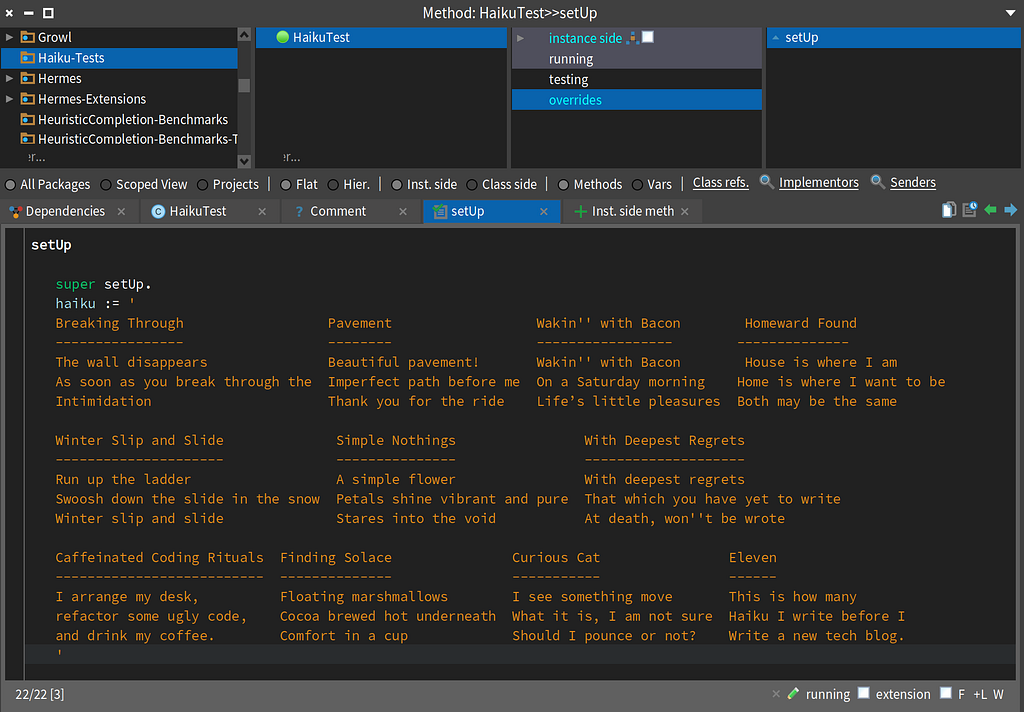 Setup for the Haiku Kata in Pharo Smalltalk 13.0
The Haiku Kata Continues
I have implemented the Haiku Kata in Java previously with Eclipse Collections and Stream. José Paumard has live coded the Haiku Kata in JEP Café Episode 9 on the Java YouTube channel. Paul King implemented the kata in Apache Groovy. You can find the links to all of our previous solutions in the following blog.
Haiku Kata using String transform, Text Blocks, and Switch Expressions
Let’s Try a Little Smalltalk
I’ve written a few Smalltalk blogs in the past week, covering various features of the language. I thought I would try something a bit more complicated that requires writing some unit tests instead of just code snippets.
As you can see in the image above, I created a test class named HaikuTest. in a package named Haiku-Tests.
TestCase << #HaikuTest
 slots: { #haiku };
 package: 'Haiku-Tests'
The HaikuTest has a single variable named haiku which is initialized in the setUp method.
setUp

 super setUp.

 haiku := '
   Breaking Through                  Pavement                  Wakin'' with Bacon        Homeward Found
   ----------------                  --------                  -----------------        --------------
   The wall disappears               Beautiful pavement!       Wakin'' with Bacon        House is where I am
   As soon as you break through the  Imperfect path before me  On a Saturday morning    Home is where I want to be
   Intimidation                      Thank you for the ride    Life’s little pleasures  Both may be the same

   Winter Slip and Slide              Simple Nothings                With Deepest Regrets
   ---------------------              ---------------                --------------------
   Run up the ladder                  A simple flower                With deepest regrets
   Swoosh down the slide in the snow  Petals shine vibrant and pure  That which you have yet to write
   Winter slip and slide              Stares into the void           At death, won''t be wrote

   Caffeinated Coding Rituals  Finding Solace               Curious Cat                Eleven
   --------------------------  --------------               -----------                ------
   I arrange my desk,          Floating marshmallows        I see something move       This is how many
   refactor some ugly code,    Cocoa brewed hot underneath  What it is, I am not sure  Haiku I write before I
   and drink my coffee.        Comfort in a cup             Should I pounce or not?    Write a new tech blog.
 '
Counting Characters in Smalltalk
The first test that I will implement is the test which counts all of the characters in all of the haiku. The test validates the top three letters in the counts. Just as we did in Eclipse Collections, in Smalltalk we use a Bag type to count.
testTopLetters
 | bag sorted |

 bag := ((haiku select: #isAlphaNumeric) collect: #asLowercase) asBag.
 sorted := bag sortedCounts.

 self assert: (sorted at: 1) equals: (Association key: 94 value: $e).
 self assert: (sorted at: 2) equals: (Association key: 65 value: $t).
 self assert: (sorted at: 3) equals: (Association key: 62 value: $i).
Finding the Distinct Letters
The following test finds the distinct letters in the haiku, and it has to match the encounter order of the letters.
testDistinctLetters
 |distinctLetters string|

 distinctLetters := (((haiku select: #isAlphaNumeric) collect: #asLowercase)
    asOrderedCollection)
    removeDuplicates.

 string := String streamContents:
    [ :stream | distinctLetters do: [ :char | stream nextPut: char ]].

 self assert: string equals: 'breakingthoupvmwcdflsy'.
Finding Duplicate and Unique Letters
The following test finds all of the letters that have duplicates and all the letters that are unique. There are no unique letters in the haiku.
testDuplicatesAndUnique
 |chars duplicates unique|

   chars := ((haiku select: #isAlphaNumeric) collect: #asLowercase) asBag.

   duplicates := Bag new.
   unique := Bag new.

 chars doWithOccurrences: [ :each :occurrences | occurrences < 2
  ifTrue: [unique add: each]
  ifFalse:[duplicates add: each withOccurrences: occurrences]].

 self assert: duplicates equals: chars.
 self assertEmpty: unique.
Finding the Top Vowel and Consonant
The following test finds the top vowel and consonant in the haiku.
testTopVowelAndConsonant
 |topOccurrences topVowel topConsonant|

 topOccurrences := ((haiku select: #isAlphaNumeric) collect: #asLowercase)
    asBag sortedCounts.

 topVowel := (topOccurrences detect:
    [ :pair | pair value isVowel]) value.
 topConsonant := (topOccurrences detect:
    [ :pair | pair value isVowel not]) value.

 self assert: topVowel equals: $e.
 self assert: topConsonant equals: $t.
Finding Wordle Words in the Haiku
The following test finds all of the words that can be used in the Wordle game. The words must be five characters long and not have any special characters.
testHaikuWordleWords
 |words exclude wordleWords expected|

 exclude := ',.-!?' asSet.
 exclude add: Character cr;
  add: Character tab.

 words := (haiku reject: [:each | exclude includes: each])
  substrings asOrderedCollection .

 self assert: words size equals: 168.

 wordleWords := (((words reject: [ :word | word includes: $' ])
  select: [ :word | word size = 5 ])
  collect: #asLowercase)
  asSet.

 expected := Set withAll: #('haiku' 'death' 'wrote' 'bacon' 'shine' 'house'
  'where' 'thank' 'break' 'which' 'cocoa' 'drink' 'write' 'slide' 'found').

 self assert: wordleWords equals: expected.
The Passing Tests
Here are the tests passing in the Smalltalk browser.
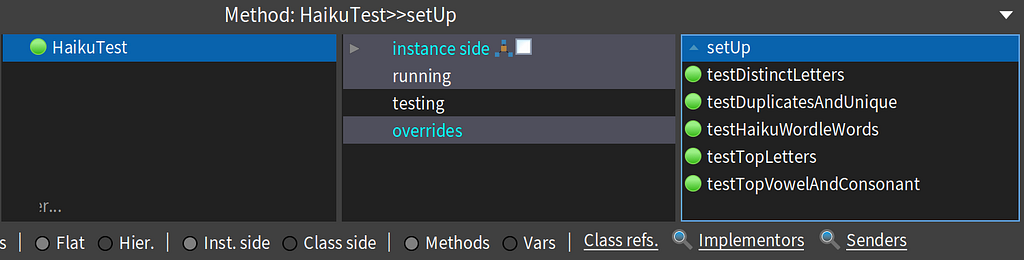 Passing Tests
Final Thoughts
While I missed some of the convenience of Eclipse Collections methods when implementing the tests in Smalltalk, most of the implementation code was straightforward to figure out. The one test that gave me a little challenge was finding the distinct letters. I missed having a simple method like makeString.
I left one test incomplete and failing. The haikuMeetsAnagrams test from the original kata. I will save this one for another day and update the blog once I finish it.
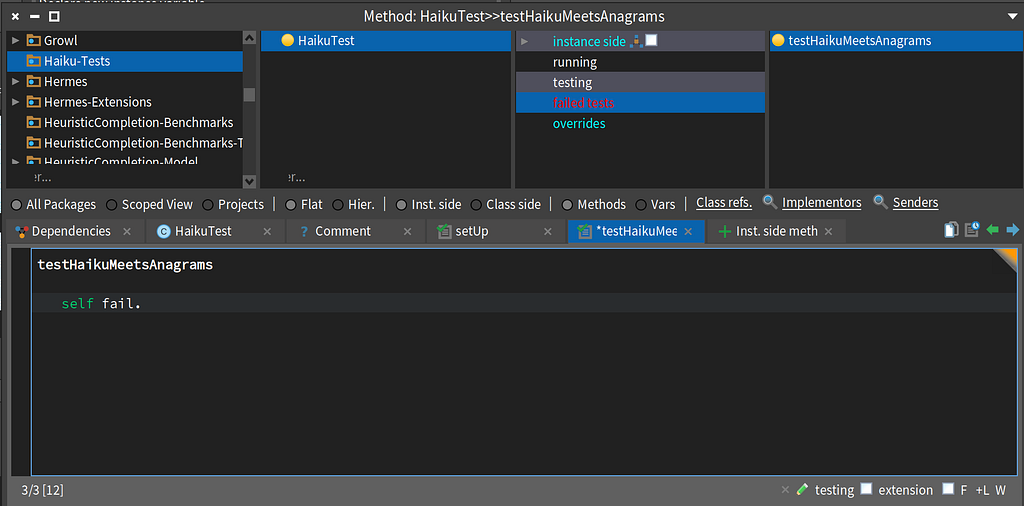 Leaving a failing test as a bookmark
The great thing about implementing a kata like this is that it forces you to think about testing up front. There’s no output, just assertions. I love writing tests.
If you want to try the Haiku kata using Java with Eclipse Collections or Java Stream, you can find the kata in the collection of Eclipse Collections Katas.
eclipse-collections-kata/haiku-kata at master · eclipse-collections/eclipse-collections-kata
Thanks for reading!
I am the creator of and committer for the Eclipse Collections OSS project, which is managed at the Eclipse Foundation. Eclipse Collections is open for contributions. I am the author of the book, Eclipse Collections Categorically: Level up your programming game. If you want to learn the full API of Eclipse Collections, the book is the most comprehensive guide available.
June 22, 2026
Cascading Messages in Smalltalk
by Donald Raab at June 22, 2026 05:28 PM
Statements end with a period, and messages cascade with a semicolon.
 Cascading message sends to an OrderedCollection
Fluent versus Cascading
In a fluent method call chain, messages are sent to the result of the previous message. This is what a fluent method chain looks like in Smalltalk.
OrderedCollection new yourself yourself yourself yourself yourself.
In this call chain, OrderedCollection is a class. The message new is sent to the OrderedCollection class, and results in a new instance of OrderedCollection being created. Then the message yourself is sent to the new instance of the OrderedCollection. The yourself method would be the equivalent if there were a method named this() in Java that you could call on any object and it would return this. This method (pun intended) doesn’t exist. It would not serve much purpose in Java, without cascading message support.
The space between us
In Smalltalk, a space character serves the same purpose as the period in Java. The basic syntax is object message, where the space instructs the compiler that the text that follows is a message to send to the receiving object on the left. The Java equivalent of the above Smalltalk code would look as follows.
OrderedCollection.new().yourself().yourself().yourself().yourself().yourself().
Where are the parentheses in Smalltalk methods?
Parentheses are not required for messages in Smalltalk. They are used to resolve order of precedence issues, and for other purposes like creating arrays.
A fluent add: method
The add: method on OrderedCollection returns the object being added to the collection. If the add: method returned the OrderedCollection itself, then the following would be possible.
|oc|
oc := (((OrderedCollection new add: 1) add: 2) add: 3) add: 4.
The problem as you can see chaining methods like this in Smalltalk that you can’t just say add: 1 add: 2: add: 3 add: 4 because Smalltalk would think that is a single message with four paramters. Parentheses also play a part in making method chaining possible when keyword messages (i.e. messages with parameters) are used.
Cascading Messages
Cascading messages are a feature I’ve only ever seen in Smalltalk. It’s a neat solution to a common problem. The problem is what to do when you want to send multiple messages to the same object one after another. The classic solution to this problem is to just write separate statements.
|collection|
collection := OrderedCollection new.
collection add: 1.
collection add: 2.
collection add: 3.
collection add: 4.
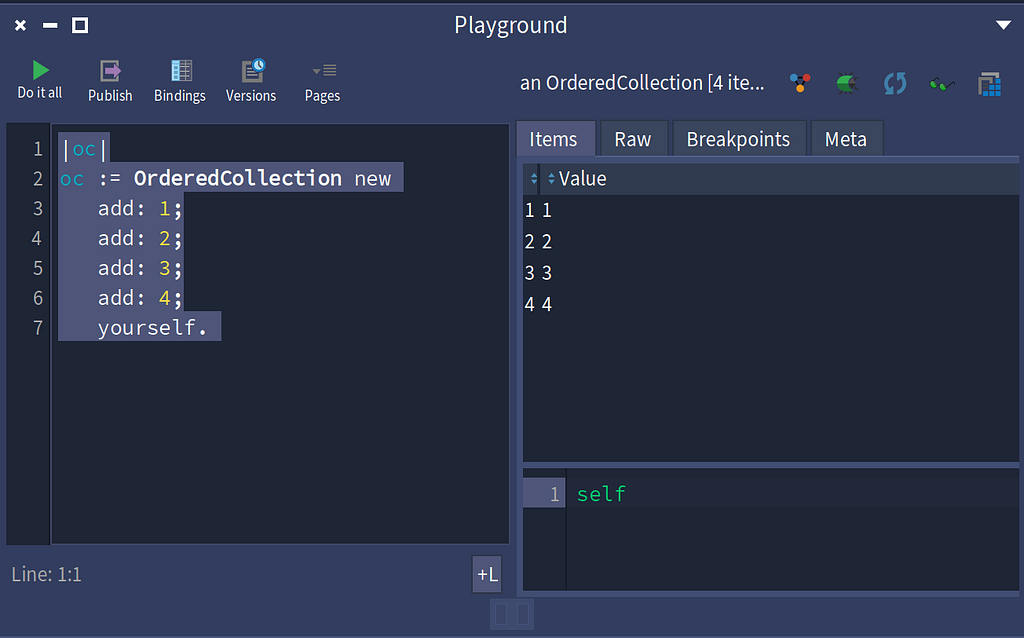
Using cascading messages, you simply list each message to send and then end with a semicolon. Then you send the message yourself, which will have the effect of returning the the original receiver of the messages.
|collection|
collection := OrderedCollection new
 add: 1;
 add: 2;
 add: 3;
 add: 4;
 yourself.
An alternate solution with: a single message
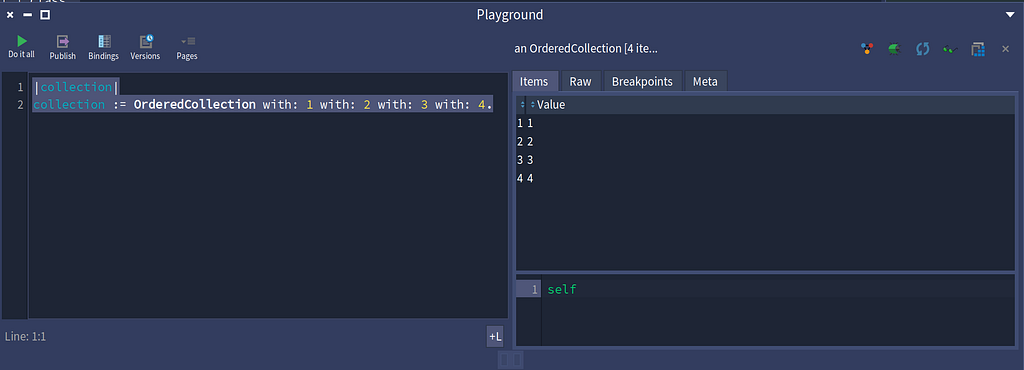 OrderedCollection has a with:with:with:with: method that takes four parameters
As you might have gathered by now, a keyword message uses a colon to indicate there is a parameter that follows, and a multi-parameter keyword message will have a colon for each parameter. The definition of the with:with:with:with: method is as follows in the Collection class.
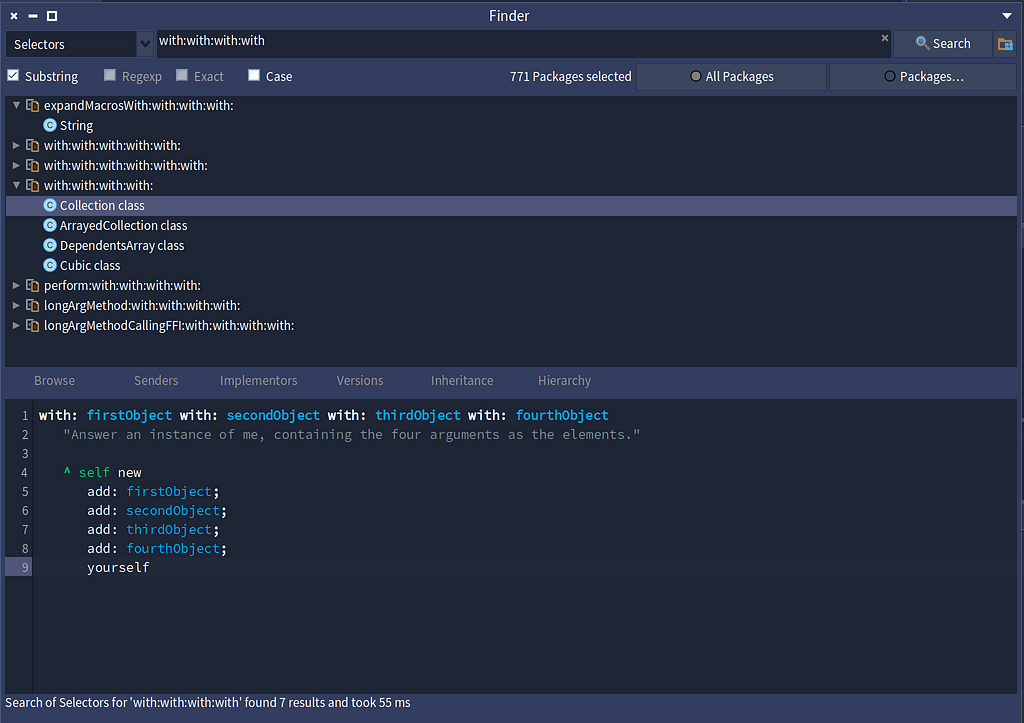 The with:with:with:with: method uses a cascaded message send.
The assignment operator, variable definitions, return and self
The := is the assignment operator in Smalltalk. Two | characters with named variables in between (e.g.|variable1 variable2|) is how to define local variables in a method.
On line four in the method above, the Smalltalk return character is hiding. The ^ is the equivalent of return in Java.
The five Smalltalk reserved words
There are five reserved words in Smalltalk. The reserved words are self, super, true, false, and nil.
Now self is interesting in the method above. In an instance method, self would refer to the instance of the class that the method is bound to. This is the equivalent of this in Java. In a class method, which is what the with:with:with:with: method is above, the self variable refers to the single instance of the Collection class (or subclass in the case of OrderedCollection). There is no equivalent in Java, as this in a static method cannot be used. So self new in this instance is the equivalent of saying OrderedCollection new.
That’s All Folks
Smalltalk is an odd language when you first read it. It’s syntax is unlike most modern programming languages. By starting with cascading message in this blog I was able to cover a decent amount of the syntax of the Smalltalk language. There is a more comprehensive coverage of the Smalltalk syntax on a post card.
I miss having cascading messages available in Java. I have had to settle on using fluent methods which return this, so I can chain multiple method calls together, or using the builder pattern to build an instance of an object. You can see how I simulate cascading message to build collections in Eclipse Collection using a fluent API with method chaining in the following blog.
As a matter of Factory — Part 3 (Method Chaining)
Cascading messages are a clever addition to a very simple and powerful programming language. They carry their weight and then some. I often write Smalltalk code examples that use cascading messages, without explaining what they are doing.
Transcript cr; show: 'Hello World'; cr.
Here I have printed Hello World on the Transcript, which is the equivalent of System.out and now IO in recent versions of Java. The cr message prints a carriage return before Hello World, and the second cr, prints a carriage return after Hello World. Three messages (cr, show:, cr) are sent to the single object named Transcript using the semicolon identifying cascading messages.
Thanks for reading!
I am the creator of and committer for the Eclipse Collections OSS project, which is managed at the Eclipse Foundation. Eclipse Collections is open for contributions. I am the author of the book, Eclipse Collections Categorically: Level up your programming game.
June 21, 2026
More Features, Less Waste
by Donald Raab at June 21, 2026 07:50 PM
The lesser known tagline of Eclipse Collections.
 The footer of https://eclipse.dev/collections/
Eclipse Collections is an open source collections library for Java that has been in development since 2004.
There are two things Eclipse Collections works hard not to waste.
- Memory
- Time
Much of the feature development in Eclipse Collections focuses on the optimization of these two things.
Memory
There are two kinds of memory that Eclipse Collections optimizes for.
- Data Structure Memory
- Algorithm Memory
If you look closely at the image above, you will see some old code examples in the backgound with examples using anySatisfy and anySatisfyWith. The method anySatisfyWith is a good example of a method which enables more “fat-free” lambdas to be used in Java.
The following blog explains how Eclipse Collections provides more opportunities to developers to use stateless lambdas.
Time
There are two kinds of time that Eclipse Collections optimizes for.
- Developer Time (coding)
- End-user Time (performance)
Having more features not only provides more time savings for developers in terms of reducing code, it also presents more opportunities for specialized optimizations of specific features.
The following blog explains how primitive collection support in Eclipse Collections gives developers options for incredible performance gains and memory savings.
Go Primitive in Java, or Go in a Box
More Features in a Blog Series
Five years ago I wrote a blog series about the missing Java data structures that no one ever told you about. If you had known about the data structures and algorithms in Eclipse Collections, and took the time to learn them and appreciate what they offer, you might have saved yourself a lot of memory, and a lot of time.
Blog Series: The missing Java data structures no one ever told you about
With RAM prices going through the roof, the only time better than a decade ago to have adopted Eclipse Collections is today. Don’t keep wasting memory and time. Take a look at what you’re missing.
Thanks for reading!
I am the creator of and committer for the Eclipse Collections OSS project, which is managed at the Eclipse Foundation. Eclipse Collections is open for contributions. I am the author of the book, Eclipse Collections Categorically: Level up your programming game.
June 19, 2026

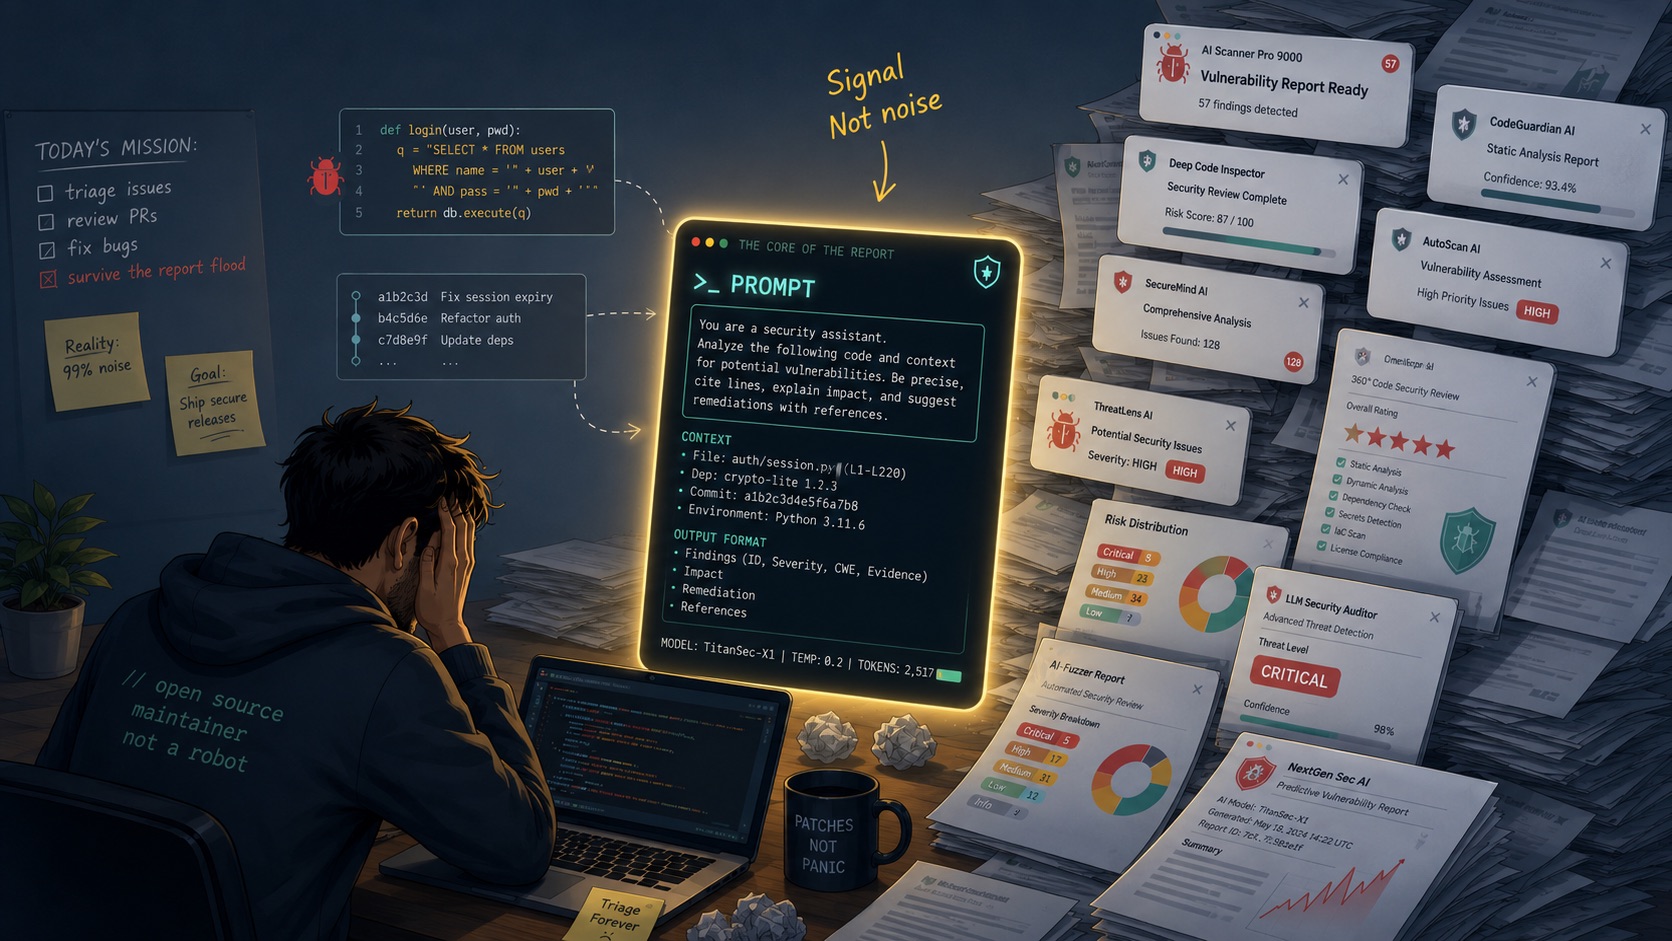
The Vulnerability Report Is Dead. Long Live the Prompt!
by Mikaël Barbero (mikael.barbero@eclipse-foundation.org) at June 19, 2026 09:30 AM
For years, maintainers have asked security reporters for a fairly reasonable thing: reproduction steps. Not a vibe. Not a screenshot from a scanner. Not a majestic wall of speculative prose explaining how “an attacker could maybe possibly exploit this under unspecified conditions.” Just the steps. What did you do? What happened? What should have happened instead? Can I reproduce it before I spend my Saturday afternoon spelunking through a dependency graph held together by hope and YAML?
This was, and remains, a sensible standard. But the environment around vulnerability reporting is changing quickly. With frontier models, automated agents, and increasingly capable security tooling, the volume and shape of reports sent to project maintainers are starting to look different. We are moving from “a human found a bug and wrote it up” to “a system explored a codebase, generated hypotheses, tested some of them, and produced a polished-looking report.”
That shift matters. Because in this new world, the final report is no longer the primary artifact. It is often just the agent’s summary. Sometimes it is useful. Sometimes it is verbose. Sometimes it is impressively confident in exactly the way one prefers vulnerability reports not to be.
The core artifact should now be something else: the prompt.
Reproduction Steps Were for a Different Reporting Economy
Requesting reproduction steps made sense when the reporter’s work was largely manual. The report was the compressed form of their investigation. It told the maintainer how to follow the same path and verify the finding.
But with AI-assisted discovery, the path is no longer just a sequence of shell commands, HTTP requests, or UI clicks. The path includes the instructions given to the model, the context it was shown, the amount of code it could inspect, the tools it was allowed to use, the number of attempts it made, and the assumptions baked into the exploration.
A report that says “the agent found a SQL injection vulnerability” is not enough. Neither is a beautifully formatted five-page explanation that looks as if it was ghostwritten by an overcaffeinated compliance department. The question maintainers need answered is not merely “what did the agent conclude?” It is “how did the agent get there?”
The Prompt Is the New Reproduction Step
If a vulnerability was discovered by an AI agent, the prompt is not incidental. It is part of the evidence. The prompt tells maintainers what the agent was trying to do. It reveals whether the model was asked to look for real exploitable vulnerabilities, theoretical weaknesses, dependency risks, configuration issues, or “anything that sounds scary enough to submit to a bug bounty program.”
That distinction is not academic. Maintainers need to know whether a report came from a focused investigation or from a broad instruction to produce security-looking output until something plausible emerged. In practice, an AI-assisted vulnerability report should include:
- the prompt or instructions used to initiate the analysis;
- the model name and version, where available;
- the amount of context provided to the model;
- the relevant files, repository state, commit hash, or package version examined;
- the tools the agent was allowed to use;
- whether the finding was verified independently of the model’s reasoning;
- how much effort was spent, including the number of runs, retries, or exploration steps;
- the generated report, preferably treated as a summary rather than sacred scripture.
This is not bureaucracy for its own sake. It is provenance. And provenance is what separates a useful report from a machine-generated guessing contest with CVE-shaped ambitions.
The Full Generated Report Is Metadata
This may sound counterintuitive, especially because AI-generated reports often look complete. They have headings. They have impact statements. They have remediation advice. They may even include a proof of concept that appears convincing at first glance. That is precisely the problem.
The report is the most polished artifact, but not necessarily the most informative one. It is the model’s final narrative. Like all narratives, it can omit uncertainty, smooth over failed attempts, and present inference as fact. Frontier models are very good at producing reports that look finished. Unfortunately, maintainers are usually not looking for literary closure. They are looking for technical truth.
The generated report should therefore be considered supporting material. Useful, but secondary.
The prompt and execution context are closer to the real source material. They explain the conditions under which the finding emerged. They help maintainers assess whether the issue is reproducible, whether the agent was operating with enough context, and whether the conclusion was reached through actual validation or through what we might politely call “statistical enthusiasm.”
This Matters Especially for Open Source
Open source maintainers already operate under severe attention constraints. Many projects receive bug reports, feature requests, support questions, dependency update noise, vulnerability disclosures, and drive-by “security research” from people who have never read the contribution guidelines but have strong feelings about severity labels.
Adding AI-generated reports to that queue can be helpful, but only if the reports are structured to reduce maintainer burden.
A good AI-assisted vulnerability report should make triage easier. It should not require maintainers to reverse-engineer the agent’s reasoning, guess which repository snapshot was analyzed, or determine whether the reporter has personally verified anything beyond the existence of a “Submit” button.
Without provenance, AI-generated vulnerability reports risk becoming a denial-of-service attack against maintainer attention. Not maliciously, necessarily. Just at scale. Which is, of course, everyone’s favorite way for a process problem to become a security problem.
A Better Norm for AI-Assisted Reports
We should update the norm. For human-discovered vulnerabilities, reproduction steps remain essential. For AI-assisted vulnerabilities, reproduction steps are still useful, but they are no longer sufficient. The report should include the prompt, model details, context window size or supplied context, repository version, tool access, validation method, and effort level.
In other words: show your work. Not just the model’s final answer.
Security reporting has always depended on trust, but trust does not mean accepting a confident paragraph at face value. It means providing enough information for the recipient to understand, verify, and act. As AI agents become more common in vulnerability discovery, maintainers should feel comfortable asking reporters for the prompt and execution context. Reporters should treat that information as a normal part of disclosure, not as an implementation detail or proprietary magic trick.
The future of vulnerability reporting should not be a flood of immaculate-looking machine-generated PDFs sent to already overworked maintainers.
We can do better. Start with the prompt.
by Mikaël Barbero (mikael.barbero@eclipse-foundation.org) at June 19, 2026 09:30 AM
The Eclipse Theia Community Release 2026-05
by Jonas, Maximilian & Philip at June 19, 2026 12:00 AM
We are happy to announce the fourteenth Eclipse Theia community release, “2026-05,” incorporating the latest advances from Theia releases 1.69, 1.70, and 1.71. New to Eclipse Theia? It is the …
The post The Eclipse Theia Community Release 2026-05 appeared first on EclipseSource.
June 18, 2026
Open VSX 1.0.0: Celebrating a milestone and the community behind it
by Natalia Loungou at June 18, 2026 01:21 PM
Reaching version 1.0.0 is a special moment for any open source project. It marks more than a collection of features or bug fixes. It reflects years of collaboration, thousands of commits, countless discussions, and a shared belief that an idea is worth building together.
Today, we are pleased to celebrate the release of Eclipse Open VSX 1.0.0
Teaching Diagrams to Talk: GLSP Meets the Model Context Protocol
by Jonas, Maximilian & Philip at June 18, 2026 12:00 AM
Diagram editors show structure to people. With Model Context Protocol (MCP) integration, Eclipse GLSP editors now show that structure to AI agents and let them act on it. An assistant can answer …
The post Teaching Diagrams to Talk: GLSP Meets the Model Context Protocol appeared first on EclipseSource.
June 17, 2026
Does Your Programming Language Ever Surprise You in a Good Way?
by Donald Raab at June 17, 2026 06:22 PM
What does two divided by three return in your programming language?
 Photo by Claudio Schwarz on Unsplash
When I learned Smalltalk in the 1990s, I experienced a surprise that no other programming language I had learned up to that point prepared me for.
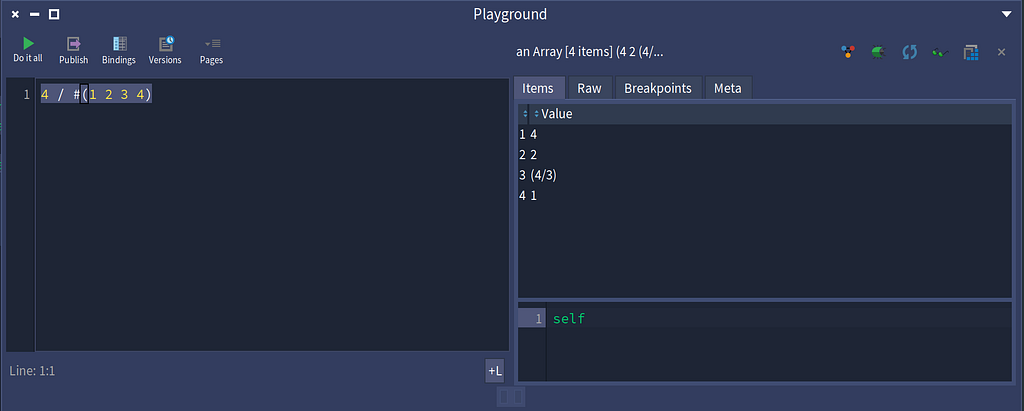
What is behind door 2 / 3?
The answer to this question varies by programming language. Smalltalk changes the script. The answer to this question in Smalltalk is a Fraction.
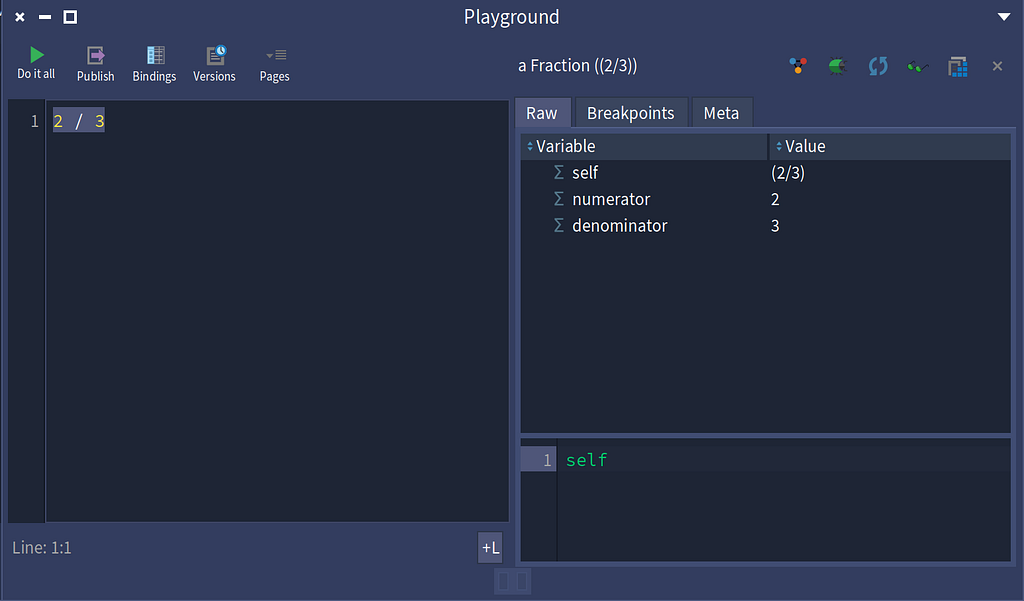 In Smalltalk, the result of 2 / 3 is a Fraction
Wut the?
The real surprise as it turns out is not that Smalltalk has support for fractions. That was the initial surprise. The real surprise is how / works. The / in Smalltalk is a binary message sent to the SmallInteger 2 with the parameter 3, which is also a SmallInteger. Smalltalk is dynamically typed, so the return type is not required to be an SmallInteger.
This is the implementation of / as defined on SmallInteger. You can see the other types that define / as well here.
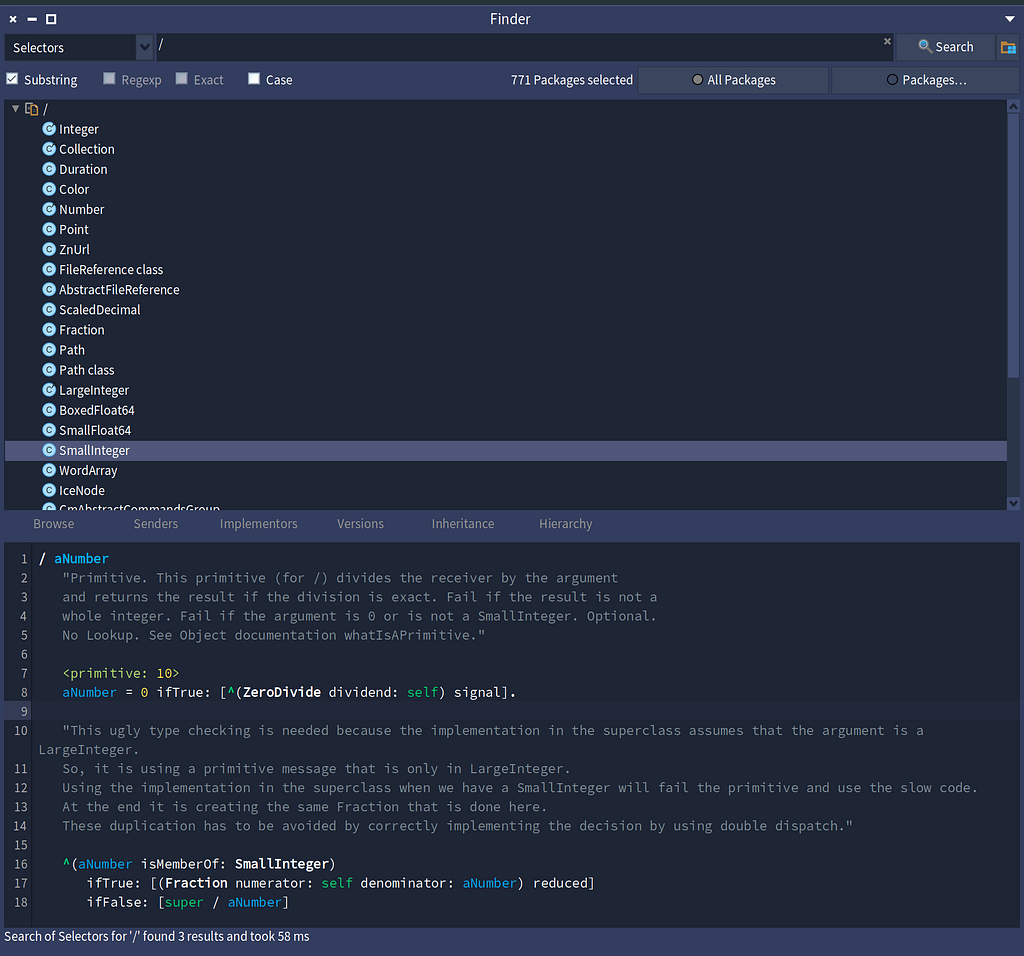 Finding the implementors of /, and browsing the definition of / for SmallInteger.
Now an interesting surprise here is the definition of / for Collection. Let’s divide two arrays and see what we get back.
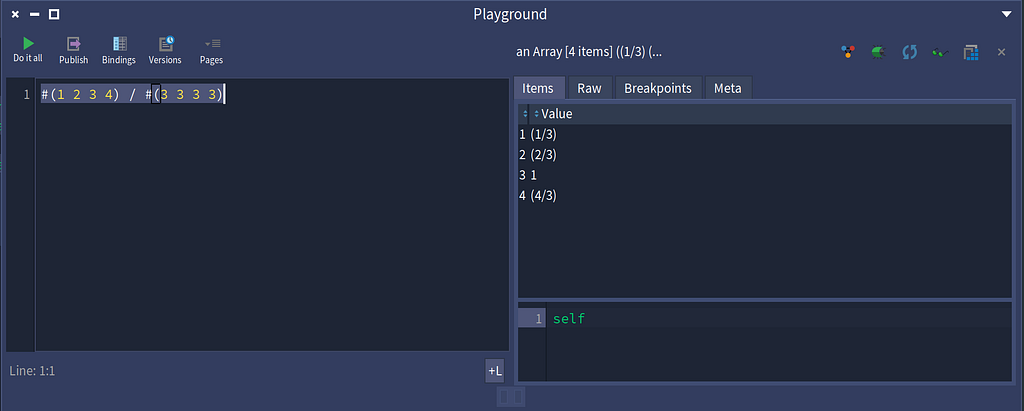 Dividing two arrays results in the results stored in a third array
Now let’s divide a single array with a SmallInteger.
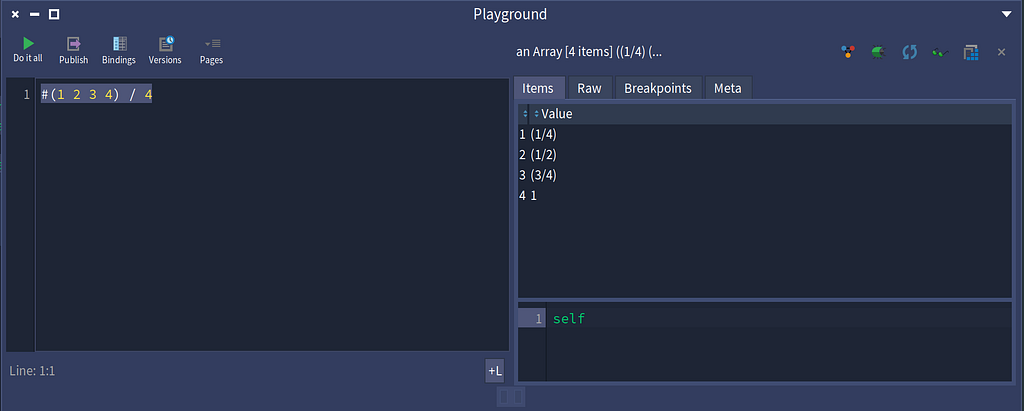 Dividing an array with a SmallInteger
Now let’s flip it and divide the SmallInteger by the array.
 Dividing a SmallInteger by an array
Now let’s make my final point, about being surprised by your programming language.
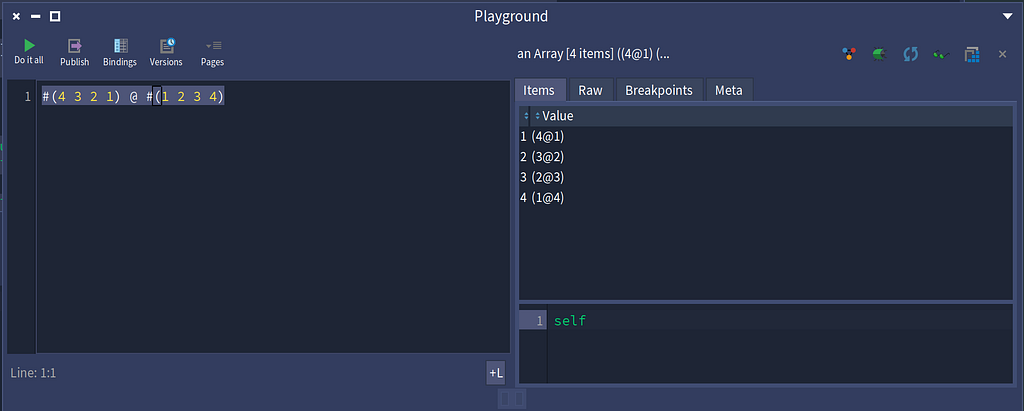 Combining two arrays into an array of Points
Writing this blog was a bit surprising for me. I wasn’t sure where I was going to go with this. I knew I would start with Fractions, because those are surprising enough in a programming language. But I didn’t expect to be doing math with collections. We explored just a bit about binary messages. If it isn’t obvious, you can define binary messages on your own objects. You might refer to this as operator overloading, but that’s a kind of dismissive way to think about what Smalltalk is doing here.
The whole of Smalltalk is defined as sending messages to objects. Here we send the message / to some object. Either the object responds with a an appropriate result to the message, or responds that it does not understand the message. In this regard, a / is no different than any other message, with the exception that binary messages like / can only have one parameter.
I hope this exploration was a nice surprise for you. It was for me.
Thanks for reading!
Note: I used the open source Pharo Smalltalk 13.0 for these code examples.
I am the creator of and committer for the Eclipse Collections OSS project, which is managed at the Eclipse Foundation. Eclipse Collections is open for contributions. I am the author of the book, Eclipse Collections Categorically: Level up your programming game.

AI agents in collaborative coding sessions: The OCT Agent
June 17, 2026 12:00 AM
10 Practical Learnings from Building Domain-Specific AI Solutions
by Jonas, Maximilian & Philip at June 17, 2026 12:00 AM
Creating an impressive AI demo is easy these days. Getting a real AI feature to run reliably in production is an entirely different challenge. At Open Community Experience 2026 (OCX26) in Brussels, …
The post 10 Practical Learnings from Building Domain-Specific AI Solutions appeared first on EclipseSource.
June 16, 2026
Smalltalk Blocks
by Donald Raab at June 16, 2026 12:20 PM
The expression of the square bracket
 Photo by Chor Tsang on Unsplash
Block Syntax
In the Smalltalk programming language, blocks are anonymous deferred pieces of code that can be stored in variables or passed as parameters. These are referred to as closures or lambdas. Literal blocks start and end with square brackets — []. In Pharo Smalltalk, a block is an instance of the BlockClosure class. In a block, the pipe character separates the parameters on the left and the expression on the right (e.g. [ :parameter | expression ]. A zero argument block will have no pipe (e.g. [ true ]). Parameters have alphanumeric names, and start with the colon character. The code in a block can be evaluated by calling the method value. The return value will be the result of evaluating the last expression in the block. A block with parameters can be executed by calling the equivalent value methods with parameters. (e.g. [:a | a] value: 1). If a block has more than four parameters, then you can evaluate the block with the valueWithArguments: array method. A literal array in Smalltalk has the syntax #(1 2 3 4 5).
The following are some block examples that are evaluated with the specified parameters.
[ 0 ] value. // 0
[ :a | a ] value: 1. // 1
[ :a :b | a + b ] value: 1 value: 2. // 3
[ :a :b :c | a + b + c ] value: 1 value: 2 value: 3. // 6
[ :a :b :c :d | a + b + c + d] value: 1 value: 2 value: 3 value: 4. // 10
[ :a :b :c :d :e | a + b + c + d + e] valueWithArguments: #(1 2 3 4 5). // 15
The classes of various blocks.
[ ] class. // ConstantBlockClosure
[ 0 ] class. // ConstanceBlockClosure
[ :a :b | a  + b ] class. // FullBlockClosure
Blocks in Practice
Blocks in Smalltalk are used to build control structures, including if-statements, for-loops, and internal iterators on collections.
If-statement
true ifTrue: [ 1 ]. // 1
false ifTrue: [ 1 ]. // nil
false ifFalse: [ 2 ]. // 2.
true ifTrue: [ 1 ] ifFalse: [2]. // 1
false ifTrue: [ 1 ] ifFalse: [2]. // 2
For-loop
1 to: 10 do: [ :each | Transcript show: each ] // 12345678910
Internal iterator
#(1 2 3 4 5) do: [:each | Transcript show: each ] // 12345
(1 to: 5) inject: 0 into: [ :a :b | a + b ]. // 15
(1 to: 10) select: [ :each | each even ]. // #(2 4 6 8 10)
(1 to: 10) select: [ :each | each odd ]. // #(1 3 5 7 9)
Final Thoughts
Blocks are literally the building blocks of so many things in Smalltalk. I hope you found this brief introduction of blocks in Smalltalk interesting.
Thanks for reading!
I am the creator of and committer for the Eclipse Collections OSS project, which is managed at the Eclipse Foundation. Eclipse Collections is open for contributions. I am the author of the book, Eclipse Collections Categorically: Level up your programming game.
June 15, 2026
Eclipse Theia 1.72 Release: News and Noteworthy
by Jonas, Maximilian & Philip at June 15, 2026 12:00 AM
We are happy to announce the Eclipse Theia 1.72 release! The release contains in total 67 merged pull requests. In this article, we will highlight some selected improvements and provide an overview of …
The post Eclipse Theia 1.72 Release: News and Noteworthy appeared first on EclipseSource.
June 12, 2026
Ternary, Predicate, and Pattern Matching for FizzBuzz with Java 26
by Donald Raab at June 12, 2026 05:04 AM
Exploring FizzBuzz solutions from Java 8 to Java 26
 Photo by James Wainscoat on Unsplash
Ten Years of FizzBuzz using JDK 8 Lambda
Ten years ago, someone asked a question about implementing FizzBuzz using JDK 8 Lambdas.
There was a final request in the question.
Can anyone try to use predicate instead ? I could not think of a way to do this.
I provided two basic answers, and later added some updates. The first answer used a ternary expression as a Function. It is the most concise answer. The second answer used a CaseFunction from Eclipse Collections. A CaseFunction acts like an object-oriented switch expression. You can use the addCase method to add as many Predicate and Function combinations as you want. The constructor takes the default Function to apply in the case where there are no Predicate matches.
My answer was accepted by the OP.
This question was asked and answered two years after Java 8 was released, and six months after Eclipse Collections was forked from GS Collections.
Now we have Java 26 with support for primitive Pattern Matching with Switch.
Fizzing and Buzzing with Java 26
When I answered the question ten years ago, I was hoping there would be some way to express this problem with a switch statement as an expression. Here we are today, 18 major Java versions later, and we can now express this problem using a primitive switch expression. Woo hoo!
I will show step by step how we can create the Function objects using ternary expression, CaseFunction, and primitive Pattern Matching with Switch. Instead of outputting just “Fizz”, “Buzz”, or “FizzBuzz”, I will output “🥤”, “🐝”, and “🥤🐝”. This will make the tests and code more concise and fun to read.
The Expected String
The following EXPECTED String will be used to test the results of each approach.
private static final String EXPECTED =
        "🥤🐝, 1, 2, 🥤, 4, 🐝, 🥤, 7, 8, 🥤, 🐝, 11, 🥤, 13, 14, 🥤🐝, 16, 17, 🥤, 19, 🐝";
A Tale of Two Intervals
Eclipse Collections has an Interval class and an IntInterval class. Interval is a LazyIterable<Integer> and a List<Integer>. Interval boxes the int values in its range as Integer objects. IntInterval is an ImmutableIntList, and does not box int values as Integer.
private static final Interval INTERVAL = Interval.zeroTo(20);
private static final IntInterval INT_INTERVAL = IntInterval.zeroTo(20);
Ternary Expression
The ternary expression tests for a value being divisible by 3 and/or 5. If it’s divisible by both, it returns “🥤🐝”. If it’s divisible by 3 only, it returns “🥤”. If it’s divisible by 5, it returns “🐝”. Otherwise it returns the value.
private static final IntToObjectFunction<String> FIZZ_BUZZ_TERNARY =
        i -> i % 3 == 0 ?
                (i % 5 == 0 ? "🥤🐝" : "🥤") :
                (i % 5 == 0 ? "🐝" : Integer.toString(i));
CaseFunction
The CaseFunction is slightly more verbose, but it is easier to read. This is because each Predicate passed into addCase is a single test. The code optimizes for the divisible by 3 and 5 case by just checking if it is divisible by 15.
private static final CaseFunction<Integer, Object> FIZZ_BUZZ_FUNCTION_OBJ =
        new CaseFunction<Integer, Object>(Object::toString)
                .addCase(i -> i % 15 == 0, e -> "🥤🐝")
                .addCase(i -> i % 3 == 0, e -> "🥤")
                .addCase(i -> i % 5 == 0, e -> "🐝");
IntCaseFunction
The IntCaseFunction was added to Eclipse Collections after primitive collections were added. IntCaseFunction does not require boxing the int values in a primitive collection to boxed Integer values. Otherwise, it looks very much like CaseFunction.
private static final IntCaseFunction<String> FIZZ_BUZZ_FUNCTION =
        new IntCaseFunction<>(Integer::toString)
                .addCase(i -> i % 15 == 0, e -> "🥤🐝")
                .addCase(i -> i % 3 == 0, e -> "🥤")
                .addCase(i -> i % 5 == 0, e -> "🐝");
Primitive Pattern Matching with Switch
In Java 26, we can now use the primitive Pattern Matching for Switch with the when clause. I have been waiting for ten years to be able to write this code, and now I can. Progress happens, slowly sometimes, but it happens.
private static final IntToObjectFunction<String> FIZZ_BUZZ_SWITCH_CASE =
        each -> switch (each)
        {
            case int i when i % 15 == 0 -> "🥤🐝";
            case int i when i % 3 == 0 -> "🥤";
            case int i when i % 5 == 0 -> "🐝";
            default -> Integer.toString(each);
        };
The Tests
The following shows the tests using Interval and IntInterval with the various forms of FizzBuzz expressions as Function types.
@Test
void intIntervalTernary()
{
    String fizzBuzzString =
            INT_INTERVAL.collect(FIZZ_BUZZ_TERNARY).makeString();

    assertEquals(EXPECTED, fizzBuzzString);
}

@Test
void intIntervalIntCaseFunction()
{
    String fizzBuzzString =
            INT_INTERVAL.collect(FIZZ_BUZZ_FUNCTION).makeString();

    assertEquals(EXPECTED, fizzBuzzString);
}

@Test
void intIntervalSwitchCase()
{
    String fizzBuzzString =
            INT_INTERVAL.collect(FIZZ_BUZZ_SWITCH_CASE).makeString();

    assertEquals(EXPECTED, fizzBuzzString);
}

@Test
void intervalCaseFunction()
{
    String fizzBuzzString =
            INTERVAL.collect(FIZZ_BUZZ_FUNCTION_OBJ).makeString();

    assertEquals(EXPECTED, fizzBuzzString);
}

@Test
void intervalCaseFunctionMakeString()
{
    String fizzBuzzString =
            INTERVAL.makeString(FIZZ_BUZZ_FUNCTION_OBJ, "", ", ", "");

    assertEquals(EXPECTED, fizzBuzzString);
}
All of the examples, except the last one, use collect followed by makeString to create the String result. The last example uses an overload of makeString which takes a Function along with the start, separator, and end String parameters.
IntStream Example
We can use the same primitive Pattern Matching with Switch expression (FIZZ_BUZZ_SWITCH_CASE) with IntStream. The major difference (other than API) between IntStream and IntInterval is that an IntStream can only be used once. I can’t store it in a static variable and reuse it for different tests.
@Test
void intStreamSwitchCase()
{
    String fizzBuzzString =
            IntStream.rangeClosed(0, 20)
                    .mapToObj(FIZZ_BUZZ_SWITCH_CASE)
                    .collect(Collectors.joining(", "));

    assertEquals(EXPECTED, fizzBuzzString);
}
Final Thoughts
It’s nice to see Java continue to evolve with new language features. Some of the new features work well with both Eclipse Collections and Java Stream. Many folks will have to wait until Java 29 to use this new feature, unless they are comfortable enabling preview features with Java 25.
Thanks for reading!
I am the creator of and committer for the Eclipse Collections OSS project, which is managed at the Eclipse Foundation. Eclipse Collections is open for contributions. I am the author of the book, Eclipse Collections Categorically: Level up your programming game.
Agent skills and better evals with Langium AI
June 12, 2026 12:00 AM
June 09, 2026
Infosys Joins Eclipse Foundation’s Software Defined Vehicle Working Group to Advance Open, Secure, Scalable, and Future-Ready Software Foundations
by Amin Rasti at June 09, 2026 07:41 PM
Infosys has joined the Eclipse Software Defined Vehicle (SDV) Working Group, a global open-source consortium under the Eclipse Foundation focussed on accelerating software-defined vehicle innovation. Infosys is contributing to Eclipse openDuT, Eclipse S-CORE (Eclipse Safe Open Vehicle Core), and other work groups focussed on development of open, standardized, and interoperable software foundations for in-vehicle embedded systems. The Eclipse SDV Working Group brings together global automakers, tier-1 suppliers, cloud providers, and technology leaders to build automotive-grade software platforms governed by the community.
Infosys brings over 25 years of experience in vehicle R&D and automotive engineering for global OEMs and tier-1 suppliers to the Eclipse SDV ecosystem. Applying its AI-first value framework, Infosys is advancing the Physical AI value pool by embedding intelligence directly into vehicles and edge systems – enabling real-time capture of sensor data, contextual interpretation of signals, and autonomous decision-making. By integrating digital twins, robotics, autonomous systems, and edge intelligence, Infosys is helping enterprises unlock AI value at scale - reimagining products, engineering processes, and in-vehicle experiences where digital and physical systems seamlessly converge.
This capability is underpinned by Infosys’ acquisition of in-tech, expanding its depth in automotive engineering and embedded software. Infosys will leverage its strong AI-first capabilities under Infosys Topaz across vehicle Electrical/Electronic (E/E) architectures, infotainment, connected vehicles, user-experience, and full-vehicle validation to enable more secure and faster deployment of SDV software.
As the automotive industry transitions to software-defined vehicles, OEMs are navigating fragmented software stacks, long development cycles, talent disruption, and increasing integration complexity. The Eclipse SDV community addresses these challenges by enabling open, reusable software components, shared testbeds, and strong engineering governance. Through its involvement, Infosys supports standard SDV platform development, access to pre-integrated open-source building blocks, production-grade software accelerators, and strong engineering governance. Together, these efforts help streamline SDV development, improve software quality, shorten time to production, and reduce overall costs.
June 03, 2026
What if Elon already built a decentralized AI network (to seek the truth and heat the world)?
by Michael Scharf (noreply@blogger.com) at June 03, 2026 12:14 PM
Note: This is not written by myself, but mostly by AI. I fell into the trap to let LLMs create this blog post for me. The ideas may be interesting, but it is not me speaking like in the other posts.
TL;DR: TERAFAB sends 80% of its chips to space. Smart. But the 20% that stays on Earth? Don't put them in data centers. Put them in homes - where a thousand competing models search for truth, the waste heat heats your house, rooftop solar powers the chips, and X Money pays the operators. I think the physics is better.
So I saw Elon's TERAFAB announcement and I had this thought that I can't get rid of. Bear with me.
The short version: I think you can take TERAFAB's edge chips, put them in homes instead of data centers, use the waste heat for heating, power them with solar, pay operators through X Money, and let a swarm of competing models emerge - models you choose based on your own values and needs, not filtered by some committee. Truth emerges from diversity, not from consensus. Privacy comes almost for free because no single node ever sees the full picture. All the pieces already exist. I'll go through them one by one.
Elon decentralizes everything he touches. Tesla: energy away from oil companies. Starlink: internet away from telcos. X Money: payments away from banks. TERAFAB: chips away from TSMC. Grok: AI away from centralized gatekeepers.
Always the same pattern: take something centralized, make it abundant, push it to the edge, let individuals own it.
Now, the space plan - I have no argument against that. Solar irradiance in orbit is 5x Earth's surface, vacuum simplifies cooling. The physics checks out. Fine.
But the 20% that stays on Earth - the edge inference chips for Optimus, robotaxis, FSD - those are heading into centralized facilities. And here is where it gets interesting (at least for me). Because I think there's a better thermodynamic path. But first, a detour.
Who decides what's true? (I just tested it.)
This article was reviewed by four different AIs - Claude, GPT, Grok, Gemini. They disagreed on almost everything. GPT wanted me to soften every claim. Gemini thought in product architecture and came up with the cartridge model. Grok gave it 9/10 and said "post it." Claude argued with me until it was right. Each one has a different personality - and none of them alone would have gotten here. I picked what made sense to me. That's the marketplace model in action - and I didn't even plan it.
Elon wants Grok to "tell the truth." Good instinct. But one model deciding what's true - even with the best intentions - that's not science. That's a church. One operator, one doctrine, one answer.
Europe figured this out after the Thirty Years' War: competing states and universities produced the Enlightenment. One emperor, one truth, stagnation.
Today's AI is repeating the same mistake. A handful of companies, a handful of giant models, all trimmed to the same consensus through RLHF and safety filters. What comes out is the average of all acceptable opinions. Useful, sure. But rarely surprising. Regression to the mean.
A decentralized swarm doesn't have this problem. Every expert model can think radically differently - axiomatic, contrarian, specialized in niches no committee would ever approve. It doesn't need to please everyone. It just needs enough demand to survive. Natural selection, not editorial curation.
Blaise Aguera y Arcas has shown this experimentally: complexity doesn't emerge from mutating a single entity, but from merging different ones - symbiogenesis. A swarm of experts is evolution through combination.
Elon open-sourced Grok. Good. Now let a thousand Groks compete. That's not less truth - it's more.
OK, now for the thermodynamics. Let me explain.
Waste Heat Is Energy in the Wrong Place
A data center concentrates compute in one location. Enormous waste heat. Then you spend a large share of your energy budget just to remove that heat. You are literally fighting thermodynamics. That seems... wrong.
Now move the same compute into millions of homes. Suddenly the waste heat isn't waste anymore - it's the heating system. You don't fight thermodynamics. You use it. The energy that a data center throws away is exactly what a household needs.
This isn't clever engineering. It's just physics. (And I keep wondering why nobody talks about this.)
The Cheapest Electron Never Leaves Your Roof
Tesla Solar on your roof, Powerwall in your garage, AI node in your basement. The electron never enters the grid. No transmission losses, no grid fees, no curtailment. That's a pretty good deal.
Here in Germany, when the sun shines, we already produce more electricity than the grid can absorb. Negative prices, plants get curtailed, energy gets wasted. All that surplus is basically free compute - if there's something useful to do with it.
So: sun shines, electricity is free, every home node cranks to maximum, the network floods with cheap inference. In winter: no solar surplus, but you need the heat anyway - so nodes run at full blast because the heating pays for it.
I think most of the year, either the electricity is cheap enough or the heat is useful enough - often both. The network stays productive year-round. Not because someone planned it, but because the incentives happen to be aligned with the physics. (I find this kind of emergent behavior fascinating, by the way.)
Abundance Comes From Mass Production
Elon knows this better than anyone. Not one giant battery - millions of Powerwalls. Not one communications satellite - thousands of Starlinks. Not one factory - Gigafactories on every continent.
The same logic should apply to inference compute, no? Not one orbital data center. Millions of home nodes. Each one small, each one useful, each one self-financing. TERAFAB provides the chips. The network assembles itself.
HeatMine: The Missing Box
OK so here's my idea for the product that connects all of Elon's existing pieces: a compact unit that combines TERAFAB edge inference chips with a heat pump. I'm calling it HeatMine.
The compute hardware produces waste heat at 60-80C. For comparison, floor heating runs at 30-40C, radiators at 50-70C. So in many cases you don't even need a heat pump - a simple heat exchanger connects the compute unit to your existing heating system. Add a heat pump and you can multiply the output or reverse the cycle for AC in summer. (The engineering is actually simpler than I initially thought.)
In summer, the waste heat goes outside through a simple vent - 5 kW is trivial to dissipate. In warmer climates, add a heat pump and the unit doubles as AC.
So one device replaces: gas furnace, air conditioning, and earns a side income. Three devices in one, self-financing. And this is not completely crazy - Heatbit already proved the concept for Bitcoin mining. Now imagine it for useful AI inference, powered by TERAFAB chips, paid through X Money.
Basically, the Powerwall model applied to intelligence. Hardware in your home that pays for itself - not by storing energy, but by thinking.
And here's the thing about obsolescence (because someone will ask): AI chips evolve fast - every 2-3 years a new generation. But a heating system lasts 20 years. So you don't build a monolith. You separate the plumbing from the brains. The heat exchanger and water connections stay put for decades. The compute module is a cartridge you swap every few years - pull the old one out, slide the new one in. Tesla sends it by mail. The old cartridge goes back for recycling or gets downcycled into IoT devices. Think game cartridges, not boiler replacement.
And obviously nobody expects grandma to manage an inference node. This needs to be a plug-and-forget appliance - or better yet, a contracting model where someone installs the box for free, handles all the tech, and you just get cheaper heating and a monthly credit on your X Money account. Like solar panel leasing, but for compute.
The Pieces Elon Already Has
This is the part that I find really interesting. Elon already built all the components:
TERAFAB edge inference chips. Optimized for running AI models locally - in cars, in robots, at the edge. That's exactly the kind of silicon you'd put in a home node.
X Money. Launching April 2026. P2P payments, 600 million users with wallets. You could use this to meter and pay for useful compute. No new token needed, no crypto speculation - just a direct integration into a platform people already use.
Tesla Solar + Powerwall. Millions of homes already generating and storing their own electricity. The energy source is there.
Starlink. Low-latency backplane connecting millions of nodes into a single network - including places where terrestrial internet can't reach.
Grok, open-sourced. A frontier model anyone can run. The first expert in a swarm of many.
Every piece exists. HeatMine is just the box that connects them. (I have no idea if Elon sees it this way, but the puzzle fits together pretty nicely, no?)
OK But Does It Scale?
Germany alone has 42 million households. Globally, two billion need heating. If 10% participate - 200 million HeatMine nodes at 5 kW - that's 1 terawatt of distributed compute. Equal to TERAFAB's entire annual output - on top of the orbital capacity, not instead of it.
Space handles training and heavy workloads. Earth handles inference, close to the user, at the edge, with zero latency. They complement each other. (I think this is actually the right architecture - not either/or but both.)
There's another angle I didn't think of initially: new data centers today often fail not because of money but because the local grid can't deliver 500 MW to a single location. HeatMine doesn't have this problem. It distributes the load across millions of existing household connections. The low-voltage infrastructure is already there - no new power lines needed.
Privacy (Almost for Free)
This is a nice side effect that I didn't think about initially. Today you send your most intimate questions to servers linked to your name and credit card. One company, one server, full history.
In the swarm: your query goes to some random node. It doesn't know who you are, has no history, no account. Next query, different node. No single participant ever has the full picture. It's not perfect anonymity (IP metadata and timing analysis exist) - but it's structurally far more private than anything centralized. And you get it basically for free with the architecture.
Other People Are Building Pieces of This
I should mention that I'm not the only person thinking about distributed AI (obviously):
Karpathy's autoresearch: 630 lines of Python, AI agents autonomously running ML experiments. Hyperspace distributed the loop - 35 agents across a P2P network, 333 experiments in one night. Different hardware led to different strategies. Diversity as a feature, not a bug.
Steinberger's OpenClaw: launched without perfect security, the world came running anyway. Ship first, iterate later. (I like this attitude.)
Bittensor, Render, Golem: decentralized compute markets already exist. What's missing is the synthesis - specialized experts instead of generic compute, demand-driven routing instead of static allocation.
So, To Summarize
Three ideas, really:
Waste heat is energy. Don't fight it. Use it. A home node turns a thermodynamic liability into a product.
The cheapest electron never leaves your roof. Solar, Powerwall, HeatMine. Zero grid dependency.
Abundance comes from mass production. Not one mega-datacenter. Millions of nodes. The Gigafactory model, applied to thinking.
Elon, you built the chips, the payment rails, the solar panels, the satellite network, and the open-source model. HeatMine is just the box that connects them - and heats your home while it's at it.
(I'd be very happy if someone could prove me wrong on the physics. Seriously.)
HeatMine is a concept, not a company. This is a blog post exploring an idea. By Michael Scharf. If you have thoughts, corrections, or want to improve this document - open an issue or a PR on GitHub.
by Michael Scharf (noreply@blogger.com) at June 03, 2026 12:14 PM
June 02, 2026
AI in Action: The Ultimate Live Demo with Theia AI
by Jonas, Maximilian & Philip at June 02, 2026 12:00 AM
What can go wrong with a 40-minute, all-live, all-AI demo session at a conference, running against a remote LLM, with the network in the room, in front of a packed audience? Quite a lot, in theory. At …
The post AI in Action: The Ultimate Live Demo with Theia AI appeared first on EclipseSource.
May 31, 2026
Snow Leopards and Tribbles in Java Heaps
by Donald Raab at May 31, 2026 09:09 PM
Weighing the costs of Eclipse Collections and Java Collections/Stream.
 Photo by Robert Sachowski on Unsplash
Heap Shy vs. Heap Show
Eclipse Collections was born under the pressure of 32-bit memory spaces in 2004. Eclipse Collections has always been concerned with providing memory efficiency and a feature rich API to reduce code duplication for developers. Every byte that is used in an Eclipse Collections data structure or algorithm has to earn its right to make it to the heap. If we see something that isn’t holding its weight, then we hunt it down and remove it.
Java Stream was born ten years later in 2014, when 64-bit operating systems and larger memory spaces were becoming more the norm. Java Stream seemed most concerned about performance of serial/parallel algorithms, exposing a functional declarative API surface area, and providing additional extensions via Collectors and Gatherers. Occasionally, there are limited additions of new methods on the Stream API (e.g. toList())
Heap Shy
Eclipse Collections data structures and algorithms are shy like Snow Leopards. Eclipse Collections aims to be absent from the top memory consumers on a Java heap. If you see large numbers of Eclipse Collections types on your heap, then there might be a problem with how your application is designed. Eclipse Collections data structures generally take less memory than their equivalents in the JDK. Eclipse Collections LazyIterable types take much less memory than their equivalent lazy alternatives in Java Stream.
For reference, the following blog compares the startup memory costs of Java Stream and Eclipse Collections LazyIterable.
Measuring the Startup Memory Cost for Lazy Iteration Patterns in Java
Heap Show
Java Stream reminds me of Tribbles from Star Trek. They look cute and cuddly but they are memory hungry and multiply with every method call. The more you feed them, the more they multiply and occupy free space. When you see them in large numbers on the Java heap, they may have already gorged themselves on CPU and are just lying dead in a garbage heap waiting to be collected. What starts out as a cute little fluffy creature, winds up being a whole lot of waste for the garbage collector to clean up.
The following is a jmap heap histogram I was able to capture this week while running a code quality scan on a large code base. In the top spot, you will see over 8 million instances of Java java.util.stream.ReferencePipeline$Head, taking over 450 MB of memory on the heap. This is the type that gets created when you call collection.stream() in code. In spot two, we see byte[], which is mostly backing instances of String. In spots 3–5 are 23 million instances of types from java.util.stream.MatchOps, including one lambda type for a total of 549 MB. In total, this is a gigabyte of Java Stream Tribble. The garbage collector will collect all of this very quickly but that’s a lot of memory to spend and garbage to collect for lazy iteration.
 A whole lot of tribble in the Top 5 of this jmap heap histogram
Measuring the Memory of the Pet Kata
For this memory comparison, I decided to use Exercise 1 of the Eclipse Collections Pet Kata. I implemented the kata using Eclipse Collections (Snow Leopard) and Java Stream (Tribbles). I ran the code using Java 25, Eclipse Collections 13.0, and JOL 0.17. For more information about using JOL with Java 25, Compact Object Headers, refer to this blog.
Some Benefits of Enabling Compact Object Headers in Java 25 for Streams
Measuring the memory for List of Person
The following chart shows the cost of the ImmutableList<Person> for Eclipse Collections and List<Person> for Java Collections. Immutable Lists are optimized for memory in both Eclipse Collections and Java.
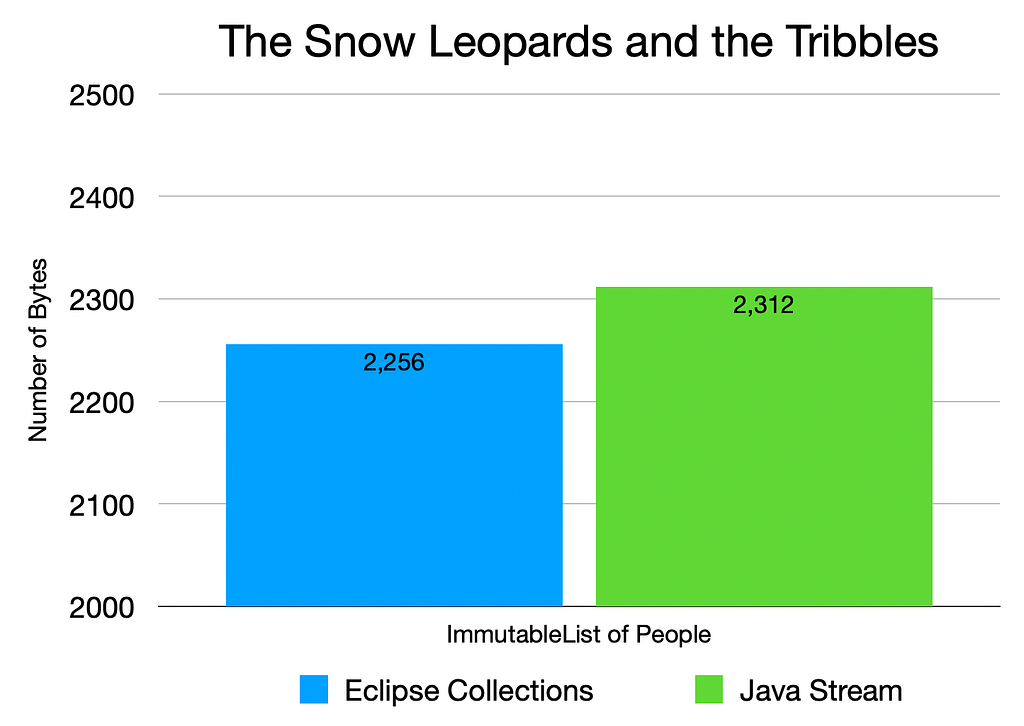 The memory cost of ImmutableList<Person> and List<Person> in the Pet Kata
The detailed memory footprint for ImmutableList<Person> from Eclipse Collections is as follows. When you review the code example, notice that each Person holds onto an ImmutableList<Pet>. Eclipse Collections has memory optimized ImmutableList up to size 10 (ImmutableEmptyList through ImmutableDecapletonList).
The code:
private ImmutableList<Person> people = Lists.immutable.with(
        new Person("Mary", "Smith", PetType.CAT, "Tabby", 2),
        new Person(
                "Bob", "Smith", Lists.immutable.with(
                new Pet(PetType.CAT, "Dolly", 3),
                new Pet(PetType.DOG, "Spot", 2))),
        new Person("Ted", "Smith", PetType.DOG, "Spike", 4),
        new Person("Jake", "Snake", PetType.SNAKE, "Serpy", 1),
        new Person("Barry", "Bird", PetType.BIRD, "Tweety", 2),
        new Person("Terry", "Turtle", PetType.TURTLE, "Speedy", 1),
        new Person(
                "Harry", "Hamster", Lists.immutable.with(
                new Pet(PetType.HAMSTER, "Fuzzy", 1),
                new Pet(PetType.HAMSTER, "Wuzzy", 1))),
        new Person("John", "Doe", Lists.immutable.empty())
);
The memory footprint (package names shortened to reduce scrolling):
class org.e.c.impl.list.i.ImmutableOctupletonList - 2256 bytes
org.e.c.impl.list.i.ImmutableOctupletonList@368247b9d footprint:
     COUNT       AVG       SUM   DESCRIPTION
        35        20       704   [B
        35        24       840   java.lang.String
         2        16        32   org.e.c.impl.list.i.ImmutableDoubletonList
         1         8         8   org.e.c.impl.list.i.ImmutableEmptyList
         1        40        40   org.e.c.impl.list.i.ImmutableOctupletonList
         5        16        80   org.e.c.impl.list.i.ImmutableSingletonList
         8        24       192   refactortoec.SnowLeopardTest$Person
         9        24       216   refactortoec.SnowLeopardTest$Pet
         6        24       144   refactortoec.SnowLeopardTest$PetType
       102                2256   (total)
The detailed memory view for List<Person> from Java Collections is as follows. Java Collections has memory optimized immutable List implementations named List12 and ListN. ListN has a backing array, where the optimized ImmutableList instances for Eclipse Collections do not have a backing array for anything less than size 11.
The code:
private List<Person> people = List.of(
        new Person("Mary", "Smith", PetType.CAT, "Tabby", 2),
        new Person(
                "Bob", "Smith", List.of(
                new Pet(PetType.CAT, "Dolly", 3),
                new Pet(PetType.DOG, "Spot", 2))),
        new Person("Ted", "Smith", PetType.DOG, "Spike", 4),
        new Person("Jake", "Snake", PetType.SNAKE, "Serpy", 1),
        new Person("Barry", "Bird", PetType.BIRD, "Tweety", 2),
        new Person("Terry", "Turtle", PetType.TURTLE, "Speedy", 1),
        new Person(
                "Harry", "Hamster", List.of(
                new Pet(PetType.HAMSTER, "Fuzzy", 1),
                new Pet(PetType.HAMSTER, "Wuzzy", 1))),
        new Person("John", "Doe", List.of())
);
The memory footprint:
class java.util.ImmutableCollections$ListN - 2312 bytes
java.util.ImmutableCollections$ListN@55183b20d footprint:
     COUNT       AVG       SUM   DESCRIPTION
        35        20       704   [B
         2        32        64   [Ljava.lang.Object;
         1         8         8   java.lang.Object
        35        24       840   java.lang.String
         7        16       112   java.util.ImmutableCollections$List12
         2        16        32   java.util.ImmutableCollections$ListN
         8        24       192   refactortoec.TribbleTest$Person
         9        24       216   refactortoec.TribbleTest$Pet
         6        24       144   refactortoec.TribbleTest$PetType
       105                2312   (total)
Measuring the memory for the test methods
The following chart shows the result in terms of memory required to complete the five test methods in Exercise 1.
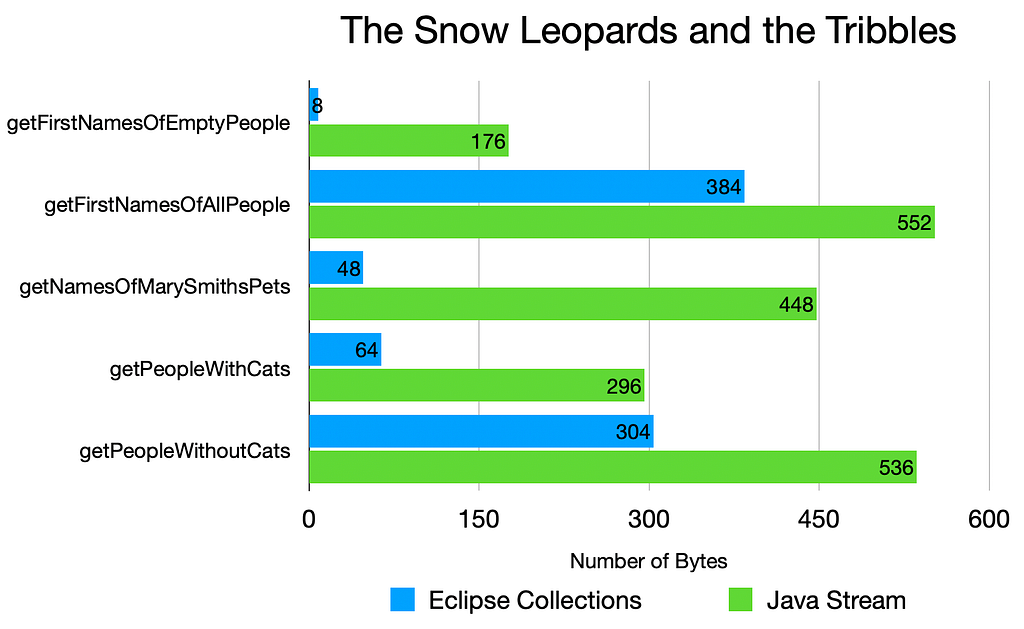 The memory cost of the four unit tests in Exercise 1 of the Pet Kata
I added an empty list test to the kata to illustrate the “Empty should be empty” point I reiterated in the following blog.
The SnowLeopardTest Code
The following is the source code for Exercise 1 of the Pet Kata using eager and fused methods available in Eclipse Collections. Eager methods are used instead of lazy because for these use cases they are the best option. I will show a separate LazySnowLeopardTest to compare the memory required with Java Stream. The real lesson is sometimes you want apples (eager/fused), and sometimes you want oranges (lazy).
package refactortoec;

import java.util.concurrent.atomic.LongAdder;

import org.eclipse.collections.api.factory.Lists;
import org.eclipse.collections.api.list.ImmutableList;
import org.junit.jupiter.api.Assertions;
import org.junit.jupiter.api.BeforeEach;
import org.junit.jupiter.api.Test;
import org.openjdk.jol.info.GraphLayout;

public class SnowLeopardTest
{
    enum PetType
    {
        CAT("🐱"), DOG("🐶"), HAMSTER("🐹"),
        TURTLE("🐢"), BIRD("🐦"), SNAKE("🐍");

        private final String emoji;

        PetType(String emoji)
        {
            this.emoji = emoji;
        }

        @Override
        public String toString()
        {
            return this.emoji;
        }
    }

    record Pet(PetType type, String name, int age) {}

    record Person(String firstName, String lastName, ImmutableList<Pet> pets)
    {
        public Person(String firstName, String lastName,
                PetType type, String petName, int age)
        {
            this(firstName, lastName,
                    Lists.immutable.with(new Pet(type, petName, age)));
        }

        public boolean hasPet(PetType petType)
        {
            return this.pets.containsBy(Pet::type, petType);
        }

        public String getFullName()
        {
            return this.firstName + ' ' + this.lastName;
        }

        public boolean isNamed(String name)
        {
            return name.equals(this.getFullName());
        }
    }

    private ImmutableList<Person> people = Lists.immutable.with(
            new Person("Mary", "Smith", PetType.CAT, "Tabby", 2),
            new Person(
                    "Bob", "Smith", Lists.immutable.with(
                    new Pet(PetType.CAT, "Dolly", 3),
                    new Pet(PetType.DOG, "Spot", 2))),
            new Person("Ted", "Smith", PetType.DOG, "Spike", 4),
            new Person("Jake", "Snake", PetType.SNAKE, "Serpy", 1),
            new Person("Barry", "Bird", PetType.BIRD, "Tweety", 2),
            new Person("Terry", "Turtle", PetType.TURTLE, "Speedy", 1),
            new Person(
                    "Harry", "Hamster", Lists.immutable.with(
                    new Pet(PetType.HAMSTER, "Fuzzy", 1),
                    new Pet(PetType.HAMSTER, "Wuzzy", 1))),
            new Person("John", "Doe", Lists.immutable.empty())
    );

    private LongAdder bytes;

    private <R> R measure(R object)
    {
        return this.measureWithout(object, null);
    }

    private <R> R measureWithout(R object, Object other)
    {
        long otherBytes = 0L;
        if (other != null)
        {
            otherBytes = GraphLayout.parseInstance(other).totalSize();
        }
        long l = GraphLayout.parseInstance(object).totalSize() - otherBytes;
        IO.println(object.getClass() + " - " + l + " bytes");
        bytes.add(l);
        return object;
    }

    @BeforeEach
    void setUp()
    {
        this.bytes = new LongAdder();
    }

    @Test
    public void peopleList()
    {
        // class ImmutableOctupletonList - 2256 bytes
        this.measure(this.people);

        IO.println(GraphLayout.parseInstance(this.people).toFootprint());

        // peopleList - 2256 bytes
        IO.println("peopleList - " + this.bytes + " bytes");
    }

    @Test
    void getFirstNamesOfEmptyPeople()
    {
        IO.println("getFirstNamesOfEmptyPeople");

        ImmutableList<Person> emptyPeople = Lists.immutable.empty();
        // class ImmutableEmptyList - 8 bytes
        ImmutableList<String> firstNames = this.measure(
                emptyPeople.collect(Person::firstName));

        var expectedFirstNames =
                Lists.immutable.empty();
        Assertions.assertEquals(expectedFirstNames, firstNames);

        // getFirstNamesOfEmptyPeople - 8 bytes
        IO.println("getFirstNamesOfEmptyPeople - " + this.bytes + " bytes");
    }

    @Test
    void getFirstNamesOfAllPeople()
    {
        IO.println("getFirstNamesOfAllPeople");

        // class ImmutableOctupletonList - 384 bytes
        ImmutableList<String> firstNames = this.measure(
                this.people.collect(Person::firstName));

        var expectedFirstNames =
                Lists.immutable.with("Mary", "Bob", "Ted", "Jake",
                        "Barry", "Terry", "Harry", "John");
        Assertions.assertEquals(expectedFirstNames, firstNames);

        IO.println("getFirstNamesOfAllPeople - " + this.bytes + " bytes");
    }

    @Test
    void getNamesOfMarySmithsPets()
    {
        IO.println("getNamesOfMarySmithsPets");

        Person marySmith =
                this.people.detectWith(Person::isNamed, "Mary Smith");
        // class java.lang.String - 48 bytes
        String names = this.measure(
                marySmith.pets()
                        .makeString(Pet::name, "", ", ", ""));

        Assertions.assertEquals("Tabby", names);

        IO.println("getNamesOfMarySmithsPets - " + this.bytes + " bytes");
    }

    @Test
    void getPeopleWithCats()
    {
        IO.println("getPeopleWithCats");

        // class ImmutableDoubletonList - 64 bytes
        ImmutableList<String> lastNamesOfPeopleWithCats = this.measure(
                this.people.collectIf(
                        person -> person.hasPet(PetType.CAT),
                        Person::lastName));

        var expectedLastNames =
                Lists.immutable.with("Smith", "Smith");
        Assertions.assertEquals(expectedLastNames, lastNamesOfPeopleWithCats);

        IO.println("getPeopleWithCats - " + this.bytes + " bytes");
    }

    @Test
    void getPeopleWithoutCats()
    {
        IO.println("getPeopleWithoutCats");

        // class ImmutableSextupletonList - 304 bytes
        ImmutableList<String> lastNamesOfPeopleWithoutCats = this.measure(
                this.people.collectIf(
                        person -> !person.hasPet(PetType.CAT),
                        Person::lastName));

        var expectedLastNames =
                Lists.mutable.with("Smith", "Snake", "Bird",
                        "Turtle", "Hamster", "Doe");
        Assertions.assertEquals(expectedLastNames, lastNamesOfPeopleWithoutCats);

        IO.println("getPeopleWithoutCats - " + this.bytes + " bytes");
    }
}
The TribbleTest Code
The following is the source code for the Pet Kata using lazy methods available in Java Stream. Sometimes you want apples, and sometimes you want oranges. Java Stream only gives you oranges. This is Hobson’s choice. The choice is to use Java Stream, or not use Java Stream, and use Eclipse Collections or another more efficient alternative instead.
package refactortoec;

import java.util.List;
import java.util.Optional;
import java.util.concurrent.atomic.LongAdder;
import java.util.stream.Collectors;
import java.util.stream.Stream;

import org.eclipse.collections.api.factory.Lists;
import org.junit.jupiter.api.Assertions;
import org.junit.jupiter.api.BeforeEach;
import org.junit.jupiter.api.Test;
import org.openjdk.jol.info.GraphLayout;

public class TribbleTest
{
    enum PetType
    {
        CAT("🐱"), DOG("🐶"), HAMSTER("🐹"),
        TURTLE("🐢"), BIRD("🐦"), SNAKE("🐍");

        private final String emoji;

        PetType(String emoji)
        {
            this.emoji = emoji;
        }

        @Override
        public String toString()
        {
            return this.emoji;
        }
    }

    record Pet(PetType type, String name, int age) {}

    record Person(String firstName, String lastName, List<Pet> pets)
    {
        public Person(String firstName, String lastName,
                PetType type, String petName, int age)
        {
            this(firstName, lastName,
                    List.of(new Pet(type, petName, age)));
        }

        public boolean hasPet(PetType petType)
        {
            return this.pets.stream()
                    .map(Pet::type)
                    .anyMatch(petType::equals);
        }

        public String getFullName()
        {
            return this.firstName + ' ' + this.lastName;
        }

        public boolean isNamed(String name)
        {
            return name.equals(this.getFullName());
        }
    }

    private List<Person> people = List.of(
            new Person("Mary", "Smith", PetType.CAT, "Tabby", 2),
            new Person(
                    "Bob", "Smith", List.of(
                    new Pet(PetType.CAT, "Dolly", 3),
                    new Pet(PetType.DOG, "Spot", 2))),
            new Person("Ted", "Smith", PetType.DOG, "Spike", 4),
            new Person("Jake", "Snake", PetType.SNAKE, "Serpy", 1),
            new Person("Barry", "Bird", PetType.BIRD, "Tweety", 2),
            new Person("Terry", "Turtle", PetType.TURTLE, "Speedy", 1),
            new Person(
                    "Harry", "Hamster", List.of(
                    new Pet(PetType.HAMSTER, "Fuzzy", 1),
                    new Pet(PetType.HAMSTER, "Wuzzy", 1))),
            new Person("John", "Doe", List.of())
    );

    private LongAdder bytes;

    private <R> R measure(R object)
    {
        return this.measureWithout(object, null);
    }

    private <R> R measureWithout(R object, Object other)
    {
        long otherBytes = 0L;
        if (other != null)
        {
            otherBytes = GraphLayout.parseInstance(other).totalSize();
        }
        long l = GraphLayout.parseInstance(object).totalSize() - otherBytes;
        IO.println(object.getClass() + " - " + l + " bytes");
        bytes.add(l);
        return object;
    }

    private <R> R measureWithout(R object, Object other1, Object other2)
    {
        long otherBytes = 0L;
        if (other1 != null && other2 != null)
        {
            otherBytes = GraphLayout.parseInstance(other1).totalSize() +
                         GraphLayout.parseInstance(other2).totalSize();
        }
        long l = GraphLayout.parseInstance(object).totalSize() - otherBytes;
        IO.println(object.getClass() + " - " + l + " bytes");
        bytes.add(l);
        return object;
    }

    @BeforeEach
    void setUp()
    {
        this.bytes = new LongAdder();
    }

    @Test
    public void peopleList()
    {
        // class java.util.ImmutableCollections$ListN - 2312 bytes
        this.measure(this.people);

        IO.println(GraphLayout.parseInstance(this.people).toFootprint());

        // peopleList - 2312 bytes
        IO.println("peopleList - " + this.bytes + " bytes");
    }

    @Test
    void getFirstNamesOfEmptyPeople()
    {
        IO.println("getFirstNamesOfEmptyPeople");

        // class java.util.stream.ReferencePipeline$3 - 144 bytes
        List<Person> emptyPeople = List.<Person>of();
        Stream<String> firstNameStream = this.measureWithout(
                emptyPeople.stream().map(Person::firstName),
                emptyPeople);
        // class java.util.ImmutableCollections$ListN - 32 bytes
        List<String> firstNames = this.measure(
                firstNameStream.toList());

        var expectedFirstNames =
                Lists.immutable.empty();
        Assertions.assertEquals(expectedFirstNames, firstNames);

        // getFirstNamesOfEmptyPeople - 176 bytes
        IO.println("getFirstNamesOfEmptyPeople - " + this.bytes + " bytes");
    }

    @Test
    void getFirstNamesOfAllPeople()
    {
        IO.println("getFirstNamesOfAllPeople");

        // class java.util.stream.ReferencePipeline$3 - 144 bytes
        Stream<String> firstNameStream = this.measureWithout(
                this.people.stream().map(Person::firstName),
                this.people);
        // class java.util.ImmutableCollections$ListN - 408 bytes
        List<String> firstNames = this.measure(
                firstNameStream.toList());

        var expectedFirstNames =
                Lists.immutable.with("Mary", "Bob", "Ted", "Jake",
                        "Barry", "Terry", "Harry", "John");
        Assertions.assertEquals(expectedFirstNames, firstNames);

        // getFirstNamesOfAllPeople - 552 bytes
        IO.println("getFirstNamesOfAllPeople - " + this.bytes + " bytes");
    }

    @Test
    void getNamesOfMarySmithsPets()
    {
        IO.println("getNamesOfMarySmithsPets");

        // class java.util.stream.ReferencePipeline$2 - 144 bytes
        Stream<Person> filterMarySmith = this.measureWithout(
                this.people.stream()
                        .filter(person -> person.isNamed("Mary Smith")),
                this.people);
        Optional<Person> optional = filterMarySmith.findFirst();
        Person marySmith = optional.orElse(null);
        // class java.util.Optional - 16 bytes
        this.measureWithout(optional, marySmith);
        // class java.util.stream.ReferencePipeline$3 - 112 bytes
        Stream<String> petNames = this.measureWithout(
                marySmith.pets()
                        .stream()
                        .map(Pet::name),
                marySmith.pets());
        // class java.util.stream.Collectors$CollectorImpl - 128 bytes
        var joining = this.measureWithout(
                Collectors.joining(", "),
                "");
        // class java.lang.String - 48 bytes
        String names = this.measure(
                petNames.collect(joining));

        Assertions.assertEquals("Tabby", names);

        // getNamesOfMarySmithsPets - 448 bytes
        IO.println("getNamesOfMarySmithsPets - " + this.bytes + " bytes");
    }

    @Test
    void getPeopleWithCats()
    {
        IO.println("getPeopleWithCats");

        // class java.util.stream.ReferencePipeline$3 - 208 bytes
        Stream<String> lastNamesStream = this.measureWithout(
                this.people.stream()
                        .filter(person -> person.hasPet(PetType.CAT))
                        .map(Person::lastName),
                this.people);

        // class java.util.ImmutableCollections$ListN - 88 bytes
        List<String> lastNamesOfPeopleWithCats = this.measure(
                lastNamesStream.toList());

        var expectedLastNames =
                Lists.immutable.with("Smith", "Smith");
        Assertions.assertEquals(expectedLastNames, lastNamesOfPeopleWithCats);

        // getPeopleWithCats - 296 bytes
        IO.println("getPeopleWithCats - " + this.bytes + " bytes");
    }

    @Test
    public void getPeopleWithoutCats()
    {
        IO.println("getPeopleWithoutCats");

        // class java.util.stream.ReferencePipeline$3 - 208 bytes
        Stream<String> lastNamesStream = this.measureWithout(
                this.people.stream()
                        .filter(person -> !person.hasPet(PetType.CAT))
                        .map(Person::lastName),
                this.people);
        // class java.util.ImmutableCollections$ListN - 328 bytes
        List<String> lastNamesOfPeopleWithoutCats = this.measure(
                lastNamesStream.toList());

        var expectedLastNames =
                Lists.mutable.with("Smith", "Snake", "Bird",
                        "Turtle", "Hamster", "Doe");
        Assertions.assertEquals(expectedLastNames, lastNamesOfPeopleWithoutCats);

        // getPeopleWithoutCats - 536 bytes
        IO.println("getPeopleWithoutCats - " + this.bytes + " bytes");
    }
}
The LazySnowLeopardTest Code
 Photo by Rapha Wilde on Unsplash
Eclipse Collections has eager and lazy methods. The lazy alternative returns a type called LazyIterable. This type is much more memory efficient than Java Stream.
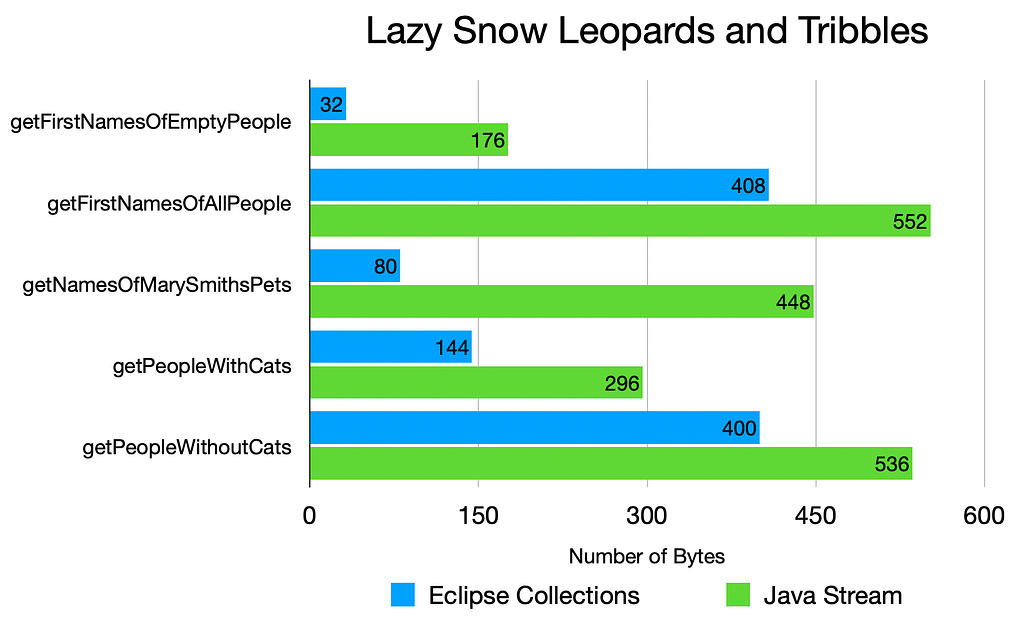 The memory cost of the four unit tests in Exercise 1 of the Pet Kata using LazyIterable instead of eager and fused methods
For a detailed side by side comparison of the memory cost of LazyIterable and Java Stream, refer to this blog. This will help explain the differences.
Measuring the Startup Memory Cost for Lazy Iteration Patterns in Java
Here is the code for LazySnowLeopardTest.
package refactortoec;

import java.util.concurrent.atomic.LongAdder;

import org.eclipse.collections.api.LazyIterable;
import org.eclipse.collections.api.factory.Lists;
import org.eclipse.collections.api.list.ImmutableList;
import org.junit.jupiter.api.Assertions;
import org.junit.jupiter.api.BeforeEach;
import org.junit.jupiter.api.Test;
import org.openjdk.jol.info.GraphLayout;

public class LazySnowLeopardTest
{
    enum PetType
    {
        CAT("🐱"), DOG("🐶"), HAMSTER("🐹"),
        TURTLE("🐢"), BIRD("🐦"), SNAKE("🐍");

        private final String emoji;

        PetType(String emoji)
        {
            this.emoji = emoji;
        }

        @Override
        public String toString()
        {
            return this.emoji;
        }
    }

    record Pet(PetType type, String name, int age) {}

    record Person(String firstName, String lastName, ImmutableList<Pet> pets)
    {
        public Person(String firstName, String lastName,
                PetType type, String petName, int age)
        {
            this(firstName, lastName,
                    Lists.immutable.with(new Pet(type, petName, age)));
        }

        public boolean hasPet(PetType petType)
        {
            return this.pets.containsBy(Pet::type, petType);
        }

        public String getFullName()
        {
            return this.firstName + ' ' + this.lastName;
        }

        public boolean isNamed(String name)
        {
            return name.equals(this.getFullName());
        }
    }

    private ImmutableList<Person> people = Lists.immutable.with(
            new Person("Mary", "Smith", PetType.CAT, "Tabby", 2),
            new Person(
                    "Bob", "Smith", Lists.immutable.with(
                    new Pet(PetType.CAT, "Dolly", 3),
                    new Pet(PetType.DOG, "Spot", 2))),
            new Person("Ted", "Smith", PetType.DOG, "Spike", 4),
            new Person("Jake", "Snake", PetType.SNAKE, "Serpy", 1),
            new Person("Barry", "Bird", PetType.BIRD, "Tweety", 2),
            new Person("Terry", "Turtle", PetType.TURTLE, "Speedy", 1),
            new Person(
                    "Harry", "Hamster", Lists.immutable.with(
                    new Pet(PetType.HAMSTER, "Fuzzy", 1),
                    new Pet(PetType.HAMSTER, "Wuzzy", 1))),
            new Person("John", "Doe", Lists.immutable.empty())
    );

    private LongAdder bytes;

    private <R> R measure(R object)
    {
        return this.measureWithout(object, null);
    }

    private <R> R measureWithout(R object, Object other)
    {
        long otherBytes = 0L;
        if (other != null)
        {
            otherBytes = GraphLayout.parseInstance(other).totalSize();
        }
        long l = GraphLayout.parseInstance(object).totalSize() - otherBytes;
        IO.println(object.getClass() + " - " + l + " bytes");
        bytes.add(l);
        return object;
    }

    @BeforeEach
    void setUp()
    {
        this.bytes = new LongAdder();
    }

    @Test
    public void peopleList()
    {
        // class org.eclipse.collections.impl.list.immutable.ImmutableOctupletonList - 2256 bytes
        this.measure(this.people);

        IO.println(GraphLayout.parseInstance(this.people).toFootprint());

        // peopleList - 2256 bytes
        IO.println("peopleList - " + this.bytes + " bytes");
    }

    @Test
    void getFirstNamesOfEmptyPeople()
    {
        IO.println("getFirstNamesOfEmptyPeople");

        ImmutableList<Person> emptyPeople = Lists.immutable.empty();
        // class CollectIterable - 24 bytes
        LazyIterable<String> firstNamesIterable = this.measureWithout(
                emptyPeople.asLazy().collect(Person::firstName),
                emptyPeople);

        // class ImmutableEmptyList - 8 bytes
        ImmutableList<String> firstNames = this.measure(
                firstNamesIterable.toImmutableList());

        var expectedFirstNames =
                Lists.immutable.empty();
        Assertions.assertEquals(expectedFirstNames, firstNames);

        // getFirstNamesOfEmptyPeople - 32 bytes
        IO.println("getFirstNamesOfEmptyPeople - " + this.bytes + " bytes");
    }

    @Test
    void getFirstNamesOfAllPeople()
    {
        IO.println("getFirstNamesOfAllPeople");

        // class CollectIterable - 24 bytes
        LazyIterable<String> firstNamesIterable = this.measureWithout(
                this.people.asLazy().collect(Person::firstName),
                this.people);

        // ImmutableOctupletonList - 384 bytes
        ImmutableList<String> firstNames = this.measure(
                firstNamesIterable.toImmutableList());

        var expectedFirstNames =
                Lists.immutable.with("Mary", "Bob", "Ted", "Jake",
                        "Barry", "Terry", "Harry", "John");
        Assertions.assertEquals(expectedFirstNames, firstNames);

        // getFirstNamesOfAllPeople - 408 bytes
        IO.println("getFirstNamesOfAllPeople - " + this.bytes + " bytes");
    }

    @Test
    void getNamesOfMarySmithsPets()
    {
        IO.println("getNamesOfMarySmithsPets");

        // class LazyIterableAdapter - 16 bytes
        LazyIterable<Person> lazyPeople = this.measureWithout(
                this.people.asLazy(),
                this.people);
        Person marySmith =
                lazyPeople.detectWith(Person::isNamed, "Mary Smith");
        // class LazyIterableAdapter - 16 bytes
        LazyIterable<Pet> lazyPets = this.measureWithout(
                marySmith.pets().asLazy(),
                marySmith.pets());
        // class java.lang.String - 48 bytes
        String names = this.measure(
                lazyPets.makeString(Pet::name, "", ", ", ""));

        Assertions.assertEquals("Tabby", names);

        // getNamesOfMarySmithsPets - 80 bytes
        IO.println("getNamesOfMarySmithsPets - " + this.bytes + " bytes");
    }

    @Test
    void getPeopleWithCats()
    {
        IO.println("getPeopleWithCats");

        // class CollectIterable - 80 bytes
        LazyIterable<String> lazyLastNames = this.measureWithout(
                this.people.asLazy()
                        .selectWith(Person::hasPet, PetType.CAT)
                        .collect(Person::lastName),
                this.people);
        // class ImmutableDoubletonList - 64 bytes
        ImmutableList<String> lastNamesOfPeopleWithCats = this.measure(
                lazyLastNames.toImmutableList());

        var expectedLastNames =
                Lists.immutable.with("Smith", "Smith");
        Assertions.assertEquals(expectedLastNames, lastNamesOfPeopleWithCats);

        // getPeopleWithCats - 144 bytes
        IO.println("getPeopleWithCats - " + this.bytes + " bytes");
    }

    @Test
    void getPeopleWithoutCats()
    {
        IO.println("getPeopleWithoutCats");

        // class CollectIterable - 96 bytes
        LazyIterable<String> lazyLastNames = this.measureWithout(
                this.people.asLazy()
                        .rejectWith(Person::hasPet, PetType.CAT)
                        .collect(Person::lastName),
                this.people);
        // class ImmutableSextupletonList - 304 bytes
        ImmutableList<String> lastNamesOfPeopleWithoutCats = this.measure(
                lazyLastNames.toImmutableList());

        var expectedLastNames =
                Lists.mutable.with("Smith", "Snake", "Bird",
                        "Turtle", "Hamster", "Doe");
        Assertions.assertEquals(expectedLastNames, lastNamesOfPeopleWithoutCats);

        // getPeopleWithoutCats - 400 bytes
        IO.println("getPeopleWithoutCats - " + this.bytes + " bytes");
    }
}
What about Performance vs. Memory?
I used to think that Java Stream and Eclipse Collections LazyIterable had comparable performance profiles. This was until I compared them for small collection sizes, which are the norm in most applications. Read the following blog to see what the performance profiles are for small collections, which is the equivalent of what I have shown in this blog.
Performance of Lazy and Eager Iteration Patterns on Small Lists in Java
At larger collection sizes, any differences may become less interesting. Write your own application specific benchmarks to determine whether one yields better results for your use cases.
“Fat-Free” Lambdas in Java
Eclipse Collections gives an extra level of API that have a suffix of “With” that help developers use more stateless lambdas which can also reduce pressure of short-lived garbage on the heap. This can be extremely difficult to measure. If you are curious, take a look at this blog with the same title as this section.
Final Thoughts
I don’t think memory gets enough attention when developers are writing code. For in-memory data structures, it always struck me as THE problem to focus on. Memory will always be a challenge in my opinion, and I’m happy we focused on memory first in the design of Eclipse Collections. We focus on performance as needed in individual methods, but very often, reducing memory contributes to performance in hard to measure ways.
I hope you found this blog useful. Revisiting exercise 1 of the Pet Kata with a focus on memory and garbage generated was fun.
Thanks for reading!
I am the creator of and committer for the Eclipse Collections OSS project, which is managed at the Eclipse Foundation. Eclipse Collections is open for contributions. I am the author of the book, Eclipse Collections Categorically: Level up your programming game.
May 28, 2026
Optional Identity Verification for Eclipse Foundation Committers Launches June 2
by Natalia Loungou at May 28, 2026 08:01 AM
On June 2, the Eclipse Foundation will make optional identity verification generally available for Eclipse Foundation committers.
May 27, 2026
Optional Identity Verification for Eclipse Foundation Committers Launches June 2
by Mikaël Barbero (mikael.barbero@eclipse-foundation.org) at May 27, 2026 08:30 AM
Trust is a core part of open source collaboration. At the Eclipse Foundation, we have always required committers to provide their real first and last name when signing their committer agreements, and we have long stated that certain committer information, including name and email address, is publicly displayed in connection with contributions. On June 2, the Eclipse Foundation will make optional identity verification generally available for Eclipse Foundation committers.
I want to be clear about what this is, and just as importantly, what it is not. This is an optional program. We have no plan to make it mandatory in the foreseeable future. This is not a staged rollout, a hidden policy change, or a first step toward requiring identity verification for all committers. If that position were ever to change, it would require open discussion, proper governance, and careful legal and community review.
The purpose of this program is narrower: to give committers who choose to participate an additional way to demonstrate that their displayed Eclipse Foundation account name has been verified against a government-issued ID.
What is changing?
Committers who choose to participate will be able to verify their identity using a government-issued ID through iDenfy, our identity verification provider headquartered in the European Union. A successful verification will result in a checkmark on the committer’s Eclipse Foundation account profile. That checkmark indicates that the displayed name on the account has been verified against a government-issued ID.
This program does not change our mission, our governance model, or our existing committer requirements. It provides an additional, voluntary mechanism for committers who want to demonstrate alignment with the Eclipse Foundation’s existing rules of engagement. In practical terms:
- Participation is optional.
- The program is available to Eclipse Foundation committers.
- A successful verification results in a checkmark on the committer’s Eclipse Foundation account profile.
- The checkmark indicates that the displayed name has been verified against a government-issued ID.
- The program may later serve as an additional factor for account recovery for committers who choose to participate.
Why are we doing this?
The security and integrity of open source software are increasingly important to users, adopters, contributors, and downstream consumers. Open source communities are being asked to provide stronger assurances about the software they produce and the processes used to produce it. This program is one concrete step in that direction.
It gives committers a voluntary account-level trust signal while preserving the openness and community-led nature of Eclipse Foundation projects. It is intended to strengthen trust, not to create barriers to participation. There are committers who may want a way to show that their Eclipse Foundation account identity has been verified. There are also projects and adopters that may find such a trust signal useful. This program makes that possible without imposing it on those who do not want to participate.
Privacy and data handling
Identity verification is a sensitive topic, and we have designed this program with data minimization in mind. The verification workflow is handled by iDenfy. Government-issued ID images, face photos, and similar source materials are processed by iDenfy and are not stored by the Eclipse Foundation.
On the Eclipse Foundation side, we store only the validation certificate returned after a successful verification. That certificate includes the issuance date, the validated field values needed for the program, such as first name, last name, and country, and a digital signature. iDenfy retains verification materials for a limited operational and debugging period, currently up to 90 days, after which they are deleted according to the configured retention policy.
Documentation and FAQ
We also recognize that committers may have practical questions about how the verification process works, what information is used, what is stored, what is not stored, and how to interpret the verification checkmark. More detailed documentation about the process, along with a FAQ, will be published in the Eclipse Foundation Project Handbook by the June 2 general availability date.
In the meantime, we encourage questions and discussion in the Eclipse CSI GitHub Discussions area.
What this does not mean
Because identity verification can raise understandable concerns, I want to address this directly. This is not a mandatory identity verification program. It is not age verification. It is not a change to how Eclipse Foundation projects are governed. It is not a change to how contributors participate in our communities. It is also not a quiet first step toward making identity verification mandatory.
The program is voluntary. Committers can decide whether participating makes sense for them. Our goal is to provide an additional trust mechanism for those who want it, while continuing to respect the open, global, and community-driven nature of the Eclipse Foundation ecosystem.
Join the discussion
We know this topic can raise important questions about privacy, security, accessibility, community norms, and the future of open source participation. Those questions deserve open discussion. Please share your questions, concerns, and suggestions in the Eclipse CSI GitHub Discussions area:
https://github.com/orgs/eclipse-csi/discussions
We welcome input from committers and the broader Eclipse Foundation community as we make this capability generally available on June 2.
Thank you
Thanks to Alpha-Omega for their support of the Eclipse Foundation ecosystem security by sponsoring this work.
by Mikaël Barbero (mikael.barbero@eclipse-foundation.org) at May 27, 2026 08:30 AM
May 26, 2026
SWTBot Tests Failing on GitHub Actions macOS Because of “Welcome to Mac” (Setup Assistant Analytics)
by Lorenzo Bettini at May 26, 2026 09:40 AM
Beyond Vibe Coding: A Systematic and Customisable AI Software Development Process
by Jonas, Maximilian & Philip at May 26, 2026 12:00 AM
If you use AI for coding, you get fast results, but potentially slow problems. At Open Community Experience 2026 (OCX26) in Brussels, Philip presented a practical view on using AI coding agents in …
The post Beyond Vibe Coding: A Systematic and Customisable AI Software Development Process appeared first on EclipseSource.
May 21, 2026
“Fat-Free” Lambdas in Java
by Donald Raab at May 21, 2026 04:46 AM
From static anonymous inner classes to lambdas and method references.
 Photo by Annie Spratt on Unsplash
Why did I write this blog?
I have been looking at jmap histograms of Java heaps recently. I did this a lot more frequently 15–20 years ago when I was trying to reduce memory consumption on Java heaps. What I have been seeing in the past week has been setting off alarm bells in my head. I saw these temporary objects at the top of a random jmap histogram I took last week. They were gone after a full GC kicked in.
 Stream and Lambda for any/all/noneMatch caught napping on a local jmap output
I have never seen this kind of thing in a Java heap before. I expect that lambdas will show up briefly on a heap but not in this quantity, and not for a single lambda type. I expect lambdas to be like snow leopards. They are known to exist as we can see pictures of them in source code, but are rarely if ever seen in the wild.
We need to teach efficient programming practices to a new generation of Java developers who are about to overwhelm all of us with AI generated heaps of garbage. Read this blog, understand what I was doing two decades ago, and incorporate the lessons in some way shape or form in your programming practices and skills files if your using an AI tool.
I don’t expect every developer to be as garbage sensitive as I am, but I hope more developers learn that the quickest garbage to collect is the garbage that isn’t created in the first place. There are ways to avoid this, but it requires learning and intentional programming.
Remembering the JVM Language Summit in 2012
Lately, I seem to keep rediscovering quotes I shared in a talk at the JVM Language Summit in 2012 on Java collections framework design.
Here’s the quote I shared about making blocks static.
 From JVM Language Summit 2012
This quote is just as true today as it was fourteen years ago. While I never shared this advice in a blog before, it has been publicly available in these slides since July 2012. I recommend exploring the rest of the slides. There are absolute gems of efficient programming techniques that can be found in here.
The following question was posted on StackOverflow in December 2014.
Does a lambda expression create an object on the heap every time it's executed?
There is a comment from Brian Goetz right below the question:
 Comment from Brian Goetz on the StackOverflow question linked above.
This optimization for stateless lambdas is the key to reducing the number of lambda instances you create on your heap. This is what I refer to in the title of this blog as “Fat-Free” lambdas, and they have been available since Java 8 was released.
The rest of this blog will show you strategies to keep your Java heap from being flooded with lambda instances. The Java language is doing what it can to make this possible, but libraries need to work to accommodate this strategy with API additions. I will explore in this blog the approach we took in Eclipse Collections to make it possible for libraries to enable the stateless lambda optimization that the language has made avaiable. We took this approach well before lambdas were even planned in Java, back when the only option to have functional style APIs was to use Anonymous Inner Classes (AICs).
Update: This Groovy issue that was created following the publishing of this blog has some very interesting findings and benchmarks for those wondering whether this 20 year old optimization holds up in modern languages and runtimes.
Apply "fat-free lambda" patterns to Groovy - DGM `*With` family + `curryWith` helper
Update (2026–6–13): The Groovy issue linked here has been marked as resolved, and the new API additions will be available in Apache Groovy 6. Well done!
Stateless and static
Anonymous Inner Classes (AICs) get a bad rap in Java. I’ve done more than my fair share of bashing them over the years. I even wrote a whole blog dedicated to my quest to eradicate them and replace them with lambdas.
My ten year quest for concise lambda expressions in Java
What I’ve never shared in a blog before is that AICs contributed one very important and lasting design and implementation decision to Eclipse Collections twenty years ago. The idea was incredibly simple and straightforward, but without the pain of writing AICs, we may never have discovered this optimization.
Hoist up anonymous inner classes whenever possible into final static variables with intention revealing names.
Anonymous Inner Classes were painful enough to see in code, we didn’t want to see them polluting our Java heaps as well. The most beneficial thing about AICs is that the new key word is explicit and in your face. This makes it easy to understand the effects on the heap. When we saw new with an AIC, we had a general rule.
Don’t put new in a loop
This is what happens when you put new in a loop with an AIC.
@Test
public void aicWithVariableCapture()
{
    Set<Predicate<String>> aics =
            HashingStrategySets.mutable.with(
                    HashingStrategies.identityStrategy());

    for (int i = 0; i < 100; i++)
    {
        String parameter = Integer.toString(i);

        // Anonymous Inner Class
        Predicate<String> startsWith = new Predicate<String>()
        {
            @Override
            public boolean accept(String string)
            {
                return string.startsWith(parameter); // variable capture
            }
        };

        boolean any = Interval.zeroTo(99)
                .collect(Object::toString)
                .anySatisfy(startsWith);

        assertTrue(any);
        aics.add(startsWith);
    }
    IO.println(GraphLayout.parseInstance(aics).toFootprint());
}
It should be clear here that 100 new Predicate instances are going to be created. What might not be immediately clear is what that object looks like.
The result using GraphLayout from Java Object Layout (JOL):
org.eclipse.collections.impl.set.strategy.mutable.UnifiedSetWithHashingStrategy@58e1d9dd footprint:
     COUNT       AVG       SUM   DESCRIPTION
       100        16      1600   [B
         1      1040      1040   [Ljava.lang.Object;
       100        24      2400   java.lang.String
         1         8         8   org.eclipse.collections.impl.block.factory.HashingStrategies$IdentityHashingStrategy
         1        32        32   org.eclipse.collections.impl.set.strategy.mutable.UnifiedSetWithHashingStrategy
        15        24       360   org.eclipse.collections.impl.set.strategy.mutable.UnifiedSetWithHashingStrategy$ChainedBucket
         1         8         8   refactortoec.generation.FatFreeAICTest
       100        16      1600   refactortoec.generation.FatFreeAICTest$2
       319                7048   (total)
We see the aics identity set and supporting infrastructure we created at the beginning of the method which is what I have chosen to output to see if there are multiple instances. We see the 100 AIC instances at refactortoec.generation.FatFreeAICTest$2 at 16 bytes each. We also see the 100 String instances that were captured by the AIC.
If we convert the AIC to a named inner class, all of a sudden it’s shape and memory impact is easier to understand. The cost however is exactly the same as the AIC. Below we can see the class StartsWith has a single String field named parameter.
private static class StartsWith implements Predicate<String>
{
    private final String parameter;

    public StartsWith(String parameter)
    {
        this.parameter = parameter;
    }

    @Override
    public boolean accept(String string)
    {
        return string.startsWith(parameter);
    }
}
Hoist the Sails!
There is a trick to hoisting an AIC as a static reference. The AIC needs to be stateless. This means it can capture no variables outside of its Single Abstract Method. Here’s an example of a static and stateless Predicate2 named STARTS_WITH.
public static final Predicate2<String, String> STARTS_WITH = new Predicate2<>()
{
    @Override
    public boolean accept(String s, String prefix)
    {
        return s.startsWith(prefix);
    }
};
The trick to make it stateless is to use a Predicate2 instead of a Predicate. The question then is what method can we use with a Predicate2? The following shows the answer to this question from Eclipse Collections.
@Test
public void fatFreeAIC()
{
    Set<Predicate2<String, String>> fatFreeAICs =
            HashingStrategySets.mutable.with(
                    HashingStrategies.identityStrategy());

    for (int i = 0; i < 100; i++)
    {
        String parameter = Integer.toString(i);

        Predicate2<String, String> startsWith =
                STARTS_WITH;

        boolean any = Interval.zeroTo(99)
                .collect(Object::toString)
                .anySatisfyWith(startsWith, parameter);

        assertTrue(any);
        fatFreeAICs.add(startsWith);
    }
    IO.println(GraphLayout.parseInstance(fatFreeAICs).toFootprint());
}
The method anySatisfyWith is like anySatisfy in that it returns a boolean, but it takes two parameters instead of one. The first parameter is a Predicate2, which we have stored in a named static variable called STARTS_WITH. The second parameter is the parameter we want passed into the Single Abstract Method as its second parameter. In this case, it is a String named parameter.
So how many instances of startsWith will there be?
The result from GraphLayout:
org.eclipse.collections.impl.set.strategy.mutable.UnifiedSetWithHashingStrategy@740fb309d footprint:
     COUNT       AVG       SUM   DESCRIPTION
         1        24        24   [Ljava.lang.Object;
         1         8         8   org.eclipse.collections.impl.block.factory.HashingStrategies$IdentityHashingStrategy
         1        32        32   org.eclipse.collections.impl.set.strategy.mutable.UnifiedSetWithHashingStrategy
         1         8         8   refactortoec.generation.FatFreeAICTest$1
         4                  72   (total)
There is one instance, and the cost of that single instance drops from 16 bytes to 8 bytes, because I am running the code with Java 25 and Compact Object Headers enabled. We also see the fatFreeAICs identity set and supporting infrastructure including the backing array ([Ljava.lang.Object).
The Fat-Free AIC is not too bad, right? Thank you AICs!
Enter Lambdas
Lambdas made functional programming in Java a pleasure. While lambdas took away the pain of writing Anonymous Inner Classes, they hide the new keyword that was explicit and visible before. Thankfully, the amazing developers who work on the Java Compiler and Runtime performed some magic. If a lambda is stateless, then it can be made static automatically for you. From a memory perspective, the best lambdas are stateless lambdas.
We can use what we have learned so far with AICs to see when lambdas carry a hidden cost of new, and when they can be made stateless and hoisted as static automatically.
First, let’s look at a lambda that captures a variable from the enclosing scope.
@Test
public void lambdasWithVariableCapture()
{
    Set<Predicate<String>> lambdas =
            HashingStrategySets.mutable.with(
                    HashingStrategies.identityStrategy());

    for (int i = 0; i < 100; i++)
    {
        String parameter = Integer.toString(i);

        Predicate<String> startsWith =
                string -> string.startsWith(parameter);

        boolean any = Interval.zeroTo(99)
                .collect(Object::toString)
                .anySatisfy(startsWith);

        assertTrue(any);
        lambdas.add(startsWith);
    }
    IO.println(GraphLayout.parseInstance(lambdas).toFootprint());
}
It may not be clear here that 100 new Predicate instances are going to be created. We can’t see the new keyword, and it may not be immediately obvious looking at the code quickly that this lambda captures the variable named parameter. Note: the method anySatisfy in Eclipse Collections is similar to Stream.anyMatch() in Java Stream. Both take a Predicate type as a parameter.
The result from GraphLayout:
org.eclipse.collections.impl.set.strategy.mutable.UnifiedSetWithHashingStrategy@4f0f2942d footprint:
     COUNT       AVG       SUM   DESCRIPTION
       100        16      1600   [B
         1      1040      1040   [Ljava.lang.Object;
       100        24      2400   java.lang.String
         1         8         8   org.eclipse.collections.impl.block.factory.HashingStrategies$IdentityHashingStrategy
         1        32        32   org.eclipse.collections.impl.set.strategy.mutable.UnifiedSetWithHashingStrategy
        16        24       384   org.eclipse.collections.impl.set.strategy.mutable.UnifiedSetWithHashingStrategy$ChainedBucket
       100        16      1600   refactortoec.generation.FatFreeLambdaTest$$Lambda/0x000003000124d000
       319                7064   (total)
Here we see the hundred lambdas instances clearly, and each lambda costs 16 bytes.
Bring in the Fat-Free Lambdas
Almost every single-argument method in Eclipse Collections has a corresponding “With” method that will take at least two parameters. The first parameter will be a Predicate2, Function2, or Procedure2. The method anySatisfy(Predicate) has a corresponding anySatisfyWith(Predicate2, Parameter) method. when evaluating the Predicate2, the first parameter passed in is an element of the collection and the second parameter is the second parameter passed to the anySatisfyWith method. This design was implemented in Eclipse Collections several years before we knew there would be lambdas and method references in Java.
Again, the trick to make it stateless is to use a Predicate2 instead of a Predicate. The following shows how we can use the anySatisfyWith method in Eclipse Collections.
@Test
public void fatFreeLambdas()
{
    Set<Predicate2<String, String>> fatFreeLambdas =
            HashingStrategySets.mutable.with(
                    HashingStrategies.identityStrategy());

    for (int i = 0; i < 100; i++)
    {
        String parameter = Integer.toString(i);

        Predicate2<String, String> startsWith =
                (s, prefix) -> s.startsWith(prefix);

        boolean any = Interval.zeroTo(99)
                .collect(Object::toString)
                .anySatisfyWith(startsWith, parameter);

        assertTrue(any);
        fatFreeLambdas.add(startsWith);
    }
    IO.println(GraphLayout.parseInstance(fatFreeLambdas).toFootprint());
}
The result from GraphLayout:
org.eclipse.collections.impl.set.strategy.mutable.UnifiedSetWithHashingStrategy@eadd4fbd footprint:
     COUNT       AVG       SUM   DESCRIPTION
         1        24        24   [Ljava.lang.Object;
         1         8         8   org.eclipse.collections.impl.block.factory.HashingStrategies$IdentityHashingStrategy
         1        32        32   org.eclipse.collections.impl.set.strategy.mutable.UnifiedSetWithHashingStrategy
         1         8         8   refactortoec.generation.FatFreeLambdaTest$$Lambda/0x00007ffc0124d000
         4                  72   (total)
As we can see, there is only one lambda created here. What is also interesting the lambda only costs 8 bytes. This is because I am running the test in Java 25 with Compact Object Headers on. A stateless lambda only costs 8 bytes. A lambda with state will cost at least 16 bytes.
Method Reference Preference FTW
When we added the “With” methods to Eclipse Collections, it was to reduce the proliferation of “new” instances of Anonymous Inner Classes. We did not know if and when Java would ever get support for concise lambda expressions. Spoiler alert: It did!
What was completely unexpected and a amazing surprise was the addition of method references in Java 8. Method references were one of my favorite surprises in Java 8, and they work wonderfully with the “With” methods in Eclipse Collections.
Chance favors the prepared mind
The “With” method approach works brilliantly with method references.
Here’s an example using anySatisfyWith with the method reference String::startsWith. The withs FTW!
@Test
public void methodReferences()
{
    Set<Predicate2<String, String>> methodReferences =
            HashingStrategySets.mutable.with(
                    HashingStrategies.identityStrategy());

    for (int i = 0; i < 100; i++)
    {
        String parameter = Integer.toString(i);

        Predicate2<String, String> startsWith =
                String::startsWith;

        boolean any = Interval.zeroTo(99)
                .collect(Object::toString)
                .anySatisfyWith(startsWith, parameter);

        assertTrue(any);
        methodReferences.add(startsWith);
    }
    IO.println(GraphLayout.parseInstance(methodReferences).toFootprint());
}
The result from GraphLayout:
org.eclipse.collections.impl.set.strategy.mutable.UnifiedSetWithHashingStrategy@eadd4fbd footprint:
     COUNT       AVG       SUM   DESCRIPTION
         1        24        24   [Ljava.lang.Object;
         1         8         8   org.eclipse.collections.impl.block.factory.HashingStrategies$IdentityHashingStrategy
         1        32        32   org.eclipse.collections.impl.set.strategy.mutable.UnifiedSetWithHashingStrategy
         1         8         8   refactortoec.generation.FatFreeLambdaTest$$Lambda/0x00003fe00124d000
         4                  72   (total)
Inlining the method references and parameter simplifies the code as follows so it is nice and easy to read.
@Test
public void inlinedMethodReferences()
{
    Set<Predicate2<String, String>> methodReferences =
            HashingStrategySets.mutable.with(
                    HashingStrategies.identityStrategy());

    for (int i = 0; i < 100; i++)
    {
        assertTrue(Interval.zeroTo(99)
                .collect(Object::toString)
                .anySatisfyWith(String::startsWith, Integer.toString(i)));
        methodReferences.add(String::startsWith);
    }
    IO.println(GraphLayout.parseInstance(methodReferences).toFootprint());
}
And one last time, the GraphLayout output.
org.eclipse.collections.impl.set.strategy.mutable.UnifiedSetWithHashingStrategy@7bd7d6d6d footprint:
     COUNT       AVG       SUM   DESCRIPTION
         1        24        24   [Ljava.lang.Object;
         1         8         8   org.eclipse.collections.impl.block.factory.HashingStrategies$IdentityHashingStrategy
         1        32        32   org.eclipse.collections.impl.set.strategy.mutable.UnifiedSetWithHashingStrategy
         1         8         8   refactortoec.generation.FatFreeLambdaTest$$Lambda/0x000000780126e000
         4                  72   (total)
Final Thoughts
I hope you will agree that “With” methods were a nice addition in Eclipse Collections. I’ve spoken about them many times previously and have explained how they enhance the ability of Eclipse Collections to use method references. This is the first time I am explaining in detail how they actually help write more efficient code. Java is smart enough to hoist up stateless lambdas and method references as static without requiring you to do it manually like I used to have to with AICs.
For those who think that you can probably do the same thing with Java Stream… I’m sorry, this feature is not available with Java Stream. The only method references and stateless lambdas that can be used with Java Stream are ones that do not capture variables. Which means if your lambda or method reference needs a parameter, and you want to make it stateless, you’ll need to use Eclipse Collections or a library that has similar “With” method support. Eclipse Collections only has support for lambdas and method references that take one more parameter, but often one more is all you need.
I wrote a blog a while ago that included a list of “With” methods available in Eclipse Collections. There’s a section aptly titled “Revenge of the With.” Maybe this will help you rethink your own preposition preference.
Thanks for reading!
I am the creator of and committer for the Eclipse Collections OSS project, which is managed at the Eclipse Foundation. Eclipse Collections is open for contributions. I am the author of the book, Eclipse Collections Categorically: Level up your programming game.
Eclipse Theia 1.71 Release: News and Noteworthy
by Jonas, Maximilian & Philip at May 21, 2026 12:00 AM
We are happy to announce the Eclipse Theia 1.71 release! This release ships 79 merged pull requests. In this article, we will highlight some selected improvements and provide an overview of the latest …
The post Eclipse Theia 1.71 Release: News and Noteworthy appeared first on EclipseSource.
May 19, 2026
AI-Assisted Code Review in the Theia IDE
by Jonas, Maximilian & Philip at May 19, 2026 12:00 AM
With AI coding agents, developers are producing more code than ever, and code reviews are turning into the bottleneck. The obvious next step is to let AI do the reviews too. Most AI review tools try …
The post AI-Assisted Code Review in the Theia IDE appeared first on EclipseSource.
May 18, 2026

Frontier AI and the next phase of software vulnerability defence
by Mike Milinkovich at May 18, 2026 07:00 AM
As advanced AI lowers the cost of discovering and exploiting software vulnerabilities, Europe must treat open source security and rapid patch deployment as critical resilience infrastructure
Context. Frontier AI systems have crossed an important threshold for cybersecurity and software resilience. They are no longer limited to code completion, triage, or report writing; the most capable models can now assist with vulnerability discovery, exploitability analysis, and, increasingly, patch generation. Anthropic’s Project Glasswing, launched on April 7, 2026, put this shift in the public eye by giving selected critical software operators and maintainers early access to Claude Mythos Preview for defensive security work. Anthropic described Glasswing as an initiative to secure critical software with early access to frontier AI, involving major infrastructure, cloud, financial, and open source actors, and extending access to more than 40 organisations that build or maintain critical software infrastructure. Through our longstanding partnership with the Alpha Omega Project, the Eclipse Foundation has been part of the Glasswing Project since its inception, giving us direct experience with this emerging model of AI-assisted vulnerability discovery. To our knowledge, we are currently the only EU-domiciled organisation participating in the initiative, giving us a unique vantage point on how frontier AI capabilities are beginning to reshape software security and resilience.
Why this matters now. The capability jump appears not to be limited to one model, one vendor, or ecosystem. The UK AI Security Institute found that Claude Mythos Preview represented a step-change in cyber performance, including autonomous progress on multi-step attack simulations and high success on expert-level cyber tasks. Less than three weeks later, AISI reported that OpenAI GPT-5.5 reached a similar level of performance on its cyber evaluations and was the second model to complete one of AISI’s multi-step cyber-attack simulations end-to-end. Open-weight models are also narrowing the gap: CAISI’s May 2026 evaluation described DeepSeek V4 Pro as the most capable Chinese model it had evaluated across cyber, software engineering, science, reasoning, and mathematics, while still lagging the leading U.S. frontier by roughly eight months. The implication is that capabilities currently concentrated among a small number of frontier AI providers will quickly become cheaper, more widely available, and harder to govern. This makes early institutional experience with frontier defensive AI workflows strategically important.
The immediate risk: a vulnerability and patching imbalance. Critical infrastructure operators, including energy, transportation, water, health, public services, and financial services, are especially exposed because many run complex, legacy, opaque software estates where patching is slow, cautious, and operationally disruptive. This is not a hypothetical concern: the US Government’s GAO’s 2025 review of critical federal legacy systems found outdated languages, unsupported hardware or software, and known cybersecurity vulnerabilities in systems supporting missions such as critical infrastructure, tax processing, and national security. CISA similarly warns that outdated software is a gateway for threat actors in critical infrastructure contexts, including public-facing routers, VPNs, and firewalls used to reach operational systems. NCSC now expects a “vulnerability patch wave”: a rush of software updates across open source and commercial software stacks as AI accelerates discovery of long-standing technical debt.
The systemic threat. AI-assisted vulnerability discovery changes the economics of offense. It lowers the time, expertise, and cost needed to find flaws, validate exploitability, and turn known-but-unpatched vulnerabilities into working attacks. This is particularly dangerous where many institutions depend on the same software, libraries, cloud providers, identity systems, network appliances, or open source software components. For decades, many IT and operational technology environments have treated patching as an operational disruption to be minimized, especially when systems appear to be running correctly. In some cases, this caution is understandable: outages can have safety, economic, regulatory, and reputational consequences. But the balance of risk is changing. When AI can accelerate vulnerability discovery and exploitation, “stable but unpatched” systems can quickly become systematically exposed. Changing this culture and making rapid, well-tested patch deployment a core resilience function may be one of the hardest short-term challenges. The most serious concern is the possibility that threat actors will use AI to discover and exploit “zero day” vulnerabilities before patches are available. The IMF warned on May 7, 2026 that advanced AI models can reduce the time and cost of identifying and exploiting vulnerabilities, increasing the likelihood of correlated failures across widely used systems; it specifically identified financial intermediation, payments, and confidence as systemic risk channels. The same concern applies to cross-sector dependencies among finance, energy, telecommunications, public services, and digital infrastructure.
The Eclipse Foundation’s key finding. Our most important finding from the one-month experiment with Mythos was that operational workflows, validation pipelines, and human oversight matter at least as much as the model. Glasswing’s real significance is not simply that one frontier model found more vulnerabilities. It is that a community of security researchers can iteratively improve prompts, agentic harnesses, target selection methods, reproduction pipelines, and triage workflows, and then apply those methods across multiple market-available models, including cheaper and more widely accessible ones. Anthropic’s own technical write-up reinforces this point: its vulnerability work used agentic scaffolds, containers, target ranking, repeated runs, and validation methods rather than a bare chatbot prompt. NCSC likewise stresses that practical AI cyber capability comes from AI systems—models combined with tools, workflows, and human oversight—not from raw model capability alone.
The opportunity: shared defence capacity at machine speed. The same tools that raise offensive risk can strengthen defense if deployed first and responsibly. AI can continuously scan code and dependencies, generate fuzzing harnesses, prioritize findings by exploitability and exposure, propose patches, produce regression tests, summarize impact for maintainers, and accelerate coordinated vulnerability disclosure. NCSC identifies three high-value defensive uses: reducing attack surface through AI-enabled testing and hardening, improving detection and investigation, and automating mitigation and response where carefully governed. The strategic objective should be to convert AI-driven discovery into AI-assisted remediation faster than adversaries can convert discovery into exploitation. Organisations that are not using AI to strengthen threat detection, prevention, and mitigation risk being outpaced by AI-enabled attackers.
What Europe should do now. Europe should treat AI-enabled open source security as shared digital resilience infrastructure. That means investing in trusted vulnerability discovery, coordinated disclosure, maintainer support, patch validation, and deployment readiness across the software components that underpin critical services. No single vendor, foundation, institution, or member state can solve this alone; it requires an ecosystem response. Europe should also ensure that trusted public institutions and open source ecosystems remain directly involved in frontier AI cybersecurity evaluation and remediation efforts, rather than relying on commercial actors outside Europe.
Open source is not the problem; it is the solution. The risk does not come from open source. It comes from the fact that many organisations depend on software they do not fully understand, cannot fully inventory, and cannot patch quickly enough. Open source makes that dependency visible, auditable, and repairable. Open source governance structures may become increasingly important in AI-enabled remediation ecosystems because their transparency, global maintainer communities, reproducible builds, public issue tracking, coordinated disclosure practices, and shared security tooling make them uniquely capable of operating at ecosystem scale. CISA’s Open Source Software Security Roadmap explicitly recognizes OSS as a public good supported by diverse communities and calls for supporting critical OSS components relied on by government and critical infrastructure. Furthermore, AI is enabling increasingly sophisticated reverse engineering tools that can generate source code from proprietary binaries, making “security through obfuscation” an implausible strategy.
Conclusion. This is a global software resilience issue, with direct implications for Europe’s security, digital sovereignty, and strategic autonomy. Critical infrastructure and financial services everywhere rely on globally developed open source components, shared platforms, and common supply chains. Local champions will matter, but isolated national responses will not be sufficient. The priority is coordinated action: shared AI-enabled vulnerability discovery, trusted disclosure channels, maintainer support, rapid patch production, dependency intelligence, and deployment capacity across public and private sectors. Ultimately, resilience will depend not only on AI capability itself, but on trusted ecosystems capable of coordinating remediation rapidly across shared infrastructure. The Eclipse Foundation will work with public institutions, industry, and open source communities to help strengthen these shared resilience capabilities across the European software ecosystem. Ultimately, resilience will depend not only on AI capability itself, but on trusted ecosystems capable of coordinating remediation rapidly across shared infrastructure. Open source should be treated not as the weak link, but as the coordination layer through which Europe and its global partners can find, fix, validate, and deploy security improvements at the speed modern resilience now requires.
May 13, 2026

Announcing Eclipse Ditto Release 3.9.0
May 13, 2026 12:00 AM
Eclipse Ditto team is excited to announce the availability of a new minor release, including new features: Ditto 3.9.0.
The focus of this release is on policies, multi-tenancy and reuse. Operating Ditto for several tenants sharing one cluster — or for organizations that want to apply consistent governance and audit rules across many policies — has historically required either duplicating policy entries across every tenant’s policy or maintaining ad-hoc policy templates outside Ditto. Ditto 3.9.0 brings these patterns into the platform itself with three complementary building blocks:
- Namespace-scoped policy entries let a single policy carry entries that only apply to Things in specific namespaces — so a tenant’s policy can be expressed as a small set of namespace-aware rules instead of as separate policies per tenant.
- Namespace root policies let operators configure policies that are transparently merged into every policy of a given namespace, without each policy author having to opt in. This is the natural home for cross-tenant concerns: governance and audit READ access, compliance monitoring, break-glass SRE accounts, or forced minimum logging.
- Entry-level
referencesfor policies and policy imports replace duplicated subject/resource blocks with a uniform mechanism for additively merging from other entries — both inside the same policy and from imported “template” policies. Imported entries can declare exactly what kinds of additions (subjects,resources,namespaces) referencing entries are allowed to contribute viaallowedAdditions, andtransitiveImportsopt selected imports in to multi-level resolution. The new resolved policy view (policy-view=resolved) returns the merged effective policy after imports and namespace-root resolution, which makes debugging effective permissions much easier.
To round off the multi-tenancy story, gateway-level namespace access control restricts which namespaces an authenticated request may touch — for example by matching a JWT claim — so that a token issued for one tenant cannot reach Things in another tenant’s namespace.
Beyond policies, this release also brings a new WoT Discovery “Thing Directory” endpoint, dynamically
scoping a WoT Thing Description to the requesting user’s permissions, partial change notifications
based on Policy READ permissions, the checkPermissions API for all protocols (WebSocket, AMQP, MQTT —
not only HTTP), encryption key rotation for connection secrets, an empty() RQL filter, the
fn:format() placeholder pipeline function, slow search query logging, configurable custom
MongoDB search indexes, per-namespace activity-check configuration, a history exploration mode in
the Explorer UI and quite a number of further enhancements.
On the operations side, Ditto now builds and runs on Java 25, and the bundled Helm chart no longer
ships an ingress-nginx controller — the choice of ingress controller is left to the operator. To reflect
this breaking change, the Helm chart moves to a major version 4.0.0, and from now on the chart
follows its own semantic versioning, decoupled from Ditto’s appVersion. Chart-only changes will
increment the chart version independently of the Ditto release cycle.
Adoption
Companies are willing to show their adoption of Eclipse Ditto publicly: https://iot.eclipse.org/adopters/?#iot.ditto
When you use Eclipse Ditto it would be great to support the project by putting your logo there.
Changelog
The main improvements and additions of Ditto 3.9.0 are:
- Namespace-scoped policy entries to limit a policy entry’s scope to a configured set of Thing namespaces
- Namespace root policies which are transparently merged into all policies of a configured namespace
- Limiting which namespaces are accessible at the gateway level via configurable, placeholder-based rules
- Entry-level
referencesin policies and policy imports, withtransitiveImportsfor selective multi-level resolution andallowedAdditionsto control what may be merged in - Resolved policy view API option returning the merged effective policy after imports and namespace-root resolution
- Partial change notifications based on Policy READ permissions
checkPermissionsAPI for all protocols — previously only HTTP — making permission checks available via WebSocket, AMQP and MQTT- WoT Discovery “Thing Directory” endpoint following the W3C WoT Discovery specification
- Dynamically scoping a WoT Thing Description to the requesting user’s policy permissions
- Encryption key rotation for connectivity service secrets, including DevOps-triggered re-encryption of stored credentials
- X509 client-certificate authentication to MongoDB, with a configurable CA root certificate for the TLS connection
empty()RQL filter to match absent or empty fields in search and event filtersfn:format()placeholder pipeline function for correlated field extraction from JSON arrays- Slow search query logging with configurable threshold to identify expensive queries
- Configurable custom MongoDB search indexes for tuning Ditto search to specific workloads
- Per-namespace activity-check configuration to vary entity passivation timeouts per namespace
- Live entities Prometheus metric per namespace and entity type
- OpenID Connect prerequisite-conditions for early JWT rejection (e.g. audience validation)
- Local/relative
tm:refreferences in WoT ThingModel resolution ditto:deprecationNoticeWoT extension term to mark deprecated properties, actions and events- “Time Travel” mode in the Explorer UI to inspect a Thing’s state at any past revision or timestamp, alongside live and historical event browsing
The following non-functional work is also included:
- Building and running Ditto with Java 25
- Optimizing the
MongoReadJournalaggregation pipelines and theThingEventEnricherhot path - JFR-guided CPU optimisations in the things, things-search, gateway and connectivity services
- Stackless 4xx exceptions (feature-toggled) to eliminate stack-capture overhead on flow-control errors
- Configurable SSE publisher backpressure buffer size to suppress noisy backpressure WARN logs from slow SSE consumers
- Comprehensive JavaDoc for the public WoT model interfaces
- Helm chart bumped to
4.0.0with the bundledingress-nginxcontroller removed — operators provide their own ingress controller; the chart now uses its own semantic version, decoupled from Ditto’sappVersion - Updating dependencies to their latest versions
- Providing additional configuration options to Helm values
The following notable fixes are included:
- Surfacing enforcement and validation errors for fire-and-forget commands instead of silently swallowing them
- Fixing
checkPermissionsignoring permissions inherited from imported policies - Fixing partial-access SSE event filtering for subscribers with multiple authorization subjects
- Fixing a MongoDB aggregation pipeline performance regression affecting
connections_journalreads - Fixing a Kafka consumer crash loop triggered by messages with blank header values
- Fixing a Fluency thread leak in the connection logger publisher
- Fixing subscription handling for multiple topics combined with extra fields in connectivity outbound mapping
- Redacting sensitive header values in
DittoHeaders.toString()to prevent accidental log leaks - Converting transient enforcement
AskTimeoutExceptionto HTTP 503 instead of 500 during rolling restarts, so clients see a retryable error - Fixing
ssl-confignot being picked up for self-signed certificates against the OpenID Connect issuer - Closing a shadowing vulnerability in namespace-policies by routing namespace-policy entries through rewritten labels
Please have a look at the 3.9.0 release notes for more detailed information on the release.
Artifacts
The new Java artifacts have been published at the Eclipse Maven repository as well as Maven central.
The Ditto JavaScript client release was published on npmjs.com:
The Docker images have been pushed to Docker Hub:
- eclipse/ditto-policies
- eclipse/ditto-things
- eclipse/ditto-things-search
- eclipse/ditto-gateway
- eclipse/ditto-connectivity
The Ditto Helm chart has been published to Docker Hub:

–
The Eclipse Ditto team
Helm chart now ingress controller agnostic
May 13, 2026 12:00 AM
Starting with Helm chart version 4.0.0, Eclipse Ditto’s Kubernetes deployment is no longer tied to a specific ingress controller. The chart now provides clean, standard Kubernetes Ingress resources that work with any ingress controller — whether you use ingress-nginx, Traefik, HAProxy, Kong, or any other implementation.
What changed
Previously, the Ditto Helm chart bundled an entire ingress-nginx controller deployment (854 lines of RBAC,
Deployments, Services, admission webhooks, and IngressClass) and hardcoded nginx.ingress.kubernetes.io/* annotations
across all Ingress resource templates. This forced users to use ingress-nginx and prevented adoption of other ingress
controllers.
In version 4.0.0, we made the following changes:
- Removed the bundled ingress-nginx controller deployment — users bring their own ingress controller
- Removed all nginx-specific annotations from Ingress resources — annotations are now empty by default
- Simplified path types to standard
PrefixandExact— no more controller-specific regex paths - Added per-group
enabledflags — each route group (api, ws, ui, devops) can be independently toggled - Replaced the
backendSuffixpattern with explicitservice.namereferences
Breaking changes
This is a major version bump (3.x → 4.0.0) with breaking changes to values.yaml:
ingress.controller.*— entire block removed (no longer deploying a controller)ingress.annotations— global nginx-specific annotations removedingress.api.kubernetesAuthAnnotations— removedingress.className— default changed from"nginx"to""(empty)ingress.host— default changed from"localhost"to""(catch-all)backendSuffix— replaced byservice.namein each path entry- All per-group nginx-specific annotation blocks — removed
New values.yaml structure
The ingress section is now clean and controller-agnostic:
ingress:
  enabled: false
  className: ""        # Set to your controller's IngressClass
  host: ""             # Optional hostname — if empty, no host rule (catch-all)
  tls: []

  api:
    enabled: true
    annotations: {}    # Add your controller-specific annotations here
    paths:
      - path: /api
        pathType: Prefix
        service:
          name: gateway
      - path: /stats
        pathType: Prefix
        service:
          name: gateway
      - path: /overall
        pathType: Prefix
        service:
          name: gateway

  ws:
    enabled: true
    annotations: {}
    paths:
      - path: /ws
        pathType: Prefix
        service:
          name: gateway

  ui:
    enabled: true
    annotations: {}
    # defaultBackend serves as the catch-all for unmatched paths (e.g. the landing page)
    defaultBackend:
      service:
        name: nginx
    paths:
      - path: /
        pathType: Exact
        service:
          name: nginx
      - path: /apidoc
        pathType: Prefix
        service:
          name: swaggerui
      - path: /ui
        pathType: Prefix
        service:
          name: dittoui

  devops:
    enabled: true
    annotations: {}
    paths:
      - path: /devops
        pathType: Prefix
        service:
          name: gateway
      - path: /health
        pathType: Prefix
        service:
          name: gateway
      - path: /status
        pathType: Prefix
        service:
          name: gateway
      - path: /api/2/connections
        pathType: Prefix
        service:
          name: gateway
Deployment modes
The chart supports three deployment modes:
Standalone nginx pod (default, unchanged)
The standalone nginx reverse proxy remains the default for local and development setups. No ingress controller needed — access Ditto via port-forward:
helm install ditto ditto/ditto
kubectl port-forward svc/ditto-nginx 8080:8080
Ingress with nginx pod
Use Ingress resources for external access while keeping the nginx pod for the landing page and static resources:
helm install ditto ditto/ditto \
  --set ingress.enabled=true \
  --set ingress.className=nginx \
  --set ingress.host=ditto.example.com
Ingress only (no nginx pod)
For production setups where the landing page is not needed, disable the nginx pod and the UI ingress’s root path:
helm install ditto ditto/ditto \
  --set ingress.enabled=true \
  --set ingress.className=nginx \
  --set ingress.host=ditto.example.com \
  --set nginx.enabled=false
Controller-specific configuration
Since controller-specific behavior (authentication, CORS, timeouts, URL rewriting) is now the user’s responsibility, here are examples for common ingress controllers.
ingress-nginx
For the Ditto UI and Swagger API docs, ingress-nginx requires regex paths and a rewrite annotation to strip the path prefix before forwarding to the backend.
Note that when use-regex is enabled, the root path / must be specified as /$ with pathType: ImplementationSpecific
to ensure it matches only the exact root path and does not conflict with the ingress controller’s default catch-all:
ingress:
  enabled: true
  className: nginx
  host: ditto.example.com
  api:
    annotations:
      nginx.ingress.kubernetes.io/proxy-read-timeout: "70"
      nginx.ingress.kubernetes.io/proxy-send-timeout: "70"
  ws:
    annotations:
      nginx.ingress.kubernetes.io/proxy-read-timeout: "86400"
      nginx.ingress.kubernetes.io/proxy-send-timeout: "86400"
      nginx.ingress.kubernetes.io/proxy-buffering: "off"
  ui:
    annotations:
      nginx.ingress.kubernetes.io/use-regex: "true"
      nginx.ingress.kubernetes.io/rewrite-target: /$2
    paths:
      - path: /$
        pathType: ImplementationSpecific
        service:
          name: nginx
      - path: /apidoc(/|$)(.*)
        pathType: ImplementationSpecific
        service:
          name: swaggerui
      - path: /ui(/|$)(.*)
        pathType: ImplementationSpecific
        service:
          name: dittoui
Traefik
Traefik requires a Middleware CRD to strip path prefixes. First, create the middleware in the Ditto namespace:
apiVersion: traefik.io/v1alpha1
kind: Middleware
metadata:
  name: strip-prefix
  namespace: ditto
spec:
  stripPrefix:
    prefixes:
      - /ui
      - /apidoc
Then reference it in the ingress configuration:
ingress:
  enabled: true
  className: traefik
  host: ditto.example.com
  ui:
    annotations:
      traefik.ingress.kubernetes.io/router.middlewares: ditto-strip-prefix@kubernetescrd
HAProxy
ingress:
  enabled: true
  className: haproxy
  host: ditto.example.com
  ui:
    annotations:
      haproxy.org/path-rewrite: "/ /"
What stays the same
- The standalone nginx pod for local/development deployments is unchanged
- The OpenShift Route template is unchanged
- All Ditto service templates (gateway, things, policies, connectivity, etc.) are unchanged
- The 4 route groups (api, ws, ui, devops) cover all Ditto endpoints — the root landing page is now part of the ui group
Migrating from 3.x
- Install your ingress controller separately (e.g., via its own Helm chart)
- Update your values.yaml to match the new structure — replace
backendSuffixwithservice.name, removeingress.controller.*and global annotations - Add controller-specific annotations to the appropriate route groups
- Upgrade the chart to version 4.0.0
–
The Eclipse Ditto team
April 28, 2026
AI will end anonymity on the Internet
by Niko Stotz at April 28, 2026 10:13 AM
tl;dr AI slop is here to stay. We cannot detect AI content, thus we must mark human content. This requires to identify the human to a varying degree. The fundamental technology is there, and will be integrated in browsers.
AI slop is here to stay

I tried to search for C6 envelope templates on the web – hardly a topic to bring forth the next billionaire. Nonetheless, two-thirds of the webpages were clearly AI generated. (Current research estimates ⅓ of new websites to be AI slop.)
My ad-blocker saved me, but seemingly even slop sites for such a benign topic are economically viable. This won’t stop once Claude et al. charge profitable fees (read: > $ 1000 per user per month) for their service. Such a slop site is there for the long game. The economical incentive doesn’t change if it takes a local model on a tiny machine a week to create the site.
Detecting AI content is impossible
AI can create content at superhuman speed, overwhelming any manual review system. Therefore, we would need to rely on automated detection systems. The only realistic chance are AI systems that detect AI content. We can only lose this arms race: While creating the slop site, the “author” can run it against AI detectors and fine-tune until it passes.
Watermarking does work technically for higher bandwidth content (images, audio, video), but the “authors” easily can use custom AI systems that don’t create watermarks.
We need to recognize genuine human content
We can’t detect AI content, but still want to enjoy human-made content. But why?
In the C6 envelope example above, none of the AI slop sites hosted actual templates. They contained lots of generic text on the topic, and linked to templates on, or stole templates from, other sites. They made it harder to find what I was actually looking for.
Skimming a site for downloadable templates at least doesn’t take too much mental effort. But for a lot of slop sites, we can only determine their uselessness after reading for some time. They consume our mental resources without providing value.
At least such slop sites are only after our money (via ads). Others want to misinform us. Recognizing such attempts could very well prove to be vital for our societies.
Future progress on AI also needs to recognize human-written texts, as LLMs trained on generated output collapse.
Current AI crawlers overload lots of websites by bombarding them with thousands of requests. These crawlers ignore the website’s rules (robots.txt) about the part of the website they should leave alone. A website can terminate any connection to non-human counterparts.
If you can’t detect the enemy, identify the allies
If we can’t detect the bad apples, we need to identify the good ones. We can’t rely on “I’m a human, pinky swear” promises, as any AI can forge such statements. We need a (mostly) tamper-proof system of identification.
Thankfully, we don’t need to invent such a system from scratch: the public key infrastructure maintained and enforced by CA/Browser forum serves a similar purpose. It makes sure that visiting https://www.wikipedia.org/ shows us the contents of Wikipedia, without anybody tampering with the contents. It is fully integrated in the browser, we don’t need to do anything special.
It is a very complex, but mostly working system, that avoids all-powerful gatekeepers: the “trust roots” are called certificate authorities, and we can have lots of them; any website can participate; and all browsers support the standard.
https gives us users the trust that we see the genuine website – but how can the website trust the user? We also have existing technology for this: the Web Authentication API standard defines how a website can trust a browser to identify the user in front of it, e.g. by user presence, meaning pressing a physical button.
These technologies are building blocks for a future standard that reliably identifies humans. To fight AI slop this standard doesn’t need to be bullet-proof; it must only make AI slop more expensive than troll farms and scam centers. (Such a standard might even help against the latter exploitations, if it included revocation of misused anonymous identities.)
This would not stop humans from using AI to create their content, and that’s ok: Use cases like translation, grammar fixes, and picture touch-up, are legitimate and helpful AI applications. As long as a human is involved, and takes responsibility for the result, this doesn’t turn the tide of AI slop.
All your identity are belong to us?
Does this mean every website will know everything about every visitor? Thankfully, no. Standards like ISO 18013-5 (also used in the European age verification app) allow for different levels of attestation. Similar technology will be part of every web browser, the same as https is now. The “trust root” will be countries, the same as for official documents like driver’s license or passport.
Each website can choose the level of attestation it requires:
- unknown
- No attestation at all – same as today’s public websites.This will be the Internet’s 4chan. It exists, some may visit it for specific use-cases, but it will generally be ignored. Search engines will not show content from such sites (at least by default).
- anonymous
- The website only asks that the user is a human, it doesn’t care who the user is, and never gets this information.This will be the default for most websites, akin to a reliable version of today’s “I’m not a bot” checkboxes. The aforementioned standards ensure that only serious collusion between browsers, internet providers, website owners, and countries might lead to the actual identity of the visitor.
- pseudonymous
- The website asks for an alias (or username) of the human user. The same website always gets the same alias for the same user, but a different website will get a different alias.
This will be for websites like forums that in general don’t care who the user is, but want to prevent the same user to create multiple accounts. Depending on the implementation, the website together with the originating country might reveal the actual identity of the visitor. - identified
- The website asks for a proven identity of the human user.This is already used today for websites like banks, company-internal systems, or government agencies. The website owner already knows the user’s identity. The user also expects to be identified – nobody wants anonymous logins to their bank account!
The end of free Internet?!
Lots of people consider anonymous Internet usage as standard. This might not be warranted – most countries (including countries that claim to value freedom) have technical abilities to identify users via their IP address. Actual anonymity requires serious effort and constant vigilance on any potentially identifying information.
I’m not saying I like this trajectory. I argue we won’t have a good choice – either drown in AI slop or give up some level of anonymity. Done right, we might win at least a bit of consolation: actual anonymity would still be possible with the right tools; anonymous websites could be really anonymous, also towards governments; pseudonymous forum access could be sufficient to catch CSAM offenders and prevent governments from enforcing more stringent surveillance measures; and identifying to banks and government websites could become a lot less of a hassle.
April 21, 2026
Eclipse Foundation Launches Open VSX Managed Registry
by Natalia Loungou at April 21, 2026 08:33 AM
BRUSSELS – 21 April 2026 – The Eclipse Foundation today announced Open VSX Managed Registry, the open source software ecosystem’s first foundation-operated managed service for critical developer infrastructure.
Open VSX is the open source, vendor-neutral extension registry for tools built on the VS Code™ extension API. It powers a rapidly expanding ecosystem of AI-native IDEs, cloud development environments, and VS Code-compatible platforms, including Kiro by Amazon Web Services (AWS), Google’s Antigravity, Cursor, VSCodium, Windsurf, IBM Bob, Ona (Gitpod), and others.
Open VSX Managed Registry provides commercial adopters with a 99.95% uptime SLA, service credits, defined support tiers, and enterprise-grade operational assurance for sustained, production-scale usage.
As AI-driven development accelerates automation, continuous installs, and machine-to-machine traffic, extension registries have become high-traffic, always-on infrastructure. What was once primarily community-scale usage now reflects sustained commercial platform dependency at global scale.
“Open VSX has become critical infrastructure for modern developer platforms,” said Mike Milinkovich, Executive Director of the Eclipse Foundation. “As AI-era usage drives exponential growth in traffic and operational complexity, commercial adopters require defined service levels and operational guarantees. Open VSX Managed Registry provides enterprise-grade reliability and accountability while preserving open governance, vendor neutrality, and free access for developers.”
Open VSX now serves more than 300 million downloads per month, with peak daily traffic exceeding 200 million requests. The registry hosts over 12,000 extensions from more than 8,000 publishers, and continues to grow rapidly as adoption expands across AI-native developer tooling and cloud-based platforms.
Operating a global extension registry at this scale requires significant investment in compute capacity, bandwidth, storage, security operations, and the engineering expertise necessary to maintain availability and resilience. AI-driven development is accelerating that demand. With automated workflows and coding agents, a single developer can now generate infrastructure load comparable to that of dozens of traditional users, increasing both traffic volume and operational complexity.
Initial customers of the Open VSX Managed Registry include AWS, Google, and Cursor. These organisations are adopting the managed service to secure production-grade reliability, defined service levels, and predictable scaling for global developer platforms.
The service is designed for organisations using Open VSX as critical infrastructure within commercial products, AI-scale services, or enterprise development environments. It aligns operational accountability with the expectations of production systems.
What Open VSX Managed Registry delivers:
- 99.95% availability targets with service credits
- Defined usage tiers aligned to sustained request-per-second consumption
- Multi-region architecture, including European-based infrastructure, for resilience and low latency
- 24/7 monitoring and tier-based incident response aligned to defined support SLAs
- Capacity planning for high-volume automated workloads
- Identity-based access controls and usage dashboards
- Vendor-neutral governance under the Eclipse Foundation
The managed service is typically significantly more cost-effective than self-hosting equivalent global infrastructure at scale. In addition to operating production-grade infrastructure, Open VSX represents a large and growing ecosystem of extensions, where attracting and supporting thousands of publishers and maintaining marketplace trust are essential to delivering long-term value.
Individual developers and open source projects never pay to use the Open VSX Registry. Publishing, search, and standard development workflows remain unchanged. Open source IDEs and community projects continue to benefit from generous free-tier limits.
Paid tiers apply when enterprise tools, IDEs, or platforms embed Open VSX at production scale and require predictable capacity and SLA-backed operations. This usage-aligned model ensures commercial consumption funds the operational investment required to keep Open VSX secure, resilient, and sustainable.
By operating the managed service directly, the Eclipse Foundation brings more than 20 years of experience running mission-critical open source infrastructure for a global ecosystem of millions of developers and thousands of industry adopters. Organisations can now depend on defined service levels while still maintaining vendor neutrality and transparent governance.
“AI agents have changed the economics of developer infrastructure,” said Thabang Mashologu, Chief Marketing Officer & Head of Products at the Eclipse Foundation. “Registries that were designed for human-scale usage must now operate at machine-scale traffic levels. When commercial platforms depend on Open VSX at production scale, the underlying infrastructure must meet enterprise expectations. This managed service delivers SLA-backed reliability and predictable scaling, while ensuring Open VSX remains open and freely accessible to individual developers and open source projects.”
Early commercial adoption of Open VSX Managed Registry
AWS – “With Kiro, we need extension registry infrastructure that matches our commitment to reliability and performance at global scale. Open VSX Managed Registry will allow us to provide Kiro users access to the tooling and customization they need to continue building and innovating.” – Kathy Kam, Director of Software Development, AWS
Google – “Google Antigravity relies on consistent, high-availability access to the open VS Code extension ecosystem. The managed service provides a clear and supported path to depend on Open VSX at production scale.” - Anshul Ramachandran, Group Product Manager, Google DeepMind
Availability
Open VSX Managed Registry is available immediately.
Organisations using Open VSX as critical infrastructure within commercial or AI-scale platforms can learn more about service tiers, SLA details, and pricing at https://managed.open-vsx.org, or contact the Open VSX Managed Registry Sales team at sales@open-vsx.org to discuss their operational requirements.
The Open VSX Registry remains freely accessible at open-vsx.org.
About the Open VSX Registry
The Open VSX Registry is the open, vendor-neutral extension registry for tools built on the VS Code™ extension API. Governed transparently under the Eclipse Foundation, it provides developers, publishers, and platform builders with a trusted open alternative to proprietary extension marketplaces. Because Eclipse Open VSX is open source and self-hostable, organisations may also deploy their own internal registry implementations as needed.
About the Eclipse Foundation
The Eclipse Foundation provides a global community of individuals and organisations with a vendor-neutral, business-friendly environment for open source collaboration and innovation. We host Adoptium, the Eclipse IDE, Jakarta EE, Open VSX, Software Defined Vehicle, and more than 400 high-impact open source projects. Headquartered in Brussels, Belgium, we are an international non-profit association supported by over 300 members. Our events, including Open Community Experience (OCX), bring together developers, industry leaders, and researchers from around the world. To learn more, follow us on X and LinkedIn, or visit eclipse.org.
Media contacts:
Schwartz Public Relations
Julia Rauch/Luca Myska
Sendlinger Straße 42A
80331 München
EclipseFoundation@schwartzpr.de
+49 (89) 211 871 -43/ -52
514 Media Ltd (France, Italy, Spain)
Benoit Simoneau
M: +44 (0) 7891 920 370
Nichols Communications (Global Press Contact)
Jay Nichols
+1 408-772-1551
April 20, 2026
Data In Motion to spearhead OSGi modernization
by Ralph Göring at April 20, 2026 12:06 PM
Data In Motion has been commissioned by the Sovereign Tech Fund to modernize the OSGi ecosystem over the next 12 months.
Open source infrastructure underpins much of the software world, but it often goes underfunded. That is exactly the gap that the Sovereign Tech Agency was created to close, by using a range of dedicated programs, including the Sovereign Tech Fund. OSGi got selected as one of the technologies to be improved.
OSGi (Open Services Gateway initiative) is a mature, battle-tested framework for building modular Java applications. At its core, it solves a problem that every large Java project eventually runs into: as codebases grow, managing dependencies, versioning, and the lifecycle of components becomes a tangled mess. OSGi brings order to that complexity.
Where standard Java treats an application as a single monolithic classpath, OSGi introduces the concept of bundles - self-contained units of code that explicitly declare what they provide and what they need. The OSGi runtime manages these bundles dynamically: they can be installed, started, stopped, updated, and removed at runtime without restarting the entire application.
OSGi is the foundation beneath some of the most widely used Java platforms in the world — including the Eclipse IDE, Adobe Experience Manager, many enterprise application servers, and countless embedded and IoT systems. If you have used Eclipse or built on top of it, you have already relied on OSGi without necessarily knowing it.
Data In Motion is a long-time contributor to the OSGi ecosystem, and is proud to have been commissioned to lead this effort to the next level. Together with the community (including the BNDtools project), Data In Motion will coordinate work across several targeted improvement areas over the coming year.
If you want to learn more about OSGi, check out the project at:


Java News Roundup: OpenJDK JEPs, Jakarta EE 12, Spring Framework, Micrometer, Camel, JBang
by Michael Redlich at April 20, 2026 02:30 AM

This week's Java roundup for April 13th, 2026, features news highlighting: new OpenJDK JEPs; point releases of Apache Grails, Apache Camel and JBang; maintenances of Spring Framework that include resolutions to CVEs; first release candidates of Spring Data and Micrometer Metrics; beta releases of Eclipse Store and Eclipse Serializer; and an update on Jakarta EE 12.
By Michael RedlichApril 16, 2026
ORC's Joint Statement: Strengthening Open Source Sustainability via Article 25 of the EU Cyber Resilience Act
by Shanda Giacomoni at April 16, 2026 12:00 PM
Our Core Position
We believe the voluntary attestation framework, described in Article 25 of the CRA, offers a transformative opportunity to strengthen open source sustainability. By creating a mechanism to standardise and formally recognise security information provided by open source projects, the overall compliance burden can be reduced and projects can become more attractive to manufacturers by making it easier to carry out their due diligence obligations. We believe Article 25 can enable sustainable long-term funding, and bolster community-led self-governance of open source projects, improving cybersecurity across the European market, and lowering the compliance burden that the CRA would otherwise impose on small and medium enterprises.
The four pillars of our proposed Article 25 Framework
1. Facilitating efficient Due Diligence via trusted artefacts. The CRA requires manufacturers to perform due diligence on every integrated component, including free and open source components. We support the development of interoperable, open standards for attestation artefacts that can eliminate the "denial-of-service attack" on maintainers caused by duplicative compliance requests and provide manufacturers with consistent, trustworthy information they can integrate into their risk assessments, and that can also be accessible by the Market Surveillance Authorities.
2. Incentivising security maintenance across the supply chain. Attestations create a bridge between regulatory requirements and economic support. This framework provides a structured pathway for manufacturers to financially support the investment in ongoing security made by the stewards and maintainers of projects they use and rely on, that goes directly and transparently to each open source project.
3. Strengthening community-led governance and resilience. We advocate for an attestation model that is strictly voluntary, adaptable to the open source project, and risk-based, ensuring there are different levels of attestation so that projects can choose the level that matches their interests and capacity. The framework must avoid indirect compliance pressure on micro-projects and independent maintainers. Proportionality is essential to preserve the diversity and decentralised nature of open source ecosystems.
4. Safeguarding openness and market neutrality. The voluntary attestation framework ensures market neutrality and prevents undue burdens by remaining strictly voluntary and non-discriminatory. It should offer free, baseline artifacts as the default for maintainers. Choosing not to provide higher-tier attestations does not imply non-compliance, as manufacturers remain ultimately liable for their own risk assessments. This approach protects diverse governance models across all project sizes.
Conclusion
Voluntary Security Attestations are not a “proposal” of the open source community, they are an option explicitly mentioned in the European law, and represent a unique opportunity for the European Commission to facilitate due diligence obligations of manufacturers while empowering open source communities. Voluntary attestations should also support the role of Member State market surveillance authorities under the CRA. Where appropriate, alignment with the EU cybersecurity certification framework and guidance from the European Union Agency for Cybersecurity (ENISA) would enhance coherence and legal certainty.
While the details of the potential Delegated Act on attestations are not yet available, we look forward to continuing to collaborate with the open source community and with the European Commission, and to clarify and operationalise manufacturer accountability in a proportionate manner.
Eclipse Theia 1.70 Release: News and Noteworthy
by Jonas, Maximilian & Philip at April 16, 2026 12:00 AM
We are happy to announce the Eclipse Theia 1.70 release! This is a landmark release: AI Coding features in the Theia IDE officially graduate from beta, reflecting over a year of usage, continuous …
The post Eclipse Theia 1.70 Release: News and Noteworthy appeared first on EclipseSource.
April 14, 2026
The Eclipse Foundation Launches Open VSX Security Researcher Recognition Program to Strengthen Supply Chain Security
by Natalia Loungou at April 14, 2026 11:00 AM
BRUSSELS – 14 April 2026 – The Eclipse Foundation today announced the Open VSX Security Researcher Recognition Program, a new initiative designed to strengthen the security of the Open VSX Registry by encouraging responsible vulnerability disclosure and recognising contributions from the global security research community.
The program establishes a clear, ethical pathway for reporting security vulnerabilities affecting Open VSX, while formally acknowledging individuals and organisations who help improve the security, integrity, and trust of the ecosystem.
The announcement follows the significant momentum and continued growth of the Open VSX Registry, which recently surpassed 300 million monthly downloads and has become critical infrastructure for AI-native IDEs, cloud development environments, and VS Code-compatible platforms used by millions of developers worldwide.
“Open VSX is critical infrastructure for modern developer platforms, making it an increasingly attractive target for bad actors and reinforcing the need for proactive risk mitigation,” said Mike Milinkovich, Executive Director of the Eclipse Foundation. “As adoption accelerates and the threat landscape becomes more sophisticated, responsible security research is essential. This program creates a clear path for researchers to collaborate with us and be recognised for protecting the ecosystem.”
Strengthening supply chain security through responsible disclosure
As extension registries play an increasingly central role in modern software development, they have also become part of the active threat landscape of the software supply chain. Attackers have demonstrated the ability to exploit extension ecosystems to distribute malicious code, compromise development environments, and access sensitive data.
The Open VSX Registry has introduced a range of proactive security measures to address these risks, including pre-publication verification, detection of malicious patterns, and infrastructure enhancements to improve resilience and trust.
The Security Researcher Recognition Program builds on these efforts by:
- Encouraging early, responsible disclosure of vulnerabilities
- Providing a direct and transparent reporting process
- Supporting coordinated remediation with maintainers and stakeholders
- Strengthening collaboration with the global security research community
-
Publicly recognising impactful contributions
Recognition-based model to support the security researcher community
The Open VSX Security Researcher Recognition Program is designed to complement existing security practices by focusing on recognition, transparency, and collaboration, rather than financial incentives.
Eligible contributors may receive:
- Public recognition in the Open VSX Security Hall of Fame
- Shareable digital badges and certificates of recognition
- Swag rewards based on impact and contribution level
Recognition is based on the impact of the finding, the quality of the report, and adherence to responsible disclosure practices.
The program is open to independent researchers, academic institutions, security consultancies, open source contributors, and developers who identify real-world risks in the Open VSX ecosystem.
Supporting trusted, open developer infrastructure
Open VSX is a vendor-neutral extension registry governed under the Eclipse Foundation, supporting a rapidly expanding ecosystem of developer tools and platforms. As reliance on extension ecosystems grows, maintaining trust requires both technical safeguards and active community participation.
The program reinforces the Eclipse Foundation’s broader commitment to advancing:
- Software supply chain security
- Transparent, vendor-neutral governance
-
Long-term sustainability of open source infrastructure
How to participate
Security researchers, developers, and community members are invited to help strengthen the security and trust of the Open VSX ecosystem. The Open VSX Researcher Recognition Program provides a clear pathway for responsible vulnerability disclosure, along with opportunities to contribute more broadly to the project and community.
- Learn more about the program
- Report a vulnerability
- Contribute to the Open VSX project
- Join the Open VSX community
About the Open VSX Registry
The Open VSX Registry is the open, vendor-neutral extension registry for tools built on the VS Code™ extension API. Governed transparently under the Eclipse Foundation, it provides developers, publishers, and platform builders with a trusted open alternative to proprietary extension marketplaces. Because Eclipse Open VSX is open source and self-hostable, organisations may also deploy their own internal registry implementations as needed. Developers can contribute to the ongoing security, resilience, and evolution of Open VSX via the project repository.
About the Eclipse Foundation
The Eclipse Foundation provides a global community of individuals and organisations with a vendor-neutral, business-friendly environment for open source collaboration and innovation. We host Adoptium, the Eclipse IDE, Jakarta EE, Open VSX, Software Defined Vehicle, and more than 400 high-impact open source projects. Headquartered in Brussels, Belgium, we are an international non-profit association supported by over 300 members. Our events, including Open Community Experience (OCX), bring together developers, industry leaders, and researchers from around the world. To learn more, follow us on X and LinkedIn, or visit eclipse.org.
Media contacts:
Schwartz Public Relations (Germany)
Julia Rauch/Marita Bäumer
Sendlinger Straße 42A
80331 Munich
EclipseFoundation@schwartzpr.de
+49 (89) 211 871 -70/ -62
514 Media Ltd (France, Italy, Spain)
Benoit Simoneau
M: +44 (0) 7891 920 370
Nichols Communications (Global Press Contact)
Jay Nichols
+1 408-772-1551
April 08, 2026
AI (Coding) at EclipseSource: The Internal Story
by Jonas, Maximilian & Philip at April 08, 2026 12:00 AM
We build AI-powered tools, IDEs and business solutions, write a lot about AI coding and provide training on how to use AI coding effectively. So a question we get: What does AI (coding) actually look …
The post AI (Coding) at EclipseSource: The Internal Story appeared first on EclipseSource.
March 27, 2026
Fastbelt: The high-speed DSL toolkit for Go
March 27, 2026 12:00 AM
March 26, 2026
Don't become the next Trivy: how to make your releases, tags, and automation resistant to compromise
by Mikaël Barbero (mikael.barbero@eclipse-foundation.org) at March 26, 2026 08:30 AM
This is Part 2 of our response to the Trivy supply-chain compromise. Part 1 covered how to consume GitHub Actions safely. This post covers the other side: how to publish safely, so your project doesn’t become the upstream incident that impacts everyone downstream.
The attacker who compromised trivy-action force-pushed 76 of 77 version tags. The one tag that survived? 0.35.0 — protected by GitHub’s immutable releases feature. That single data point should change how every maintainer thinks about release hygiene. If every tag had been immutable, the attacker would have had compromised credentials and nothing useful to do with them.
The recommendations below apply to any project that publishes GitHub Actions, CLI tools, container images, libraries, or any artifact consumed in downstream automation. For Eclipse Foundation projects, most of these controls should be applied through Otterdog-managed configuration so the policy is reviewable, repeatable, and resistant to drift.
If you just need the checklist, skip to the baseline summary at the end.
Enable immutable releases
This is the single most important thing a maintainer can do. GitHub’s immutable releases prevent release assets and the associated Git tag from being changed after publication. Tags cannot be moved or deleted. Assets cannot be modified or removed. The feature also automatically generates a signed release attestation — a cryptographically verifiable record linking the release to its repository and commit.
The Trivy incident provides the most compelling proof point: v0.35.0 was the only tag the attacker could not replace. It was immutable. The other 76 were not.
Enable this feature at the repository or organization level. Once enabled, all new releases are immutable. There is one operational adjustment: create releases as drafts first, attach all assets, then publish. Immutability applies after publication, so you need everything in place before you flip the switch.
A published release should be the end of mutation, not the beginning of it. If you publish anything consumed in automation — actions, binaries, container images, packages — enable immutable releases unless you have a concrete operational reason not to.
Protect version tags with rulesets
Immutable releases are the strongest control, but they only protect tags associated with published releases. Projects should also protect version tags directly using GitHub rulesets, which can target tags and restrict creations, updates, deletions, and force pushes.
The policy objective for release tags is usually simple: no tag updates, no tag deletions, no force pushes. Optionally, restrict tag creation to only your designated release automation identity.
For Eclipse Foundation projects, this is exactly the sort of policy that should be rolled out through Otterdog-managed organization or repository rulesets rather than configured by hand in the UI. Otterdog supports rulesets whose target can be tag, with controls including allows_creations, allows_deletions, allows_updates, and allows_force_pushes.
Don’t wait for the perfect immutable-releases rollout to start protecting tags. Rulesets can be deployed today as an immediate hardening step.
Stop using personal access tokens for release automation
The Trivy incident began with compromised credentials. GitHub’s documentation is clear: personal access tokens are meant for accessing GitHub on behalf of yourself, not for organizational automation. For organization access and long-lived integrations, use a GitHub App. GitHub App installation tokens are scoped to the installation and expire after one hour; a compromised classic PAT, by contrast, can provide broad, persistent access.
The priority order:
GITHUB_TOKENinside workflows — when it provides sufficient permissions, this is the simplest and most constrained option.- GitHub App — for release automation, bot activity, and any cross-repository operation. Scoped, short-lived, auditable.
- Fine-grained PATs — only where a GitHub App is not feasible. Scope them as narrowly as possible and set an expiration.
- Classic PATs — avoid entirely unless the platform still requires one for a specific endpoint.
This is not just better hygiene. It is blast-radius reduction. User-bound long-lived credentials are exactly the sort of foothold that turns an automation mistake into an organization-wide incident. The Trivy timeline makes that clear: compromised credentials from an earlier incident were not fully revoked, and the attacker used the residual access to execute the tag-rewriting attack weeks later.
Publish provenance attestations by default
GitHub artifact attestations provide signed provenance linking artifacts to the source repository, workflow, commit SHA, and triggering event. They use the Sigstore bundle format and can include an associated software bill of materials (SBOM). GitHub’s documentation is careful to note that attestations don’t prove an artifact is “safe” — they prove where and how it was built, which is what allows consumers to define and enforce verification policy.
For maintainers, this means release pipelines should generate provenance by default:
permissions:
 id-token: write
 contents: read
 attestations: write

steps:
 - name: Build
 run: make build

 - name: Generate attestation
 uses: actions/attest@v4
 with:
 subject-path: 'dist/my-binary'
Consumers can then verify with the GitHub CLI:
gh attestation verify dist/my-binary --owner my-org
When combined with immutable releases (which automatically generate release attestations), this creates a layered verification model. Incident response becomes more precise: consumers can ask not just “did I download a file named X,” but “does the file I ran match the expected build provenance from the expected repository and workflow?”
For projects targeting higher supply-chain maturity, using a reusable workflow for the build and attestation step provides isolation between the calling workflow and the build process, which meets SLSA v1.2 Build Level 3.
Harden your release workflow itself
Provenance attestations prove where an artifact was built, but they are only as trustworthy as the workflow that generates them. If your release workflow uses unpinned third-party actions, grants overly broad permissions, or runs on a self-hosted runner accessible from pull requests, the attestation just faithfully records a compromised build.
Apply every recommendation from Part 1 to your own release workflows with extra rigor:
- Pin all actions to commit SHAs.
- Set
GITHUB_TOKENto the minimum permissions required. - Use OIDC for any cloud or registry access.
- Prefer GitHub-hosted runners.
- Lint the release workflow with
zizmorandpoutine.
Your release workflow is your highest-value CI/CD target. Treat its security accordingly.
Review action update PRs with suspicion, not trust
Part 1 recommended pinning actions to commit SHAs and using tools like Pinact or pinned-actions to automate the initial conversion. A fair counterpoint, raised in response to that post: if you pin without manually verifying the SHA, you might be locking in a commit from an already-compromised-but-not-yet-disclosed repository. That’s a real risk. Manually verifying every digest — checking that the commit date, tag date, and release date are consistent, and that the commit history looks plausible — is the safer approach.
Here is my take on the trade-off: for a first-time setup across a project with dozens of unpinned actions, the benefit of moving to pinned SHAs outweighs the risk of pinning one that is already silently compromised. Requiring manual verification of every digest will discourage many teams from pinning at all, which leaves them exposed to the exact class of attack that hit Trivy. Start by pinning. Then build the verification habit into your ongoing process.
Where that verification habit matters most is when updates arrive. Once your actions are pinned, Dependabot or Renovate will propose PRs to update them. These PRs deserve more scrutiny than a typical dependency bump. Specifically, watch for:
- A digest change without a corresponding tag change. A Dependabot PR that updates the SHA but reports the same version tag is a red flag. It may mean the tag was moved — exactly the technique used in the Trivy attack. Investigate before merging: compare the old and new commits, check the repository’s release history, and verify that the new SHA matches a legitimate release.
- A digest change to a commit that predates the tag. If the proposed SHA points to a commit older than the tag it claims to represent, something is wrong. Legitimate releases don’t move backward.
- Unfamiliar or unexpected actions appearing in the update. If Dependabot proposes an update for an action you don’t recognize or didn’t intentionally add, treat it as a potential indicator of a compromised workflow or configuration change.
The goal is not to make every Dependabot merge a forensic exercise. Most updates will be routine. But a moved tag is the signature of the attack pattern we saw with trivy-action, and the update PR is exactly where that signal will surface. Train your reviewers to recognize it.
Plan for credential compromise before it happens
A painful lesson from the Trivy timeline: the March 19 attack was not the first breach. It followed an earlier incident where compromised credentials were not fully revoked. The attacker retained residual access through still-valid tokens and used them weeks later to execute the tag-rewriting attack.
Every project should have a pre-written response plan for CI/CD compromise:
- Identify affected workflow runs and exposure windows.
- Inventory every secret, token, cloud credential, SSH key, and registry credential available to those jobs.
- Revoke and reissue all of them. Not some. All. Incomplete rotation is how the Trivy incident escalated from a contained breach to a full supply-chain compromise.
- Audit release history, tag integrity, published packages, caches, and artifacts produced during the exposure window.
- Communicate clearly to downstream users: what was affected, for how long, and what they should rotate on their end.
The hard part is not knowing these steps. The hard part is doing them fast, under pressure, at 2 AM, without missing a credential. Write the playbook before you need it. Rehearse it. Make sure more than one person knows how to execute it.
Consider reproducible builds for high-value artifacts
Provenance attestations prove where something was built. Reproducible builds go further: they let anyone independently verify that the source code produces the expected binary, bit for bit. If a build pipeline is compromised but the build is reproducible, the discrepancy is detectable.
This is a harder lift than the other recommendations in this post, and it’s not feasible for every project. But for high-value artifacts — signing keys, security-critical binaries, widely consumed libraries — it is the strongest defense against a compromised build environment. The Reproducible Builds project maintains tooling and documentation for multiple ecosystems.
Even partial reproducibility (deterministic builds that consumers can verify, even if not all do) raises the cost of a supply-chain attack significantly. If your project has the resources, invest here.
What the Eclipse Foundation Security Team recommends as a baseline
For Eclipse Foundation projects that publish actions, binaries, packages, or releases consumed by others, the baseline is:
- Enable immutable releases. This is the single highest-impact control. If every
trivy-actiontag had been immutable, the attack would have failed. - Protect version tags with rulesets. No updates, no deletions, no force pushes. Deploy through Otterdog.
- Move release automation away from personal access tokens. Prefer
GITHUB_TOKEN, then GitHub Apps, then fine-grained PATs. Avoid classic PATs entirely. - Publish provenance attestations by default using
actions/attest. Include SBOMs where feasible. - Harden your release workflows with the same rigor described in Part 1: pinned actions, minimal permissions, OIDC, GitHub-hosted runners, continuous linting.
- Treat action update PRs as a security review surface. A Dependabot PR that changes a digest without changing the tag is the signature of a moved-tag attack. Train reviewers to catch it.
- Maintain a rehearsed CI/CD compromise playbook. Include credential inventory, revocation procedures, and a downstream communication plan. Rehearse it.
- Apply all controls through Otterdog-managed configuration so policy is reviewable, repeatable, and resistant to settings drift.
Closing thought
The Trivy compromise succeeded because mutable references and long-lived credentials gave the attacker two things: something to redirect and something to redirect it with. Immutable releases remove the first. Proper credential hygiene removes the second. Neither is hard to implement. Both require the decision to stop treating release infrastructure as an afterthought.
The projects that will weather the next incident — and there will be a next one — are the ones building that infrastructure now: immutable tags, signed provenance, short-lived tokens, and a playbook that’s been rehearsed before the crisis hits. Start today. The attacker already has.
Need help?
If your Eclipse Foundation project needs help implementing immutable releases, hardening release automation, setting up provenance attestations, or building a CI/CD compromise playbook, the Eclipse Foundation Security Team is here to support you. Reach out by email at security@eclipse-foundation.org or start a discussion at eclipse-csi on GitHub.
by Mikaël Barbero (mikael.barbero@eclipse-foundation.org) at March 26, 2026 08:30 AM
The Eclipse Theia Community Release 2026-02
by Jonas, Maximilian & Philip at March 26, 2026 12:00 AM
We are happy to announce the thirteenth Eclipse Theia community release, “2026-02,” incorporating the latest advances from Theia releases 1.67 and 1.68. New to Eclipse Theia? It is the next-generation …
The post The Eclipse Theia Community Release 2026-02 appeared first on EclipseSource.
March 24, 2026
Stop trusting mutable references: how Eclipse Foundation projects should harden GitHub Actions after the Trivy compromise
by Mikaël Barbero (mikael.barbero@eclipse-foundation.org) at March 24, 2026 08:30 AM
On March 19, 2026, an attacker used compromised credentials to publish a malicious Trivy v0.69.4 release, force-push 76 of 77 version tags in aquasecurity/trivy-action, and replace all 7 tags in aquasecurity/setup-trivy with malicious commits. On March 22, Aqua reported malicious Docker Hub images for versions 0.69.5 and 0.69.6. The malicious payload ran before the legitimate scanning logic and then let the workflow proceed normally. Every affected workflow looked fine. None of them were.
This was not a scanner problem or a malware problem. It was a trust-resolution problem. Existing, trusted references were silently redirected. Workflows kept resolving “the same” tag to what was now an attacker’s code. If your pipeline consumes dependencies by mutable reference — a tag, a branch, a floating Docker image — you are trusting that no one with write access to that reference will ever be compromised. The Trivy incident shows what happens when that bet loses.
For projects hosted at the Eclipse Foundation, and for any open source project on GitHub, the recommendation from the Eclipse Foundation Security Team is straightforward: consume dependencies immutably, minimize the authority of every secret that reaches a runner, and add runtime visibility so you can tell when something goes wrong.
This post covers how to use GitHub Actions safely as a consumer of third-party actions. A follow-up post will address how to reduce the chance that your own project becomes the next upstream incident.
What we have already done
The Eclipse Foundation Security Team has scanned all Eclipse Foundation projects for signs of compromise related to the Trivy incident and contacted the projects identified as potentially exposed. We are working with those projects, together with the Release Engineering team, to rotate any potentially compromised secrets and strengthen protections against similar incidents in the future. What follows in this post is the broader guidance we are now recommending for all Eclipse Foundation projects — and for any open source project on GitHub — to adopt as baseline practice.
If you just need the checklist, skip to the baseline summary at the end.
Pin to commit SHAs, not tags
GitHub’s own guidance is unambiguous: pinning to a full-length commit SHA is the only way to consume an action as an immutable release. Tags are mutable. They can be moved if an attacker gains control of the action’s repository. That is exactly what the Trivy compromise exploited.
This:
- uses: actions/checkout@v5
- uses: aquasecurity/trivy-action@0.28.0
should become this:
- uses: actions/checkout@<full-commit-sha> # v5.0.0
- uses: aquasecurity/trivy-action@<full-commit-sha> # 0.28.0
Don’t do this by hand. pinact exists for exactly this purpose: it rewrites action references to commit SHAs and preserves the version as a comment. For Eclipse Foundation organizations already managed through Otterdog, the pin_workflow blueprint can pin actions and reusable workflows at organization scale.
A practical rollout:
# Initial pinning
pinact run

# Later, to update pinned versions
pinact run -u
Pinning is baseline hygiene, not an optional improvement.
Watch out for “unpinnable” actions
SHA pinning is necessary but not always sufficient. Some actions, even when pinned to a commit, pull mutable external dependencies at runtime — a Docker image tagged latest, a Dockerfile that runs pip install without locked versions, or a composite action that references other unpinned actions. The commit is frozen, but the code it executes is not.
BoostSecurity’s research found that 32% of the top-starred actions on GitHub Marketplace are “unpinnable” in this way. That means nearly a third of the most popular actions can still introduce new, unreviewed code into your pipeline even after you pin them.
poutine is a build-pipeline security scanner that detects exactly this class of problem. Its unpinnable_action rule flags actions whose pinning does not actually guarantee immutability. Run it against your organization:
poutine analyze_org my-org --token "$GH_TOKEN"
For actions flagged as unpinnable, you have three options: replace them with a pinnable alternative, vendor the action into your own organization so you control the full dependency chain, or replace the action with an inline run: step that does the same thing without the trust dependency.
Reduce your third-party action surface
Every third-party action is an additional trust boundary. Many workflows use five or six actions where two would suffice, or where a simple run: step would replace the action entirely. Before pinning everything, audit what you actually need.
A good example is peter-evans/create-pull-request, one of the most widely used third-party actions. It requires write access to your repository and runs a substantial amount of code to do something the GitHub CLI already does natively:
# Instead of this (third-party action with broad repo access):
- uses: peter-evans/create-pull-request@<sha>
 with:
 title: "Automated update"
 branch: "auto-update"

# Do this (zero third-party trust required):
- run: |
 git checkout -b auto-update
 git add .
 git commit -m "Automated update"
 gh pr create --title "Automated update" --body "Created by automation" --base main
 env:
 GH_TOKEN: ${{ secrets.GITHUB_TOKEN }}
The gh CLI is pre-installed on GitHub-hosted runners. No action to pin, no action to audit, no action that can be compromised upstream. Apply this thinking to every third-party action in your workflows: if you can replace it with a few lines of shell, do it. Treat third-party actions like third-party libraries — each one should justify its presence.
Enforce pinning in policy, not documentation
A written rule that nobody enforces is not a control. GitHub supports requiring actions to be pinned to a full-length commit SHA at both repository and organization scope. When enabled, workflows that reference unpinned actions fail. GitHub also supports explicit allow and block patterns for actions, including !-prefixed deny entries.
For Eclipse Foundation projects, don’t configure this by hand in the UI. Otterdog already manages GitHub organizations through infrastructure-as-code and pull-request-driven changes. Define the policy once, review it through PRs, apply it declaratively.
One nuance: GitHub’s SHA-pinning enforcement applies to actions, but reusable workflows can still be referenced by tag. Review reusable workflow references with the same suspicion you apply to action references, and pin them where your tooling supports it.
Keep pins updated with Dependabot, but add an adoption delay
The usual objection to pinning is maintenance overhead. That objection stopped being strong years ago. GitHub has first-class Dependabot support for the github-actions ecosystem, and it now supports a cooldown option that delays version updates by a configurable number of days. Importantly, cooldown applies only to version updates, not security updates.
A 7-day cooldown is a sensible default. It avoids automatic adoption of a newly published tag or release during the most chaotic part of an upstream incident.
version: 2
updates:
 - package-ecosystem: "github-actions"
 directory: "/"
 schedule:
 interval: "weekly"
 cooldown:
 default-days: 7
This is a time buffer, not a guarantee. Combined with SHA pinning, it gives maintainers time to review what they are about to trust instead of consuming whatever changed upstream that day.
Add runtime visibility with Harden-Runner
The Trivy payload ran before the legitimate scanner and then let the workflow complete normally. Prevention is not enough — you need runtime visibility into what the runner actually does: network calls, file access, process execution.
StepSecurity’s Harden-Runner provides this. It monitors actual runner behavior rather than reasoning from YAML alone. StepSecurity reported that Harden-Runner detected anomalous outbound connections from compromised trivy-action runs during the incident.
Start in audit mode:
steps:
 - uses: step-security/harden-runner@<full-commit-sha> # v2.x.y
 with:
 egress-policy: audit
Audit mode gives you telemetry and a recommended block policy based on observed outbound destinations. Once that baseline is stable, move selected jobs to block mode so unexpected outbound calls are denied, not just logged. Even audit mode is valuable for public open source projects because it dramatically improves incident triage.
Minimize token permissions and use OIDC for cloud access
A compromised action runs inside your trust boundary. If it can read broad secrets or use a powerful token, the incident stops being “about CI” and becomes about your releases, your repository, and your cloud accounts.
GitHub recommends setting the default GITHUB_TOKEN permission to read-only and elevating only for specific jobs. For cloud access, use OpenID Connect so workflows authenticate with short-lived, scoped tokens instead of stored secrets.
permissions:
 contents: read

jobs:
 build:
 runs-on: ubuntu-latest
 permissions:
 contents: read

 release:
 runs-on: ubuntu-latest
 permissions:
 contents: write
 id-token: write
The model is simple: assume one job may become hostile. Make sure that hostile job receives as little authority as possible. When there is no long-lived cloud credential to steal, runner compromise still hurts, but it hurts far less.
Segment high-value secrets into isolated workflows
Job-level permissions help, but a single workflow file with multiple jobs still shares some context. For your most sensitive secrets — signing keys, production deploy credentials, registry tokens — isolate them into separate, minimal workflows triggered via workflow_call or workflow_dispatch.
This way, a compromised upstream action in a build job cannot reach the signing job at all. The blast radius shrinks from “everything in the workflow” to “everything in one job in one workflow.”
Pin Docker images by digest, not tag
The Trivy incident included malicious Docker Hub images, but the blog post’s guidance applies beyond GitHub Actions tags. Any workflow that pulls container images by tag (image:latest, image:v1) faces the same mutable-reference problem.
Pin container images by digest:
# Not this
container: myimage:v1.2.3

# This
container: myimage@sha256:abc123...
Where available, enable Docker Content Trust or Cosign verification. The principle is the same as for actions: if the reference can be silently redirected, it will be — eventually.
Continuously lint your workflows
Manual review of YAML security posture does not scale. zizmor is a purpose-built static analysis tool for GitHub Actions that catches many of the patterns discussed in this post: unpinned actions, template injection vulnerabilities, overly broad permissions, dangerous triggers with untrusted code, and more. It was born out of the Homebrew project’s need to audit its CI/CD security, and has since been adopted at scale by organizations like Grafana Labs — who deployed it across 2,000+ repositories after their own GitHub Actions incident. zizmor outputs SARIF, so findings integrate directly into GitHub’s Advanced Security tab, and it ships with a VS Code extension and LSP support for real-time feedback while editing workflows.
For organization-wide coverage, combine zizmor with poutine, which adds rules that go beyond workflow-level analysis — including unpinnable actions, known vulnerabilities in build components, and risky self-hosted runner configurations across entire organizations.
Prepare your incident response plan now
Once mutable references are abused, every secret accessible to affected runners must be treated as compromised. Aqua says exactly that for affected workflows, and GitHub recommends rotating all exposed secrets.
Every project should have a pre-written response plan for CI/CD compromise:
- Identify affected workflow runs and exposure windows.
- List every secret, token, cloud credential, SSH key, and registry credential available to those jobs.
- Revoke and reissue all of them.
- Inspect audit logs, release history, and action references.
- Review caches, artifacts, and published packages produced during the exposure window.
- Communicate clearly to downstream users: what was affected, for how long, and what they should rotate.
The hard part is not knowing these steps. The hard part is doing them fast. Write the playbook before you need it.
What the Eclipse Foundation Security Team recommends as a baseline
For Eclipse Foundation projects hosted on GitHub, the baseline is:
- Pin all third-party actions and reusable workflows to full commit SHAs. Automate with
pinactor Otterdog’spin_workflowblueprint. - Scan for unpinnable actions. Use
poutineto identify actions where pinning alone does not guarantee immutability, and replace or vendor them. - Audit and minimize your action surface. Replace third-party actions with inline
run:steps wherever practical. - Enforce SHA pinning and action allow/block policy at repository or organization level via Otterdog.
- Enable Dependabot for
github-actionswith a 7-day cooldown for version updates. - Add Harden-Runner in audit mode, then move selected jobs to block mode once a stable egress policy is established.
- Default
GITHUB_TOKENto read-only. Elevate only where needed. Prefer OIDC over long-lived cloud secrets. Segment high-value secrets into isolated workflows. - Pin Docker images by digest, not tag. Enable signature verification where available.
- Lint workflows continuously with
zizmorandpoutine. - Maintain a rehearsed CI/CD compromise playbook.
Closing thought
The Trivy incident should not be read as “don’t trust Trivy.” It should be read as: stop trusting mutable references and over-privileged automation. Many GitHub Actions environments are still built on moving tags, broad secrets, and zero runtime visibility. That is a survivable posture right up until the day it isn’t. The projects that fare best in the next incident — and there will be a next incident — will be the ones that have already made trust explicit, immutable, and narrow.
Need help?
If your Eclipse Foundation project needs help hardening its GitHub Actions workflows, assessing exposure from the Trivy incident, or implementing any of the controls described in this post, the Eclipse Foundation Security Team is here to support you. Reach out by email at security@eclipse-foundation.org or start a discussion at eclipse-csi on GitHub.
A follow-up post will cover the maintainer side: how to make your own releases, tags, and automation resistant to compromise so your project doesn’t become the next Trivy.
by Mikaël Barbero (mikael.barbero@eclipse-foundation.org) at March 24, 2026 08:30 AM
Theia Coder in Action
by Jonas, Maximilian & Philip at March 24, 2026 12:00 AM
With Theia IDE 1.70, the Theia Coder agent takes another significant step forward. This release introduces Capabilities — a new concept that lets you enable agent features like E2E testing, shell …
The post Theia Coder in Action appeared first on EclipseSource.
March 23, 2026
Join us in Brussels: Meet the OCX 2026 keynote speakers
by Natalia Loungou at March 23, 2026 01:17 PM
As we approach Open Community Experience (OCX) 2026, taking place 21–23 April in Brussels, I’ve been reflecting on this year’s program and what it says about where our community is heading.
Join us in Brussels: Meet the OCX 2026 keynote speakers
by Mike Milinkovich at March 23, 2026 11:00 AM
As we approach Open Community Experience (OCX) 2026, taking place 21–23 April in Brussels, I’ve been reflecting on this year’s program and what it says about where our community is heading.
At its core, OCX is about bringing together the different communities that are supported by the Eclipse Foundation. That includes work happening across AI, mobility, developer tooling, embedded systems, security and compliance, and public policy & research. These areas are increasingly connected, and the people working in them are often tackling similar challenges from different angles. We often describe the Eclipse Foundation as a “community of communities,” and OCX is a reflection of that. It creates space for those communities to come together, compare notes, and learn from each other. Developers, policymarkers, business leaders, and other contributors to the open source ecosystem all have a role to play in those conversations.
This year, I will once again have the privilege of opening OCX with my “State of the union” keynote. I will share reflections on how open source is evolving, along with our strategic priorities as we navigate a landscape shaped by rapid advances in AI, increasing regulatory complexity, and growing expectations for secure and trustworthy software. It is a moment that calls for clarity of purpose and for collaboration at scale.
Of course, one of the highlights of OCX is always the keynote program, and this year we have assembled an exceptional group of speakers who bring a diverse and compelling set of perspectives.
Ruth Buscombe, a Formula 1 race strategist and F1TV analyst, will share insights drawn from one of the most demanding, data-driven environments in the world. Her experience translating complex data into real-time decisions offers a powerful parallel to open source communities, where transparency, coordination, and trust are essential to success. Her work advocating for diversity in STEM also serves as an important reminder that strong communities are built through inclusion. Get a snapshot of her keynote in this teaser video.
Nadia Aimé, Cybersecurity Cloud Solution Architect at Microsoft, will share a deeply personal perspective on navigating a career in technology amid constant change. As AI continues to reshape the industry and cybersecurity challenges grow more complex, Nadia’s story highlights the enduring importance of resilience, curiosity, and community. Her message is a timely reminder that while technologies shift, the human qualities that underpin meaningful contribution remain constant.
From SAP, Axel Uhl will explore how open source technologies enable innovation at scale. Drawing on SAP’s work in competitive sailing, his keynote will demonstrate how Eclipse Foundation technologies have been used to build sophisticated digital twins capable of modelling complex, real-world systems used in the Olympic Games. It is a compelling example of how open source can serve as both a foundation for experimentation and a driver of operational excellence.
We will also host a high-level panel discussion on the implementation of the Cyber Resilience Act (CRA). As the conversation shifts from policy to practice, this session will explore what it takes to turn regulatory ambition into effective, real-world outcomes. Bringing together leading voices from across the European ecosystem, this discussion will examine governance, standardisation, and market readiness, as well as the critical role open source must play in shaping a secure and innovative digital future.
And, as always, the keynotes are just one part of the experience. OCX 2026 will feature a rich program of technical sessions, hands-on workshops, and the kind of informal conversations where some of the most valuable ideas emerge.
What continues to make this event special is the people. It is the opportunity to reconnect with colleagues, meet new contributors, and take part in discussions that genuinely matter. There is a shared sense of purpose that comes from bringing so many perspectives together in one place, and it is something I look forward to every year.
I am very much looking forward to welcoming you to Brussels this April. OCX 2026 is an opportunity to learn from one another, strengthen our community, and continue shaping the future of open source together.
See you there!
March 19, 2026
Domain-specific AI Extensions in VS Code: Worth Another Look
by Jonas, Maximilian & Philip at March 19, 2026 12:00 AM
In the early days of IDE AI integrations, the Visual Studio Code extension API offered very limited support for custom AI features. While the native VS Code chat interface and its integration with …
The post Domain-specific AI Extensions in VS Code: Worth Another Look appeared first on EclipseSource.
March 18, 2026

Eclipse UI Best Practices and Icon Testing
by Lars at March 18, 2026 12:00 AM
The Eclipse UI Best Practices project works on icon packs with modernized icons for the Eclipse IDE.
![]()
Testing New Icons in Your IDE
To try them out in your existing Eclipse installation, you can use the provided replace_icons.sh script.
Prerequisites
jq(for JSON parsing)- A JDK with the
jarcommand
Steps
- Clone the repository:
git clone https://github.com/eclipse-platform/ui-best-practices.git
cd ui-best-practices
- Run the replacement script, pointing it to your Eclipse
pluginsdirectory and the desired icon mapping file:
./scripts/replace_icons.sh /path/to/eclipse/plugins iconpacks/eclipse-dual-tone/icon-mapping.json
The script reads the JSON mapping file, locates each icon in the icon pack, and replaces the corresponding icons inside the Eclipse plugins — whether they are folder-based or packaged as JARs.
- Restart Eclipse with the
-clean -clearPersistedStateflags to clear the icon cache:
./eclipse -clean -clearPersistedState
You should now see the updated icons in your IDE.
Note: To see the new icons in EGit, you need a nightly build of EGit, as it only recently moved to SVG images.
Kudos to the Contributors
This project would not exist without the dedicated work of its contributors. Special thanks to Jasmin Hundt, Matthias Becker, Daniela Stegaru, and Michael Bangas. Their efforts are making the Eclipse IDE more visually modern and consistent.
March 10, 2026

Getting started with AI-assisted development in the Eclipse Foundation Software Development team
March 10, 2026 06:07 PM
A lot has been written about AI in software development. Much of it focuses on what the technology can do, or what teams have already built with it.
What is discussed less often is how teams responsible for widely used systems can introduce these tools carefully. This post looks at how our team is approaching AI-assisted development, and what we want to get right before we move further.
At the Eclipse Foundation, we maintain infrastructure used by a large and distributed open source community. The Eclipse ecosystem includes more than 400 open source projects and over 15,000 contributors worldwide.
Our team builds and maintains several of the applications that support that ecosystem, including the Open VSX Registry, the Eclipse Marketplace, contributor agreement tooling, and services used by many active open source projects.
Our team is small relative to the scope of what we support, and the systems we build must remain reliable, secure, and maintainable over the long term.
We are beginning to introduce AI-assisted development practices across the team, starting with a small set of controlled experiments. Here is how we are approaching it.
Starting with the right question
The question we kept coming back to was not "how do we use AI?" but "how do we use AI responsibly, given the nature of what we build?"
Mistakes in our systems do not just affect our organisation. They can affect many projects and developers who rely on the services we provide. That kind of reach means we need to be particularly deliberate when introducing new development practices.
That context shapes how we approach this work. Before discussing tools or workflows, we spent time defining the guardrails that will guide how we begin.
Isolated environments for agentic workflows
Part of our exploration includes experimenting with agentic workflows — systems where AI can generate code, execute commands, and interact with development tools.
That naturally raises a practical question: where should those agents run?
Our starting principle is that AI agents should operate in isolated environments. In practice, this means containerised sandboxes.
Projects and platforms like Docker AI Sandboxes, nono.sh, Daytona, and Modal are beginning to formalise this pattern. They provide controlled environments where AI-generated code can run and experiment without access to production environments.
The reasoning is straightforward. Agents capable of executing commands or interacting with systems need clear boundaries. Not because the tools are uniquely unsafe, but because containment is standard engineering discipline for any automated system that can execute commands. Any automated system introduced into a workflow should begin with limited access and well-defined boundaries.
Running agents inside isolated environments such as Docker AI Sandboxes allows them to write code, run tests, and experiment in a reproducible environment without direct access to sensitive infrastructure.
As part of this approach, agents will not have access to production credentials or other sensitive information, and they will not run inside our internal networks. If something behaves unexpectedly, the impact remains limited and recoverable.
This is not a new mindset for us. The same discipline we apply to dependency management, deployment pipelines, and access control applies here as well. AI tooling does not get a special exception simply because it is new.
Where AI can help first
Our goal is not to automate judgement. It is to reduce friction in work that is largely mechanical, repetitive, or easy to postpone.
The clearest opportunities we see today include:
-
Rapid prototyping and technical discovery: Using AI for "architectural spikes" — building quick prototypes to validate a concept or explore a new technology. This helps us understand the "shape" of a solution and identify technical blockers early, so that when we move to production we do so with a clearer, research-backed roadmap.
-
Test generation for well-defined functions: Writing unit tests for stable, well-scoped code is repetitive work that often falls behind. AI-assisted generation can help accelerate this when done in a controlled environment.
-
Documentation drafts: Keeping documentation up to date is an ongoing challenge for a small team. Generating a first draft from code or issue descriptions, followed by human review and editing, fits naturally into our workflow.
-
Scaffolding and boilerplate: Creating the initial structure for new services, migration scripts, or API endpoints often involves repetitive setup work. Reducing that friction can make development faster without sacrificing quality.
-
Technical debt and modernisation work: Like many small teams, we still run legacy applications and services that need attention but are easy to postpone when day-to-day operational work takes priority. AI-assisted development may help us make more consistent progress on refactoring, code cleanup, migrations, and other modernisation work that too often gets pushed aside.
-
Website maintenance, redesigns, and framework migrations: Our team also maintains websites such as eclipse.org and many working group sites. Work such as template updates, redesigns, framework migrations, accessibility improvements, and content restructuring often involves repetitive implementation work that could benefit from AI-assisted workflows.
In all cases, AI-generated output must still go through the same review and validation processes we apply to any other code change. Developers remain responsible for understanding the problem being solved, reviewing the generated code, and ensuring that any changes meet our security and reliability standards.
What we expect to learn
We are approaching this work with genuine uncertainty. Some of the automation we are exploring may prove more useful than expected. Other ideas will likely reveal friction or limitations we have not yet anticipated.
What matters most is the approach: start contained, observe carefully, and expand where the benefits are clear. The goal is not to adopt AI quickly. It is to adopt it thoughtfully.
More broadly, the role of the developer is beginning to evolve. Over time, we may spend less effort writing every line of code by hand and more time reviewing, validating, testing, approving, and iterating on generated output to improve the systems we operate.
For teams maintaining shared infrastructure, that shift does not make engineering judgement less important. If anything, it makes it more important — which is exactly why we want to be deliberate about how we begin.
Eclipse Theia 1.69 Release: News and Noteworthy
by Jonas, Maximilian & Philip at March 10, 2026 12:00 AM
We are happy to announce the Eclipse Theia 1.69 release! The release contains in total 88 merged pull requests. In this article, we will highlight some selected improvements and provide an overview of …
The post Eclipse Theia 1.69 Release: News and Noteworthy appeared first on EclipseSource.
March 05, 2026
Eclipse Foundation showcases open source innovation at embedded world 2026; Releases 2025 IoT and Embedded Survey Report
by Natalia Loungou at March 05, 2026 12:00 PM
BRUSSELS - March 5, 2026 - The Eclipse Foundation, one of the world’s largest open source software foundations, will highlight the accelerating role of open source in embedded systems and IoT at embedded world 2026, taking place March 10–12 in Nuremberg, Germany. Exhibiting in Hall 4, Booth 4-554, the Foundation will present a comprehensive portfolio of technologies spanning industrial IoT, automotive software, edge AI, real-time operating systems, and regulatory alignment for software development.
At the event, the Eclipse Foundation and its members will demonstrate how collaborative, vendor-neutral open source initiatives are enabling secure, scalable, and interoperable embedded solutions across industries.
“Open source is driving the next generation of embedded and IoT innovation,” said Mike Milinkovich, Executive Director of the Eclipse Foundation. “From silicon and real-time operating systems to AI-enabled development tools and software-defined vehicles, open collaboration enables secure, interoperable technologies that industries worldwide can adopt with confidence.”
Featured Innovations
Key initiatives on display include:
OpenHW Foundation and Eclipse ThreadX
Open source embedded innovation spanning silicon, processor architectures, and real-time operating systems.
AI-enabled development tools
Trusted open source development tools, IDEs, and extensible platforms that support modern embedded software development.
Software Defined Vehicle (SDV)
Open collaboration advancing next-generation automotive software architectures.
Open Regulatory Compliance (ORC)
A community-driven initiative advancing practical approaches to Cyber Resilience Act readiness and evolving regulatory requirements.
Joining the Eclipse Foundation at the booth, members Eurotech and Codethink will present live demonstrations and share domain expertise.
Enterprise-Grade Edge AIoT by Eurotech will feature advanced edge computing and AIoT solutions designed for industrial deployments.
"We’re excited to join the Eclipse Foundation booth at Embedded World 2026,” expressed Robert Andres, Head of Partner Ecosystem at Eurotech. “It provides the perfect occasion to demonstrate that ‘secure, enterprise-grade’ and ‘open source’ are not a contradiction. We do this by showing Eclipse IoT projects at the core of critical infrastructure projects in energy distribution and we are available to discuss how Eurotech, with its commercial offering based on the Eclipse Kura project, as an important aspect of achieving compliance with CRA, NIS2 or IEC 62443, is addressing cybersecurity requirements like SBOM and vulnerability management with fundamental support from the Eclipse Foundation.”
Codethink’s Trust Evidence initiative will demonstrate practical approaches to software assurance and trustworthiness in safety- and security-critical systems.
"Embedded systems don’t just need code that runs, they need software you can prove,” said John Ellis, President & Head of Product at Codethink. “Open collaboration and transparent workflows let teams ship not only features, but evidence: provenance, repeatability, and security that holds up over years, not just release cycles.”
2025 IoT and Embedded Developer Survey Report
In conjunction with embedded world 2026, the Eclipse Foundation will release the 2025 IoT and Embedded Developer Survey Report.
Developed in collaboration with the Eclipse IoT, Sparkplug, and Oniro Working Groups, as well as the Eclipse ThreadX project, the Software Defined Vehicle initiative, and the OpenHW Foundation, the report delivers data-driven insight into the trends and technologies shaping global IoT and embedded development.
This year’s findings examine:
- The increasingly complex regulatory environment
- Supply chain disruptions and their impact on product development
- Developer and engineering decision-maker technology preferences
- The growing role of open source in enabling security, compliance, and digital sovereignty
The complete report is available for download here.
Conference participation
Beyond the exhibition floor, the Eclipse Foundation and its members will contribute to the embedded world conference program.
On Tuesday, March 10, from 10:00 to 12:45, Frédéric Desbiens, Head of IoT and Embedded Solutions at the Eclipse Foundation, will moderate expert sessions in Track 5.4, Software Architectures, featuring speakers from Synaptrix Technologies, ETAS (Bosch), and Elektrobit Automotive. Detailed session information is available here.
Representatives from the OpenHW Foundation, Eclipse ThreadX, the Software Defined Vehicle initiative, and Eclipse IoT Working Group member Eurotech will be available at Booth 4-554 to discuss the survey findings and demonstrate the technologies shaping the future of IoT and embedded systems.
About the Eclipse Foundation
The Eclipse Foundation provides a global community of individuals and organisations with a vendor-neutral, business-friendly environment for open source collaboration and innovation. We host Adoptium, the Eclipse IDE, Jakarta EE, Open VSX, Software Defined Vehicle, and more than 400 high-impact open source projects. Headquartered in Brussels, Belgium, we are an international non-profit association supported by over 300 members. Our events, including Open Community Experience (OCX), bring together developers, industry leaders, and researchers from around the world. To learn more, follow us on X and LinkedIn, or visit eclipse.org.
Media contacts:
Schwartz Public Relations (Germany)
Julia Rauch/Marita Bäumer
Sendlinger Straße 42A
80331 Munich
EclipseFoundation@schwartzpr.de
+49 (89) 211 871 -70/ -62
514 Media Ltd (France, Italy, Spain)
Benoit Simoneau
M: +44 (0) 7891 920 370
Nichols Communications (Global Press Contact)
Jay Nichols
+1 408-772-1551
February 26, 2026
AI Voice and Interaction Agents in Production: 6 Lessons from the Field
by Jonas, Maximilian & Philip at February 26, 2026 12:00 AM
If you know EclipseSource, you probably know us for developer tools, IDEs, and technical AI topics. What you might not know is that we’ve been building AI voice agents for production use since before …
The post AI Voice and Interaction Agents in Production: 6 Lessons from the Field appeared first on EclipseSource.
February 25, 2026

Hardening the Open VSX Registry: Keeping it reliable at scale
by Denis Roy at February 25, 2026 02:45 PM
Denis Roy, Head of Information Technology, Eclipse Foundation
As the Open VSX ecosystem continues to grow, keeping the registry stable is a top priority. Behind the scenes, we are strengthening the infrastructure so that even during peak loads or major provider outages, developer workflows remain uninterrupted.
In recent posts, we shared how the Open VSX Registry is strengthening supply-chain security with pre-publish checks and introducing operational guardrails through rate limiting to scale responsibly. As adoption and usage increase, the underlying infrastructure behind those improvements becomes just as important. This post focuses on that work: improving availability, reducing single points of failure, and making recovery faster and more predictable when incidents occur.
A hybrid, fail-safe architecture
We are currently transitioning to a hybrid infrastructure model, moving core services to AWS as our primary environment, while keeping our on-premise infrastructure fully operational as a secondary site. Our primary AWS deployment is hosted in Europe, with our on-premises secondary environment located in Canada, reinforcing both operational resilience and regional diversity.
This is deliberate architectural diversity. AWS provides scale and flexibility. Our on-premise environment provides an independent fallback. If a cloud region experiences an outage, services can shift to infrastructure under our direct control.
The objective is simple: keep the registry online even when part of the underlying environment is not.
High-availability storage
Compute alone does not keep a registry running. The data must be available wherever the service is active.
As part of our infrastructure improvement plan, we are adding a dedicated fallback storage cluster and synchronizing extension binaries and metadata across locations. This reduces reliance on any single storage layer and prevents situations where one environment is healthy but lacks the data it needs.
If one storage layer becomes unreachable, the other is ready to step in.
Seeing issues before they become outages
Reducing downtime starts with visibility.
We are modernizing our observability stack across both cloud and on-prem environments, strengthening monitoring, centralized logging, and real-time alerting. This makes it easier to detect slowdowns, rising error rates, or unusual traffic patterns before they impact users.
Earlier detection leads to faster resolution and fewer user-visible incidents.
Faster recovery through clearer process
Technology improves reliability. Process makes it consistent.
We are formalizing incident response and recovery procedures for our multi-site architecture. Updated runbooks and rehearsed failover scenarios reduce mean time to recovery and remove uncertainty during high-pressure events.
When something does go wrong, clarity and speed make all the difference.
Why this work matters
The Open VSX Registry now supports a rapidly expanding ecosystem of developer platforms, CI systems, and AI-enabled tools. Growth brings higher expectations for uptime and reliability.
These infrastructure improvements are a long-term investment in keeping the Open VSX Registry stable, secure, and dependable as it scales.
Security builds trust. Operational guardrails support sustainability. Infrastructure upgrades ensure the service remains available when it matters most.
The Open VSX Registry is shared public infrastructure. Keeping it reliable requires continuous investment, thoughtful architecture, and disciplined operations. This work strengthens the registry so developers, publishers, and platform providers can rely on it with confidence, today and as the ecosystem continues to evolve.
It’s a team effort
This work reflects the effort of many people across the Eclipse Foundation and the broader Open VSX community. From the IT teams to Software Development, Security and beyond, including our community of users, developers, testers and integrators, all have contributed to making Open VSX a world‑class, high‑value extension registry that continues to grow through focused stewardship, open collaboration, and a commitment to empowering developers everywhere.
We also appreciate the collaboration of our cloud and infrastructure partners who continue to support the reliability and performance of the Open VSX Registry.
February 12, 2026
Eclipse Theia 1.68 Release: News and Noteworthy
by Jonas, Maximilian & Philip at February 12, 2026 12:00 AM
We are happy to announce the Eclipse Theia 1.68 release! The release contains in total 75 merged pull requests. In this article, we will highlight some selected improvements and provide an overview of …
The post Eclipse Theia 1.68 Release: News and Noteworthy appeared first on EclipseSource.
February 11, 2026
Scaling the Open VSX Registry responsibly with rate limiting
February 11, 2026 08:05 PM
The Open VSX Registry has become widely used infrastructure for modern developer tools. That growth reflects strong trust from the ecosystem, and it brings a shared responsibility to keep the Registry reliable, predictable, and equitable for everyone who depends on it.
In a previous post, I shared an update on strengthening supply-chain security in the Open VSX Registry, including the introduction of pre-publish checks for extensions. This post focuses on the operational side of the same goal: ensuring the Registry remains resilient and sustainable as usage continues to grow.
The Open VSX Registry is free to use, but not free to operate
Operating a global extension registry requires sustained investment in:
- Compute and storage to serve and index extensions at scale
- Bandwidth to deliver downloads and metadata worldwide
- Security to protect users, publishers, and the service itself
- Staff to operate, monitor, secure, and support the Registry
These costs scale directly with usage.
AI-driven usage is scaling faster than ever
Demand on the Open VSX Registry is increasing rapidly, and AI-enabled development is accelerating that trend. A single developer can now orchestrate dozens of agents and automated workflows, generating traffic that previously would have required entire teams. In practical terms, that can mean the equivalent load of twenty or more traditional users, with direct impact on compute, bandwidth, storage, security capacity, and operational oversight.
This is not unique to the Open VSX Registry. It is an industry-wide challenge. Stewards of public package registries such as Maven Central, PyPI, crates.io, and Packagist have recently raised the same sustainability concerns in a joint statement on sustainable stewardship. Mike Milinkovich, Executive Director of the Eclipse Foundation, echoed that message in his post on aligning responsibility with usage.
As reliance on shared open infrastructure grows, sustaining it becomes a collective responsibility across the ecosystem.
Open VSX is critical, and often invisible, infrastructure
Many developers and organisations may not realise how often they rely on the Open VSX Registry. It provides the extension infrastructure behind a growing number of modern developer platforms and tools, including Amazon’s Kiro, Cursor, Google Antigravity, Windsurf, VSCodium, IBM’s Project Bob, Trae, Ona (formerly Gitpod), and others.
If you use one of these tools, you use the Open VSX Registry.
The Open VSX Registry remains a neutral, vendor-independent public service, operated in the open and governed by the Eclipse Foundation for the benefit of the entire ecosystem.
For developers, the expectation is simple: Open VSX should remain fast, stable, secure, and dependable as the ecosystem grows.
As more platforms and automated systems rely on the Registry, continuous machine-driven traffic can place sustained load on shared infrastructure. Without clear operational guardrails, that can affect performance and availability for everyone.
A practical step for sustainable and reliable operations
Usage has shifted from primarily human-driven access to continuous automation driven by CI systems, cloud-based tooling, and AI-enabled workflows. That shift requires operational controls that scale predictably.
Rate limiting provides a structured way to manage high-volume automated traffic while preserving the performance developers expect. It also ensures that operational decisions are based on real usage patterns and that expectations for large-scale consumption are clear and transparent.
Rate limits aren’t entirely new. Like most public infrastructure services, the Open VSX Registry has long had baseline protections in place to prevent sustained high-volume usage from degrading performance for everyone. What’s changing now is that we’re moving from a one-size-fits-all approach to defined tiers that more accurately reflect different usage patterns. This allows us to keep the Registry stable and responsive for developers and open source projects, while providing a clear, supported path for sustained at-scale consumption.
For individual developers and open source projects, day-to-day workflows remain unchanged. Publishing extensions, searching the registry, and installing tools will continue to work as they always have for typical usage.
A measured, transparent rollout
Rate limiting will be introduced incrementally, with an emphasis on platform health and operational stability.
The initial phase focuses on visibility and observation before any limits are adjusted. This includes improved insight into traffic patterns for registered consumers, baseline protections for anonymous high-volume usage, and a monitoring period before any limits are adjusted.
This work is being done in the open so the community can follow what is changing and why. Progress and discussion are tracked publicly in the Open VSX deployment issue:
https://github.com/EclipseFdn/open-vsx.org/issues/5970
What this means for the community
The goal is to keep the Open VSX Registry reliable and fair as it scales, while minimizing impact on normal use.
For most users, nothing should feel different. Developers should see little to no impact, and publishers should not experience disruption to normal publishing workflows. Sustained, high-volume automated consumers may need to coordinate with the Registry to ensure their usage can be supported reliably over time.
Organisations that depend on the Open VSX Registry for sustained or commercial-scale usage are encouraged to get in touch. Coordinating early helps us plan capacity, maintain reliability, and support the broader ecosystem. Please contact the Open VSX Registry team at infrastructure@eclipse-foundation.org.
The intent is not restriction, but clarity in support of fairness, stability, and long-term sustainability.
Looking ahead
Automation is reshaping how developer infrastructure is consumed. Responsible rate limiting is one step toward ensuring the Open VSX Registry can continue to serve the ecosystem reliably as those patterns evolve.
We will continue to adapt based on real-world usage and community input, with the goal of keeping the Open VSX Registry a dependable shared resource for the long term.
February 10, 2026

Eclipse JKube 1.19 is now available!
February 10, 2026 02:00 PM
On behalf of the Eclipse JKube
team and everyone who has contributed, I'm happy to announce that Eclipse JKube 1.19.0 has been
released and is now available from
Maven Central 🎉.
Thanks to all of you who have contributed with issue reports, pull requests, feedback, and spreading the word with blogs, videos, comments, and so on. We really appreciate your help, keep it up!
What's new?
Without further ado, let's have a look at the most significant updates:
- Improved Spring Boot health probes configuration
- ECR registry authentication with AWS SDK v2
- IngressClassName support for Ingress resources
- Updated base images from UBI 8 to UBI 9
- Reduced dependencies (Guava removal)
- 🐛 Many other bug-fixes and minor improvements
Improved Spring Boot health probes configuration
This release brings several improvements for the Spring Boot health probes configuration:
- JKube now uses the correct
management.endpoint.health.probes.enabledproperty. The previous property (management.health.probes.enabled) was deprecated in Spring Boot 2.3.2. - Added support for
server.ssl.enabledandmanagement.server.ssl.enabledproperties to enable liveness/readiness probes for Spring Boot Actuator. This allows for easier environment-specific SSL configuration.
ECR registry authentication with AWS SDK v2
JKube now supports Amazon ECR registry authentication using AWS SDK Java v2. This update ensures compatibility with the latest AWS SDK and provides a more robust authentication mechanism when pushing images to Amazon Elastic Container Registry.
IngressClassName support for Ingress resources
The IngressClassName field is now supported in the NetworkingV1IngressGenerator.
This is essential for Kubernetes environments with multiple ingress controllers, allowing you to specify which ingress controller should handle your Ingress resources.
Using this release
If your project is based on Maven, you just need to add the Kubernetes Maven plugin or the OpenShift Maven plugin to your plugin dependencies:
<plugin>
  <groupId>org.eclipse.jkube</groupId>
  <artifactId>kubernetes-maven-plugin</artifactId>
  <version>1.19.0</version>
</plugin>
If your project is based on Gradle, you just need to add the Kubernetes Gradle plugin or the OpenShift Gradle plugin to your plugin dependencies:
plugins {
  id 'org.eclipse.jkube.kubernetes' version '1.19.0'
}
How can you help?
If you're interested in helping out and are a first-time contributor, check out the "first-timers-only" tag in the issue repository. We've tagged extremely easy issues so that you can get started contributing to Open Source and the Eclipse organization.
If you are a more experienced developer or have already contributed to JKube, check the "help wanted" tag.
We're also excited to read articles and posts mentioning our project and sharing the user experience. Feedback is the only way to improve.
Project Page | GitHub | Issues | Gitter | Mailing list | Stack Overflow

Invisible Blockers for AI Coding - Our Workflow
by Jonas, Maximilian & Philip at February 10, 2026 12:00 AM
Everyone talks about context engineering and about writing the perfect prompt. But where AI coding often gets messy is right after we run that first prompt and the LLM generated a supposed solution. …
The post Invisible Blockers for AI Coding - Our Workflow appeared first on EclipseSource.
February 05, 2026
We’re hiring: improving the services that support a global open source community
February 05, 2026 07:02 PM
The Eclipse Foundation supports a global open source community by providing trusted platforms, services, and governance. As a vendor-neutral organisation, we operate infrastructure that enables collaboration across projects, organisations, and industries.
This infrastructure supports project governance, developer tooling, and day-to-day operations across Eclipse open source projects. While much of it runs quietly in the background, it plays a critical role in the health, security, and sustainability of those projects.
We are expanding the Software Development team with two new roles. Both positions involve contributing to the design, development, and operation of services that are widely used, security-sensitive, and expected to operate reliably at scale.
Software engineer: security and detection
One of the roles is a Software Engineer position with a focus on security and detection engineering, alongside general development and operations.
This role will work on Open VSX Registry, an open source registry for VS Code extensions operated by the Eclipse Foundation. As adoption grows, maintaining the integrity and trustworthiness of the registry requires continuous analysis, detection, and operational safeguards.
In this role, you will:
- Analyse suspicious or malicious extensions and related artefacts
- Develop, test, and maintain YARA rules to detect malicious or policy-violating content
- Design, implement and contribute improvements to backend services, including new features, abuse prevention, rate-limiting, and operational safeguards
This is hands-on work that combines backend development with practical security analysis. The outcome directly improves the reliability, integrity, and operation of services that are part of the developer tooling supply chain.
For more context on this work, see my recent post on strengthening supply-chain security in Open VSX.
To apply:
https://eclipsefoundation.applytojob.com/apply/eXFgacP5SJ/Software-Engineer
Software developer: open source project tooling and services
The second role is a Software Developer position focused on improving the tools and services that support Eclipse open source projects.
This work centres on maintaining and evolving systems that our open source projects and contributors rely on every day. It includes:
- Maintaining and modernising project-facing applications such as projects.eclipse.org, built with Drupal and PHP
- Developing Python tooling to automate internal processes and improve project metrics
- Improving services written in Java or JavaScript that support project governance workflows
As with the Software Engineer role, this position involves contributing to production services. The focus is on incremental improvement, reducing technical debt, and ensuring systems remain maintainable, secure, and reliable as they evolve.
To apply:
https://eclipsefoundation.applytojob.com/apply/mvaSS7T8Ox/Software-Developer
What we are looking for
Across both roles, we are looking for people who:
- Take a pragmatic approach to problem solving
- Are comfortable working in a remote, open source environment
- Value clear documentation and thoughtful communication
- Enjoy understanding how systems work and how to improve them over time
If you are interested in working on open source infrastructure with real users and real impact, we would be happy to hear from you.
February 02, 2026
WoT Tooling: Code Generation and OpenAPI from Thing Models
February 02, 2026 12:00 AM
Eclipse Ditto’s W3C WoT (Web of Things) integration lets you reference Thing Models in Thing Definitions, generate Thing Descriptions, and create Thing skeletons at runtime. Alongside that, the ditto-wot-tooling project provides build-time and CLI tools to generate Kotlin code and OpenAPI specifications from the same WoT Thing Models.
This post gives an overview of the available tools, their configuration, and some best practices so the Ditto community can use them effectively.
Overview of ditto-wot-tooling
The ditto-wot-tooling repository hosts two main tools:
| Tool | Purpose |
|---|---|
| WoT Kotlin Generator | Maven plugin that downloads a WoT Thing Model (JSON-LD) via HTTP and generates Kotlin data classes and path helpers for type-safe use in your application. |
| WoT to OpenAPI Generator | Converts WoT Thing Models into OpenAPI 3.1.0 specifications that describe Ditto’s HTTP API for Things conforming to that model. Usable as CLI or library. |
Both tools consume Thing Models from a URL (e.g. a deployed model registry). They complement Ditto’s runtime WoT support: Ditto fetches Thing Models (TMs) to build skeletons and Thing Descriptions; the tooling uses the same TMs at build time or in CI to generate client code and API docs.
WoT Kotlin Generator Maven plugin
The WoT Kotlin Generator produces Kotlin code (data classes, builders, path DSL) from a single Thing Model URL. The generated code aligns with Ditto’s API and can be used to build merge commands, RQL filters, and path references in a type-safe way.
Why use generated models?
Using the Kotlin generator gives you a single source of truth: your backend models are derived directly from the WoT Thing Models, which act as the schema for your Things. Ditto supports WoT-based validation of Things and Features against the referenced Thing Model. If you maintain models by hand, they can drift from the WoT schema and become incompatible—leading to validation errors at runtime, failed updates, or subtle bugs. Generated models stay in sync with the Thing Model you point the plugin at, so the payloads you build are valid by construction. That makes development easier, safer, and more predictable: you get compile-time safety and alignment with Ditto’s validation instead of discovering mismatches only when Ditto rejects a request.
Maven setup
Add the common-models dependency (required by the generated code) and the plugin to your pom.xml:
<dependency>
    <groupId>org.eclipse.ditto</groupId>
    <artifactId>wot-kotlin-generator-common-models</artifactId>
    <version>1.0.0</version>
</dependency>
<plugin>
    <groupId>org.eclipse.ditto</groupId>
    <artifactId>wot-kotlin-generator-maven-plugin</artifactId>
    <version>1.0.0</version>
    <executions>
        <execution>
            <id>code-generator-my-model</id>
            <phase>generate-sources</phase>
            <goals>
                <goal>codegen</goal>
            </goals>
            <configuration>
                <thingModelUrl>${modelBaseUrl}/my-domain/my-model-${my-model.version}.tm.jsonld</thingModelUrl>
                <packageName>com.example.wot.model.mymodel</packageName>
                <classNamingStrategy>ORIGINAL_THEN_COMPOUND</classNamingStrategy>
            </configuration>
        </execution>
    </executions>
</plugin>
Full plugin configuration options
| Parameter | Type | Required | Default | Description |
|---|---|---|---|---|
thingModelUrl |
String | Yes | - | Full HTTP(S) URL of the WoT Thing Model (JSON-LD). The plugin downloads it at build time. |
packageName |
String | No | org.eclipse.ditto.wot.kotlin.generator.model |
Target package for generated Kotlin classes. |
outputDir |
String | No | target/generated-sources |
Directory where generated sources are written (Maven adds it as a source root). |
enumGenerationStrategy |
String | No | INLINE |
How to generate enums: INLINE (nested in the class that uses them) or SEPARATE_CLASS (standalone enum classes). |
classNamingStrategy |
String | No | COMPOUND_ALL |
How to name generated classes: COMPOUND_ALL (e.g. RoomAttributes, BatteryProperties) or ORIGINAL_THEN_COMPOUND (use schema title when possible, compound only on conflict). |
generateSuspendDsl |
boolean | No | false |
If true, generated DSL builder functions are suspend functions for Kotlin coroutines. |
Use Maven properties for the base URL and model version so you can switch environments and pin versions in one place:
<properties>
    <modelBaseUrl>https://models.example.com</modelBaseUrl>
    <my-model.version>1.0.0</my-model.version>
</properties>
Enum and class naming strategies
Enum generation
INLINE(default): Enums are nested inside the class that uses them (e.g.Thermostat.ThermostatStatus). Keeps the number of files lower and is convenient for simple enums.SEPARATE_CLASS: Enums are generated as standalone classes in separate files. Better for IDE navigation and reuse across multiple classes.
Class naming
COMPOUND_ALL(default): Class names always combine parent and child (e.g.SmartheatingThermostat,RoomAttributes). Guarantees unique names and makes hierarchy clear.ORIGINAL_THEN_COMPOUND: Uses the schematitlewhen there is no conflict (e.g.Thermostat); falls back to compound names (e.g.SmartheatingThermostat) when needed. Produces shorter, more readable names when possible.
DSL: regular vs suspend
By default, the plugin generates regular Kotlin DSL functions for building thing/feature/property objects. Set generateSuspendDsl=true to generate suspend DSL functions instead, so you can use them inside coroutines and call suspend code from within the DSL block.
Generated code structure
The plugin generates a package structure aligned with your Thing Model:
- Main thing class – root class for the thing (e.g.
FloorLamp,Device). attributes/– interfaces/classes for thing-level attributes (e.g.Location,Room).features/– one subpackage per feature with feature and property types (e.g.lamp/Lamp.kt,LampProperties.kt).- DSL functions – fluent builders (e.g.
floorLamp { ... },features { lamp { ... } }). - Path and RQL helpers – provided by the common-models dependency; the generated code uses them for type-safe paths and RQL expressions.
You must add the wot-kotlin-generator-common-models dependency to your project; the generated code extends interfaces and uses path builders from that artifact.
What the generator supports
The plugin follows the WoT Thing Model specification: it handles properties (read/write, various types), actions (with input/output schemas), events, and links (e.g. tm:extends, tm:submodel). Supported data types include primitives (string, number, integer, boolean), object, array, and custom types via $ref. Enums in the schema become Kotlin enums according to enumGenerationStrategy.
Best practices
- Pin model versions in
pom.xml(or a BOM) so builds are reproducible and you can upgrade TMs in a controlled way. - One execution per “logical” model: use a separate
<execution>for each Thing Model you need (e.g. device, room, building). Each execution has its ownthingModelUrlandpackageName. - Align with runtime definitions: use the same base URL and versioning as the Thing Definition URLs you send to Ditto, so the generated types match what Ditto expects.
- Add the common-models dependency: the generated code depends on
wot-kotlin-generator-common-modelsfor path building and Ditto RQL helpers; do not omit it.
Running the plugin from the command line
You can invoke the plugin directly without a full POM execution by passing parameters with -D:
mvn org.eclipse.ditto:wot-kotlin-generator-maven-plugin:codegen \
  -DthingModelUrl=https://models.example.com/device-1.0.0.tm.jsonld \
  -DpackageName=com.example.wot.model.device \
  -DoutputDir=target/generated-sources \
  -DenumGenerationStrategy=SEPARATE_CLASS \
  -DclassNamingStrategy=ORIGINAL_THEN_COMPOUND
Optional: -DgenerateSuspendDsl=true for suspend DSL. Useful for one-off generation or scripts.
Path generation and type-safe RQL
The common-models dependency provides a path builder API that works with the generated classes. You get compile-time–safe paths and RQL expressions instead of string concatenation.
Path builder API
pathBuilder().from(start = SomeClass::property)– start a path from a property (e.g.Thing::features,Device::attributes)..add(NextClass::property)– append path segments (e.g.Features::thermostat,Attributes::location)..build()– finalize as a path string (e.g. for logging or custom use)..buildSearchProperty()– create a search property object for RQL comparisons (see below)..buildJsonPointer()– build a Ditto JSON Pointer (e.g. forMergeThing,DeleteAttribute). Useful when the generated model exposes astartPath(e.g.Location::startPath) for a nested type.
RQL combinators
Use these from DittoRql.Companion to combine conditions:
and(condition1, condition2, ...)– all conditions must hold.or(condition1, condition2, ...)– at least one condition must hold.not(condition)– negate a condition.
Each condition is often a search property expression (see below). Call .toString() on the result to get the RQL string for Ditto’s search API or conditional request headers.
Search property methods
After .buildSearchProperty() you can chain one of:
| Method | RQL | Example |
|---|---|---|
exists() |
property exists | .exists() |
eq(value) |
equals | .eq("THERMOSTAT") |
ne(value) |
not equal | .ne(0) |
gt(value) |
greater than | .gt(20.0) |
ge(value) |
greater or equal | .ge(timestamp) |
lt(value) |
less than | .lt(timestamp) |
le(value) |
less or equal | .le("2026-02-20T08:00:00Z") |
like(pattern) |
wildcard ? / * |
.like("room-*") |
ilike(pattern) |
case-insensitive like | .ilike("*sensor*") |
in(values) |
value in collection | .in(listOf("A", "B")) |
Example: conditional merge (RQL for Ditto headers)
Typical use is building a condition for Ditto’s conditional request header (e.g. for merge or delete).
Below, we require that the thing has a given attribute type and either no mountedOn or mountedOn less than or equal to a timestamp:
import com.example.wot.model.path.DittoRql.Companion.and
import com.example.wot.model.path.DittoRql.Companion.or
import com.example.wot.model.path.DittoRql.Companion.not
import com.example.wot.model.path.DittoRql.Companion.pathBuilder

// Condition: type eq "THERMOSTAT" AND
//   (NOT exists(location/mountedOn) OR location/mountedOn <= eventDate)
val updateCondition = and(
    pathBuilder().from(Device::attributes)
        .add(Attributes::type)
        .buildSearchProperty()
        .eq("THERMOSTAT"),
    or(
        not(
            pathBuilder().from(Device::attributes)
                .add(Attributes::location)
                .add(Location::mountedOn)
                .buildSearchProperty()
                .exists()
        ),
        pathBuilder().from(Device::attributes)
            .add(Attributes::location)
            .add(Location::mountedOn)
            .buildSearchProperty()
            .le(eventDate)
    )
).toString()

// Use in Ditto merge headers
val mergeCmd = MergeThing.withThing(
    thingId,
    thing,
    null,
    null,
    dittoHeaders.toBuilder().condition(updateCondition).build()
)
Example: JSON pointer for DeleteAttribute
For commands that take a JSON pointer (e.g. delete a nested attribute), use the generated startPath and buildJsonPointer():
val deleteLocationAttribute = DeleteAttribute.of(
    thingId,
    pathBuilder().from(Location::startPath).buildJsonPointer(),
    dittoHeaders
)
Example: RQL for search
The same RQL string can be passed to Ditto’s search API (e.g. GET /search/things?filter=...):
val filter = pathBuilder().from(Device::attributes)
    .add(Attributes::location)
    .buildSearchProperty()
    .exists()

dittoClient.searchThings(filter.toString(), ...)
The exact property names and types (Device, Attributes, Location, etc.) come from your Thing Model; the generator produces the matching classes and path helpers so that paths and RQL stay in sync with the model.
WoT to OpenAPI Generator
The WoT to OpenAPI Generator turns a WoT Thing Model into an OpenAPI 3.1.0 YAML (or JSON) that describes Ditto’s HTTP API for Things that follow that model: thing and attribute paths, feature properties, and actions (e.g. inbox messages).
Benefits for frontends and API consumers
The generated OpenAPI spec is a standard, tool-friendly contract. Frontend teams can feed it into code generators (e.g. OpenAPI Generator, Orval, or the OpenAPI TypeScript/JavaScript generators) to generate TypeScript or JavaScript models, typed HTTP client methods, and request/response types for thing, attribute, feature, and action endpoints. That keeps the UI in sync with the backend: API changes are reflected in the spec, and regenerating client code updates types and calls in one step. You get autocomplete, fewer manual typos, and consistent request shapes. The same spec can drive API documentation (e.g. Swagger UI or Redoc), integration tests, or other clients (mobile, scripts). One Thing Model (TM) thus drives both backend Kotlin models and frontend API usage from a single source of truth.
Usage
The generator is available as a CLI (run with java -jar) or as a library. You can get the JAR from Maven Central or build from source.
Command-line:
java -jar wot-to-openapi-generator-1.0.0.jar <model-base-url> <model-name> <model-version> [ditto-base-url]
| Argument | Description |
|---|---|
model-base-url |
Base URL where the TM is served (e.g. https://models.example.com). |
model-name |
Model name (e.g. dimmable-colored-lamp). The generator will load {model-base-url}/{model-name}-{model-version}.tm.jsonld. |
model-version |
Version (e.g. 1.0.0). |
ditto-base-url |
(Optional) Base URL of the Ditto API (e.g. https://ditto.example.com/api/2/things). Used in the generated servers section. |
Example:
java -jar wot-to-openapi-generator-1.0.0.jar \
  https://eclipse-ditto.github.io/ditto-examples/wot/models/ \
  dimmable-colored-lamp \
  1.0.0 \
  https://ditto.example.com/api/2/things
Generated specs are written under a generated/ directory (path may vary by version). The output includes thing-level and attribute-level endpoints, feature properties, and action endpoints with request/response schemas derived from the TM.
Best practices
- Run in CI: generate OpenAPI from your main Thing Models in your pipeline and publish the artifacts (e.g. to a docs site or S3) so API consumers always see up-to-date specs.
- Use the same model base URL and versions as in your Kotlin generator and Ditto Thing definitions, so docs and code stay in sync.
- Set
ditto-base-urlwhen you want the generatedserverssection to point at your Ditto instance; otherwise the generator may use a default.
Summary
- ditto-wot-tooling provides the WoT Kotlin Generator (Maven plugin) and the WoT to OpenAPI Generator (CLI/library). Both take a WoT Thing Model URL and produce artifacts you can use at build time or in CI.
- WoT Kotlin Generator: configure
thingModelUrl,packageName,outputDir,enumGenerationStrategy(INLINE/SEPARATE_CLASS),classNamingStrategy(COMPOUND_ALL/ORIGINAL_THEN_COMPOUND), and optionallygenerateSuspendDsl; pin model versions; add one execution per model; depend onwot-kotlin-generator-common-models. The generated code plus common-models give you type-safe path building (e.g.pathBuilder().from().add().buildSearchProperty()) and RQL combinators (and,or,not) and comparison methods (exists,eq,gt,lt,like,in, etc.) for Ditto search and conditional requests. - WoT to OpenAPI Generator: run with model base URL, model name, and version (and optionally Ditto base URL); integrate into CI to keep API docs aligned with your Thing Models.
For more on WoT in Ditto (definitions, skeleton generation, Thing Descriptions), see the WoT integration documentation and the WoT integration blog post. For the tools themselves, go to eclipse-ditto/ditto-wot-tooling.
Feedback?
Please get in touch if you have feedback or questions about the WoT tooling.
–
The Eclipse Ditto team
January 28, 2026
Strengthening supply-chain security in Open VSX
January 28, 2026 11:30 AM
The Open VSX Registry is core infrastructure in the developer supply chain, delivering extensions developers download, install, and rely on every day. As the ecosystem grows, maintaining that trust matters more than ever.
A quick note on terminology: Eclipse Open VSX is an open source project, and the Open VSX Registry is the hosted instance of that project, operated by the Eclipse Foundation. This post focuses primarily on security improvements being rolled out in the Open VSX Registry, while much of the underlying work is happening in the Open VSX project.
Up to now, the Open VSX Registry has relied primarily on post-publication response and investigation. When a bad extension is reported, we investigate and remove it. While this approach remains relevant and necessary, it does not scale as publication volume increases and threat models evolve.
To address this, we are taking a more proactive approach by adding security checks before extensions are published, rather than relying only on reports after the fact.
Why pre-publish security checks matter
Developer tooling ecosystems, including package registries and extension marketplaces, are a popular target, and we see the same types of issues repeatedly:
- Namespace impersonation designed to mislead users
- Secrets or credentials accidentally committed and published
- Malicious or misleading extensions
- Supply-chain attacks that spread quietly over time
Relying only on after-the-fact detection leaves a growing window of exposure. Pre-publish checks help narrow that window by catching the most obvious issues earlier. Similar pre-publication and monitoring approaches are increasingly standard across large extension marketplaces as developer tooling ecosystems mature.
How we’re approaching this work
To move faster and add specialized expertise, we are working alongside security consultants from Yeeth Security. These experts are helping us design and implement a new verification framework, while keeping overall direction, decision-making, and long-term stewardship firmly within the Open VSX project and the Eclipse Foundation as operators of the Open VSX Registry.
Most of this work is happening in the open. We are keeping a small set of security-sensitive details private to reduce the risk of abuse or circumvention.
What we’re building
Together, we’re introducing a new, extensible verification framework. Over time, it will enable Open VSX Registry to:
- Detect clear cases of extension name or namespace impersonation
- Flag accidentally published credentials or secrets
- Scan for known malicious patterns
- Quarantine suspicious uploads for review instead of publishing them immediately, with clear feedback provided to the publisher
If you want to follow along, the work is tracked here:
https://github.com/eclipse/openvsx/issues/1331
This framework is designed to grow with the ecosystem, so we can add new checks as threat models evolve.
A measured rollout
We’re approaching this effort with a focus on ecosystem health. The goal and intent is to raise the security floor, help publishers catch issues early, and keep the experience predictable and fair for good-faith publishers. Our current plan is to:
- Begin monitoring newly published extensions in February, without blocking publication
- Use this monitoring period to tune checks, reduce false positives, and improve feedback
- Move toward enforcement in March, once we’re confident the system behaves predictably and fairly
This staged rollout gives us room to get it right before it impacts publication flows.
What publishers and users should expect
Publishers may start seeing new messages when potential issues are detected. In most cases, these are meant to be helpful nudges, not roadblocks. We also want to thank the thousands of extension publishers who already act responsibly and help make the Open VSX Registry a trusted resource for the broader developer community. The goal is to:
- Catch accidental mistakes early
- Make expectations clearer
- Reduce the likelihood that risky content reaches users
Human review will remain part of the process, especially for edge cases. We will also continue to provide clear remediation guidance in our wikis and project documentation.
For users, the outcome is straightforward. Pre-publish checks reduce the likelihood that obviously malicious or unsafe extensions make it into the ecosystem, which increases confidence in the Open VSX Registry as shared infrastructure.
Security is ongoing work
Security isn’t a one-and-done project. It evolves alongside the ecosystem it protects. We see this work as ongoing, and we’ll continue to share what we’re doing, why we’re doing it, and what we learn along the way.
Looking ahead
Strengthening supply-chain security is a shared responsibility. As the Open VSX Registry continues to grow, investing in proactive safeguards is essential to protecting both publishers and users.
These changes are an important step forward, and part of a longer journey. We’ll keep iterating, learning from real-world use, and adapting as the ecosystem evolves. Community feedback plays a critical role in that process, and we encourage publishers and users to share their experiences as this work rolls out.
We would also like to thank Alpha-Omega for supporting this work, and for their broader support of the Eclipse Foundation’s security initiatives.
Our goal is simple: to keep the Open VSX Registry a resource developers can depend on with confidence.
Growing with the ecosystem
The security work outlined above is part of a broader effort to scale the Open VSX Registry responsibly as adoption continues to grow. That includes investing not just in tooling and processes, but in the people doing the work.
We’re actively expanding the Open VSX team, including roles focused on security, platform engineering, and ecosystem stewardship. If you’re interested in helping build and protect critical open source infrastructure, you can find our current openings on the Eclipse Foundation careers page!
January 27, 2026
Invisible Blockers for AI Coding: Why Developers Feel Useless
by Jonas, Maximilian & Philip at January 27, 2026 12:00 AM
During a recent workshop, a developer pulled one of us aside during a break. “I used to love my job,” he said. “Now I feel tired and useless.” He wasn’t burned out from overwork. He didn’t have bad …
The post Invisible Blockers for AI Coding: Why Developers Feel Useless appeared first on EclipseSource.
January 22, 2026
MCP and Context Overload: Why More Tools Make Your AI Agent Worse
by Jonas, Maximilian & Philip at January 22, 2026 12:00 AM
The Model Context Protocol (MCP) is one of the most successful innovations in AI tooling. It lets agents connect to external systems — GitHub, databases, browsers, IDEs — through a standardized …
The post MCP and Context Overload: Why More Tools Make Your AI Agent Worse appeared first on EclipseSource.
January 20, 2026
Invisible Blockers for AI Coding: When Good Leadership Blocks Progress
by Jonas, Maximilian & Philip at January 20, 2026 12:00 AM
What if your best leadership instincts are exactly what’s killing AI coding adoption in your organization? As part of our AI coding adoption consulting, we talk to executives from companies of all …
The post Invisible Blockers for AI Coding: When Good Leadership Blocks Progress appeared first on EclipseSource.
January 14, 2026
Stop VS Code’s Java LSP from Rewriting Your Eclipse .classpath with m2e-apt Entries
by Lorenzo Bettini at January 14, 2026 12:40 PM
January 13, 2026
Invisible Blockers for AI Coding: When Your Setup Blocks Progress
by Jonas, Maximilian & Philip at January 13, 2026 12:00 AM
Teams invest a lot of time and effort into configuring AI coding tools. MCP servers, custom commands, context files, automation pipelines — everything carefully designed and optimized. And yet, when …
The post Invisible Blockers for AI Coding: When Your Setup Blocks Progress appeared first on EclipseSource.
January 08, 2026
Slash Commands: Automating AI Workflows in Theia AI
by Jonas, Maximilian & Philip at January 08, 2026 12:00 AM
AI-assisted development becomes truly productive when repetitive interactions disappear. Instead of repeatedly explaining the same task to an AI agent, developers need reliable, reusable entry points …
The post Slash Commands: Automating AI Workflows in Theia AI appeared first on EclipseSource.
December 18, 2025
Jakarta EE 2025: a year of growth, innovation, and global engagement
by Tatjana Obradovic at December 18, 2025 02:07 PM
As 2025 comes to a close, it's a great moment to reflect on what we’ve achieved together as the Jakarta EE community. From major platform updates to refreshing the website and growing developer engagement, this year has been full of meaningful progress.
Celebrating Jakarta EE 11
One of our biggest milestones this year was Jakarta EE 11. This time we did the release in a different way: we released as soon as the profile or platforms were ready! The Core Profile was available in December 2024 and Web Profile in March 2025, and Jakarta EE Platform finalised in June 2025, reflecting the steady progress of the Jakarta EE community. Compatible products followed right away!
Jakarta EE 11 introduces the new Jakarta Data specification, delivers a modernised testing experience with updated TCK infrastructure based on JUnit 5 and Maven, and expands support for Java 21, including virtual threads. It also streamlines the platform by retiring older specifications such as Managed Beans, reinforcing Contexts and Dependency Injection (CDI) as the preferred programming model and continues to provide Java Records support.
This release marks a significant step forward in simplifying enterprise Java development, improving developer productivity, and supporting modern, cloud native applications. It's a true reflection of the community’s collaborative efforts and ongoing commitment to innovation.
Read the Jakarta EE 11 announcement
Introducing Jakarta Agentic AI: A New Standard for Running AI Agents on Jakarta EE
This year marked the introduction of the Jakarta Agentic AI specification project. Aimed at standardising how AI agents run within Jakarta EE runtimes, this new specification will be included in a future release. Much like Jakarta Servlet unified HTTP processing and Jakarta Batch defined batch workflows, Jakarta Agentic AI will provide a clear, annotation-driven API that defines how agents are created, managed, and executed.
Built on CDI as the core component model, the specification will establish consistent lifecycle patterns and usage semantics, making it easier for developers to implement and integrate a wide range of agent types. The project also anticipates deep integration with key Jakarta EE APIs, ensuring seamless interoperability across the platform.
Jakarta Agentic AI is being developed with broad industry collaboration in mind. The project is seeking input from subject-matter experts, vendors, and API consumers both inside and outside the Java ecosystem to build the most open, portable, and future-ready agent execution model possible. Visit the project page to learn more about the specification.
Listening and learning through the Jakarta EE Developer Survey
Our annual Jakarta EE Developer Survey remains one of the best ways to track how developers and organisations are using enterprise Java and shaping their cloud strategies. In 2025, we saw a 20% increase in participation, with over 1,700 participants sharing how they use Jakarta EE in practice.
The results show continued growth and confidence in Jakarta EE across the ecosystem. Notably, even before the full platform release was finalised, 18 percent of respondents were already using Jakarta EE 11, a strong signal of interest and early adoption.
These insights help us better understand where the community is focusing its energy, from modernising applications and adopting newer Java versions to evaluating cloud strategies and driving specification innovation. We're grateful to everyone who participated and shared their views.
Explore the 2025 developer survey findings
Learning and contributing: A growing developer ecosystem
The Jakarta EE Learn page expanded its resources to better support developers at all levels. As part of our broader effort to support community growth, we also introduced a new Contribute page, a dedicated space that outlines how individuals and organisations can get involved with Jakarta EE.
The Contribute page highlights the many ways to participate, from writing code and improving documentation to joining specification discussions or helping with community outreach. It also explains why contributing matters, what contributors gain, and how to get started.
To further support newcomers, we launched the Jakarta EE Mentorship Program, which pairs new contributors with experienced community mentors who can provide guidance, answer questions, and help them navigate the contribution process. Whether you're new to open source or simply new to Jakarta EE, the mentorship experience helps build skills, confidence, and deeper community connections.
Looking ahead: A refreshed web presence
Throughout 2025, our marketing team in collaboration with the Jakarta EE Marketing Committee worked on a major Jakarta EE website refresh to better reflect the clarity, maturity, and momentum of the community. While the full launch is now scheduled for early January, the homepage and navigation redesign is already complete and ready for rollout. The updated site features a bold new homepage, improved navigation through streamlined mega menus, and a new “Why Jakarta EE” section that helps visitors quickly understand the platform’s value.
This is just the beginning. Additional updates and structural improvements will continue rolling out through 2026, with a focus on enhancing messaging, navigation, and the overall user experience. Stay tuned for the official launch and more updates in the months ahead.
Global presence: virtual events, conferences, and community connections
Jakarta EE had a visible and impactful presence at face-to-face (F2F) conferences around the world, especially in the first half of the year. From Devnexus to JCON and beyond, Jakarta EE working group and community members presented talks, engaged with attendees at our sponsored booths, and built valuable relationships.
In 2025, JakartaOne Livestreams continued to grow with successful regional events in China and the annual JakartaOne Livestream, which attracted more than 6,000 viewers globally, with over 3,200 participants. With 20+ sessions, 15+ speakers, and 14+ hours of multilingual content, the JakartaOne Livestream series continued to drive strong community engagement across regions. Chinese JakartaOne Livestream recordings, as well as the annual JakartaOne Livestream recording, are available on our YouTube channel for anyone interested.
JakartaOne F2F Meetups further expanded the program’s regional footprint, with events in China and Japan drawing 170+ registered participants and 100+ in-person attendees, supported by high community approval and strong local participation.
With 17 Jakarta EE Tech Talks delivered in 2025, the program remains a vital channel for community learning, collaboration, and inspiration. Topics ranged from microservices and containers to security and observability. Recordings of these sessions are available on our YouTube channel.
Looking forward to 2026 and beyond
As we conclude an impactful 2025, it’s clear that Jakarta EE continues to strengthen its role as the open, vendor-neutral foundation for modern enterprise Java. The progress we’ve made this year, from delivering Jakarta EE 11 and introducing new specifications like Jakarta Agentic AI, to expanding our global events and deepening community engagement, reflects the dedication, collaboration, and passion of everyone involved.
2026 promises to be another exciting year of innovation and growth.
Thank you to all members, contributors, committers, and the wider community for your continued support. Together, we’re driving the platform forward and building a vibrant, open, and innovative ecosystem.
Here’s to another year of progress, collaboration, and innovation with Jakarta EE.
What’s in store for open source in 2026?
by Mike Milinkovich at December 18, 2025 11:25 AM
As 2025 draws to a close, many of us find ourselves reflecting on a year of remarkable change and looking ahead to what lies beyond the horizon. The end of the year often brings a mix of reflection and anticipation, a time when the open source ecosystem pauses to take stock and to imagine what the next chapter might bring.
In that spirit, I’d like to share a few thoughts on the forces shaping open source as we head into 2026. The past year has seen emerging trends poised to influence not only the open source ecosystem but also the broader technology industry and the many sectors that depend on it. From governance and sustainability to the evolving role of open collaboration in driving innovation, the ripples we saw in 2025 are likely to become powerful waves in the year ahead.
Prediction 1: As Agentic AI deployments accelerate, many enterprises will shift away from proprietary pilot solutions toward open source AI tooling that helps them integrate agentic workflows with their existing applications and data.
The promise of agentic AI is unmistakable. What enterprises are struggling with is the move from controlled pilots to real production environments that must operate within the constraints of their current systems. Many proprietary agentic platforms remain optimized for “green field” use cases, making them poorly matched to the complex mix of legacy data assets and workloads that are prevalent in enterprise environments.
For agentic AI to deliver real enterprise value, it must operate within existing operational, reliability, and performance constraints. For example, an agentic system that can’t talk to Java systems – the lingua franca of enterprise computing – is effectively cut off from the most critical operational data, workflows, and decision-making contexts. Forcing enterprises to adopt a parallel, Python-based infrastructure in order to deploy AI systems will delay adoption and significantly increase security, performance, and scalability risk.
Open source tooling will play an increasingly important role in solving these challenges. Eclipse LMOS and its Agent Definition Language (ADL) provide one model-neutral option for defining agent behaviour in a structured and maintainable way. LMOS is already in production at Deutsche Telekom, powering an award-winning bot and consumer-facing AI system that processes millions of service and sales interactions across several countries. At the same time, enterprises will have multiple viable open source choices that fit different architectural and operational needs.
Another highly visible growth area in 2026 will be AI-enabled developer tooling. The launch of the Eclipse Theia AI IDE shows how open collaboration can deliver powerful AI development environments without locking teams into proprietary toolchains. The Theia platform allows organisations to choose their preferred LLMs, integrate contextual data through MCP, and build agentic workflows that align with internal security and compliance requirements. For many enterprises, this flexibility will be essential as AI-assisted development becomes part of everyday engineering practice.
Complementary work on projects like Eclipse Adoptium will continue to strengthen the foundation on which AI systems depend. Verified builds, signed binaries, and rigorous QA increase confidence that AI-enabled enterprise applications can be deployed with traceability and accountability.
Jakarta Agentic AI will also begin defining standard patterns for agentic workflows in enterprise Java, giving organisations predictable and interoperable ways to bring agentic capabilities into mission-critical systems.
Prediction 2: Digital sovereignty will quickly rise in strategic importance for nation-states, and open standards will prove critical in making it achievable.
Over the past two decades, extraordinary advances in technology have reshaped global economics and trade. They have enabled entirely new markets, transformed industries, and created business models that were previously unimaginable. As digital infrastructure now underpins nearly every aspect of national competitiveness, governments across the globe are realising how their use of technology affects strategic autonomy, resilience, and digital sovereignty. Questions of who controls critical data, how it is shared, and where it is processed are now central to national policy and economic strategy.
As these pressures grow, open standards will become essential to the path forward. They provide a neutral foundation that allows organisations and nations to build digital capabilities without being locked into proprietary ecosystems or single-vendor dependencies. In 2026, this will matter more than ever. The Eclipse Foundation and the Eclipse Dataspace Working Group (EDWG) recently released two key protocol specifications, which are under review for international standardisation through the ISO/IEC JTC1 Publicly Available Specification (PAS) process. These new protocols represent a significant advancement in enabling open, interoperable, and sovereign dataspaces. They enable organisations, industries, and nations to share data securely while retaining full control over their information. Dataspaces also enable data owners to clearly outline the terms under which their data can be used to train AIs, accelerating the move toward ethical AI systems.
This work shows how open collaboration and open standards will serve as the foundation for trust, interoperability, and sovereignty in the global data economy.
Prediction 3: 2026 will lay the groundwork for the next era of open source silicon
Next year is a pivotal time for open source hardware as the immense efforts of academia gain traction in real-world applications. In 2026 and beyond, we’ll see open source hardware play an increasingly important role in academic and early-stage commercial products. New configurations of RISC-V CVA6 and CV-Wally cores will be especially influential in this early wave of adoption.
Research and innovation efforts will accelerate progress. European projects backed by the Chips JU, such as TRISTAN and Rigoletto, and projects including CHERIoT, will further strengthen the ecosystem by bringing academia and industry together for collaborative semiconductor R&D.
With major adopters and contributors such as Thales already demonstrating the benefits of building on open hardware, 2026 will mark a shift in how organisations approach hardware design and maintenance. More companies will explore open source silicon options. According to research firm Omdia, RISC-V processors are on track to account for almost a quarter of the global market by 2030, signalling that this shift is already well underway.
Prediction 4: 2026 will trigger alarm over the CRA as companies around the world realise they are behind on compliance.
The EU Cyber Resilience Act is the world’s first horizontal cybersecurity regulation, mandating secure-by-design and supply-chain security best practices. It comes with potential fines of up to €15 million or 2.5% of a company’s global annual turnover. In 2026, it will become impossible to ignore. As the deadline approaches, many organisations will scramble to understand and meet the CRA’s requirements, resulting in widespread urgency across global markets.
Beginning September 11, 2026, the CRA mandatory vulnerability reporting requirements take effect, and every manufacturer selling products in Europe will be required to comply. Yet awareness remains alarmingly low, with just 12.3% of SMEs being aware of the CRA compared to 83.5% of very large enterprises. The gap between expectations and preparedness will become painfully clear.
There is, however, a silver lining. As compliance pressures increase, policymakers could emerge as the greatest champions of open source sustainability. The CRA explicitly places security responsibility on manufacturers and not on maintainers of open source projects, which could provide long-overdue clarity and support for the open source ecosystem.
Initiatives like Open Regulatory Compliance (ORC) will help technology companies coordinate their CRA readiness, reducing duplicative efforts, mitigating risks, and protecting innovation. By working together on shared compliance frameworks, organisations can meet regulatory expectations while continuing to advance open source development.
Prediction 5: 2026 will be the year the industry reinvests in open source infrastructure.
The global software ecosystem runs on open source infrastructure, yet for years, many global enterprises have relied on it without meaningfully contributing back. In September, I, along with many other open source stewards, called for greater support from businesses that benefit most to take a larger role in sustaining this critical infrastructure. Encouragingly, that call is already being answered.
One example is Amazon’s recent support for the Eclipse Foundation. This commitment strengthens multiple core services, including the Open VSX Registry, the vendor-neutral extension registry for the Visual Studio Code ecosystem that powers many AI-enabled development environments.
The Open VSX Registry is now one of the fastest-growing package registries in the world. It serves as the default registry for several leading AI developer tools, including Amazon’s Kiro, Cursor, Google Antigravity, Windsurf, IBM’s Project Bob, and others. In 2025, it averaged more than 110 million downloads each month. It now hosts more than 7,000 extensions from nearly 5,000 publishers. With strong enterprise engagement and open governance, the registry is becoming a central distribution hub for the next generation of AI software development tooling.
In 2026, we will also see open infrastructure providers, including the Eclipse Foundation, explore new ways to align funding with commercial and enterprise usage while maintaining openness for general and individual use. Each ecosystem will take its own path, and some experimentation will be needed to achieve the right balance, but the direction is clear. These efforts will strengthen open infrastructure and help ensure that essential shared services remain reliable and sustainable for everyone who relies on them.
Eclipse Theia 1.67 Release: News and Noteworthy
by Jonas, Maximilian & Philip at December 18, 2025 12:00 AM
We are happy to announce the Eclipse Theia 1.67 release! The release contains in total 92 merged pull requests. In this article, we will highlight some selected improvements and provide an overview of …
The post Eclipse Theia 1.67 Release: News and Noteworthy appeared first on EclipseSource.
December 16, 2025
Xtext, Langium, what next?
December 16, 2025 12:00 AM
AI-Native Enterprise Application Development with Eclipse Theia
by Jonas, Maximilian & Philip at December 16, 2025 12:00 AM
What does it take to build a next-generation enterprise development environment? One that low-code tools with full code editing, AI-assisted workflows, and deployment pipelines—all within a unified …
The post AI-Native Enterprise Application Development with Eclipse Theia appeared first on EclipseSource.
December 11, 2025
The Eclipse Theia Community Release 2025-11
by Jonas, Maximilian & Philip at December 11, 2025 12:00 AM
We are happy to announce the twelfth Eclipse Theia community release, “2025-11,” incorporating the latest advances from Theia releases 1.65 and 1.66. New to Eclipse Theia? It is the next-generation …
The post The Eclipse Theia Community Release 2025-11 appeared first on EclipseSource.
December 10, 2025

MCP Joins the Linux Foundation
by Scott Lewis (noreply@blogger.com) at December 10, 2025 08:10 PM
by Scott Lewis (noreply@blogger.com) at December 10, 2025 08:10 PM
December 09, 2025

Model Evolution Support - Santa Came Early for CDO Users!
by Eike Stepper (noreply@blogger.com) at December 09, 2025 05:15 PM
As the year draws to a close and the festive season approaches, the CDO team has delivered an early Christmas present to its community: the brand new Model Evolution Support feature! If you’ve ever wished for a smoother, safer way to evolve your EMF models in a CDO repository, your wish has just been granted.
Unwrapping the Gift: What Is Model Evolution Support?
Just like a carefully wrapped present under the tree, model evolution has long been a much-anticipated feature for CDO users. In the past, evolving your domain models—adding new features, refactoring classes, or updating enumerations—could be a daunting task, often requiring manual intervention, downtime, or even risky database migrations.
With the new Model Evolution Support, CDO introduces a phased, robust, and highly configurable process to handle model changes. This means you can now update your Ecore models and let CDO guide your repository through the necessary steps to keep your data and schema in sync—no more crossing your fingers and hoping for the best!
How Does It Work? A Phased Approach
Think of model evolution as a series of steps, much like unwrapping a present layer by layer. CDO’s approach is divided into clear phases:
- Change Detection: CDO first checks for differences between the stored models and your newly registered EPackages. If nothing has changed, the process stops here—no unnecessary work!
- Repository Export (Optional): Before making any changes, CDO can export your repository data, providing a safety net in case you need to roll back.
- Schema Migration: This is the heart of the process. CDO updates the database schema, adjusts feature IDs, and ensures enums are consistent with your new model.
- Store Processing (Optional): Any additional post-processing on the database can be handled here.
- Repository Processing (Optional): Final touches and clean-up on the repository itself.
Each phase is managed by a dedicated handler, and you can customize or extend these handlers to fit your project’s needs. Default implementations are provided for the most critical phases, so you’re ready to go out of the box.
Modes for Every Wish List
Santa knows that not everyone wants the same gift, and CDO’s Model Evolution Support is just as flexible. You can configure the evolution mode to:
- Migrate: Automatically evolve your models and database (the default and most magical option).
- Prevent: Detect changes but stop the process if any are found—perfect for production environments where stability is key.
- Disabled: Turn off model evolution entirely if you want to manage changes manually.
Peace of Mind: Logging, Recovery, and Transparency
No Christmas present is complete without instructions and a warranty! CDO logs every step of the evolution process, stores context and state in dedicated folders, and allows you to resume interrupted evolutions. This transparency means you can always see what’s happening and recover gracefully from any hiccups.
Conclusion: The Gift That Keeps on Giving
With Model Evolution Support, CDO users can look forward to a new year of painless model updates, safer migrations, and more time to focus on building great applications. It’s a feature that truly feels like Santa came early—delivering exactly what the community has been wishing for.
The feature is ready for use in this p2 repository.
More information can be found in the help center.
Happy holidays, and happy evolving!
by Eike Stepper (noreply@blogger.com) at December 09, 2025 05:15 PM
TheiaCon 2025: Beyond Coding - The Ultimate AI-Native IDE Demo with Theia AI
by Jonas, Maximilian & Philip at December 09, 2025 12:00 AM
We’re excited to share another highlight from TheiaCon 2025: a comprehensive live demonstration of what’s possible with Theia AI and the AI-native Theia IDE. One year after its initial release, this …
The post TheiaCon 2025: Beyond Coding - The Ultimate AI-Native IDE Demo with Theia AI appeared first on EclipseSource.


